

Hardware components | ||||||
 |
| × | 1 | |||
| × | 1 | ||||
| × | 1 | ||||
| × | 1 | ||||
| × | 1 | ||||
| × | 1 | ||||
 |
| × | 1 | |||
 |
| × | 1 | |||
| × | 1 | ||||
| × | 1 | ||||
| × | 1 | ||||
Hand tools and fabrication machines | ||||||
| ||||||
| ||||||
| ||||||
Every Holiday season, my mom likes to decorate the outside of our home with colorful projectors and decoration lights depending on the season (Christmas, Thanksgiving or Easter). We have a small home, so all the light decorations are connected in series to one (sometimes two) power plug. So, in order to turn the decorations on, she would plug the lights into the wall outlet around 5-6 pm and then take the plug out before midnight. I thought that it would be great if the lights would turn on and off automatically according to a set time without having to do anything. I am aware that there are products in the market that can do what I just described, but what is the fun in that?! So, I decided to create my own smart power plug that is controlled by a Particle Photon board. The power plug can be controlled either through voice command using Google Assistant or the default option where the lights are turned on/off according to the current time.
When the Holiday season passes, I use the device for my bedroom. I use a different code (attached) where the plug is only controlled through voice command and not automated like the decoration lights.
Now to the steps:
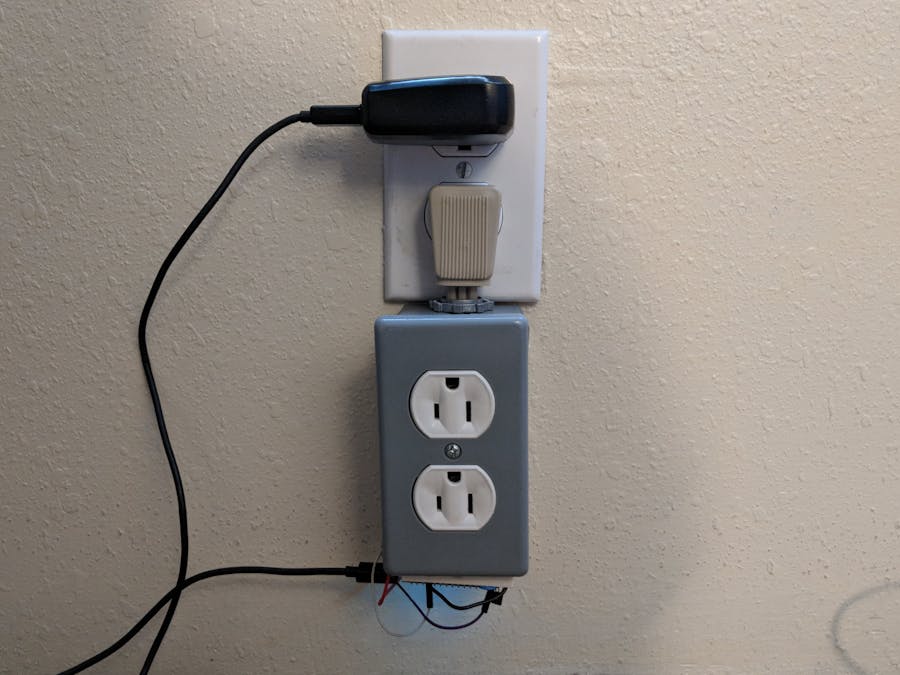
1- Building the box.I can write a step by step to this part, but I think Circuit Basics have explained it in the best way possible: http://www.circuitbasics.com/build-an-arduino-controlled-power-outlet/
The "Constructing the Box" section explains how to setup the box, cut the power cable and how to connect the power cable to the relay and then to the duplex outlet.
MAKE SURE that you feel comfortable doing this part, and MAKE SURE that you watch videos on how to identify the HOT wire. We are dealing with high voltage at this point. (http://activerain.com/blogsview/4553240/identify-the-hot-neautral-wires-on-lamp-cords-in-stamford--ct).
In my example, I used one-channel relay to control both outlets meaning the outlets are either both on or both off. If you would like to control the outlets separately, you can buy a two-channel relay and then do the steps twice where the power plug's HOT wire is split into two wires where each wire would go to one of the common terminal of the relay. Then, as stated in the instructions, two wires would go from the two "normally closed" terminals in the relay to each of the brass screws on the outlet. HOWEVER, if the two brass screws on the outlet are connected through a bridge, you HAVE TO cut the connection, so the two screws are separated. Otherwise, the two outlets will not function as intended. Then, there will be two signal wires from the relay to control each channel. In the code, you would have to add another output pin and duplicate the circuit/code part that deals with the signal.
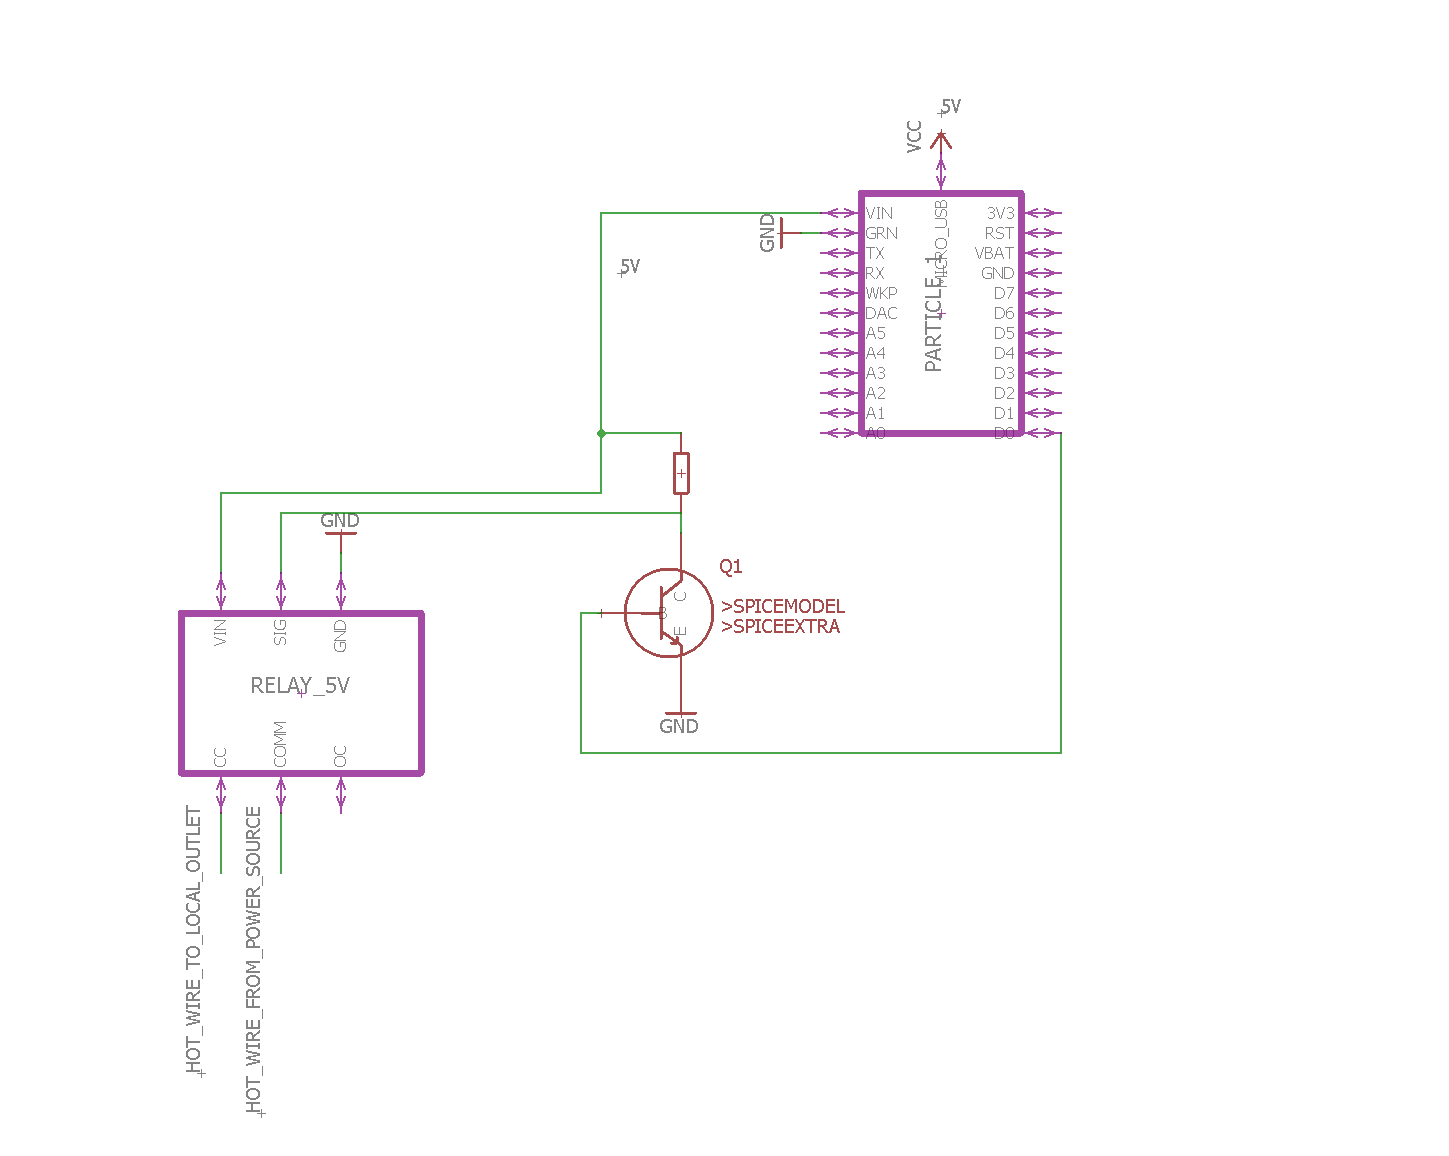
2- CircuitThe Particle Photon will be powered by the 5V micro USB power adapter. the power pin from the relay will be connected to the "VIN" pin on the Photon board and the ground pin from the relay will be connected to any of the ground pins on the board. The relay signal will be connected as shown in the schematic. The reason for using a transistor is that the board pins output 3.3V, and to drive the relay signal, we need 5V. So, the transistor circuit is used to do so. When D0 (the board pin in my example) is HIGH, the transistor is ON, so the current goes through the resistor and voltage drop across the resistor is very close to 5V, leaving the relay signal to be close to 0V. Since we have the hot wire in the "normally closed", the plug is on. When D0 is LOW, the transistor is OFF, so there is no current going through the resistor i.e no voltage drop across the resistor. So, majority of the 5V is across the VCE which means the relay signal is ON. Because of that, the relay would switch and the power plug turns off.
Just to clarify. The output signal from the board goes to the base of the transistor. The emitter pin is connected to ground and the collector pin is connected to the resistor and the relay signal.
Note: 5V Solid-state relays can be used as well. Arguable, they should last longer because there are no moving parts compared to our relay.
In order to use the voice command functionality, we need to use IFTTT services to connect our Particle board to Alexa or Google Assistant. Simply go to the IFTTT website and create new applet.
For the THIS part, we can choose either Alexa or Google Assistant. We can choose the option with the ingredient text and write something along the lines of: "Turn decorations $"
So, the $ would be the ingredient word. Then THAT part, we choose Particle, and then we choose the name of the declared function that we used ("plug" in my example). In this sense, if we say: "Turn decorations on", the string "on" will be passed through our function and it would turn on the power plug in return. If using the code with the timing automation, we can add another applet with the phrase: "Turn decorations to $" because saying "Turn decorations default" might sound weird.
And that would be it! It was very fun working on it. It's a simple project that made my mom's life easier and it made my room "smarter".
I would like to add that this power plug can be used in MANY ways and can be automated for so many scenarios. For my example, it was a specific use, but it can be used for other appliances as well.
Comments