

Hardware components | ||||||
| × | 1 | ||||
| × | 1 | ||||
| × | 1 | ||||
| × | 1 | ||||
Software apps and online services | ||||||
 |
| |||||
A musical instrument built entirely within the M5Stack ecosystem — no soldering, no 3D printing, no coding required.
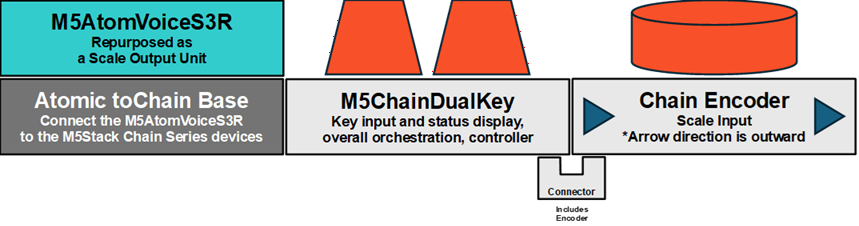
- Chain DualKey with ESP32-S3 : Key Device.Main orchestrator handling overall control and input.
- Atom VoiceS3R : Speaker Unit : Handles sound generation and audio output.
- Chain Encoder : Encoder Unit : Input unit for note selectionAtomic.
- toChain Base : Connection Base : Adapter connecting the Speaker Unit to the Key Device.
The Key Device was just there. I had no idea what to do with it. But something about it excited me.
Two LEDs, two buttons. Wireless and USB capable. Battery built in, designed to hang from a bag. That's all it was. I had no idea what to use it for. But the excitement was real.
At first, there was no meaning. No plan. An object without purpose had simply been placed there. That was all.
purposeThe Key Device was designed with expansion in mind from the start. Alone, it had no meaning — it was waiting for something from the beginning.
Soon, the Encoder Unit was released. In that instant, the range of expression expanded dramatically. The bandwidth of input possibilities widened.
Meanwhile, the Atom VoiceS3R (Speaker Unit) was also stuck. In the M5Stack ecosystem, it's positioned as a smart speaker. But I already had smart speakers. I'd already built one with other M5Stack devices. "What am I supposed to do with this thing?" — that was where I stood.
So what if, instead of using it as a speaker, I used the raw power of the ESP32-S3 to generate sine waves? I could build an analog synth emulator. While I was thinking this, the Connection Base was released — an adapter to connect Atom series devices to the Chain series.
In that moment, I had already ordered the Encoder Unit and Connection Base.
One concern remained. If the Key Device couldn't supply power to the Speaker Unit, the USB cable couldn't be removed. No portability.
I connected everything and tried it. Unplugged the USB. Pressed a button. The LED changed color. Sound came out at the same time. The Key Device's battery was powering the Speaker Unit. It ran standalone.
It worked. But a question remained. What does this instrument actually mean?
Sine waves come out. The scale changes with the encoder. So what? Real performance isn't possible. It's an inconvenient tool until you get used to it. What's the point of playing with this?
Then I remembered something I saw on TV once. A steel pan. An instrument made from oil drums. Nobody designed it to be an instrument. Yet it became one — and today it's played all over the world.
This device could be that kind of thing.
I decided to build first, and find the meaning later. I deliberately left the specs undefined. I wanted to keep it simple. Even if it failed, even if what came out had no meaning — that was okay. Both the hardware and the software.
The M5Stack ecosystem carried me to that simplicity.
materialChain DualKey with ESP32-S3 (C147) — $14.50The orchestration center of this project. Two hot-swappable mechanical keys, two RGB LEDs, and a built-in 350mAh battery. Lanyard design makes it wearable as a bag accessory. Key A plays a sustained note, Key B plays a percussive note. The battery also powers the Speaker Unit. Commonly used as a wireless left-hand controller — but inside, it's a full controller running on ESP32-S3, with the ability to daisy-chain other Chain series devices.
Chain Encoder (STM32G031) (U207) — $5.95A Chain series expansion device with a rotary encoder and button. Rotating the encoder selects the note; pressing the button toggles between Major and Minor scales. The communication protocol is publicly available, enabling connection with various controllers. This module transformed a simple button device into a musical instrument.
Atomic toChain Base (A163) — $2.95An adapter connecting the Atom series to the Chain series. As of June 2026, no audio output device exists in the Chain series lineup. Without this base, using the Speaker Unit as a sound source would not have been possible. This $2.95 part seamlessly connected two devices that had each been stuck with no clear purpose.
Atom VoiceS3R Smart Speaker Dev Kit (C126-ECHO) — $14.50The sound output device. Equipped with ESP32-S3 and ES8311 audio codec. Positioned as a smart speaker in the M5Stack ecosystem — but here, it serves as a sine wave sound source. Misuse of a tool, deliberately.
Total: $37.90
All that remained was for each device to communicate. That was all.
Instructions for Creation — hardware1. Place the Key Device at the center
Keep the Key Device at the center — this matters. It has two HY2.0-4P connectors on left and right for daisy-chaining Chain expansion devices.
2. Connect the expansion devices — pay attention to arrow direction
Connect the Encoder Unit to one side of the Key Device using the U-shaped connector included with each device.
One critical warning: align the arrow printed on each device so it points away from the Key Device.
Both connectors are physically identical, so reverse connection is physically possible. But it won't work in reverse. I lost an hour not realizing this.
3. Connect the Connection Base and Speaker Unit
The Connection Base has a single upward-facing Grove connector. There's no way to get it wrong. Connect it to the other side of the Key Device.
However, you need to be aware of which pin number you're connecting to. Chain-to-Chain devices resolve this automatically, but the Atom series does not.
The Grove connector on the Connection Base communicates via the bottom-facing connector, not standard Grove. On the Speaker Unit side, this maps to G5 and G6 — for AtomS3. Other Atom models may use different pin numbers. The details are printed in small text on the Connection Base itself.
Assembly complete. No cables. No soldering.
It feels just like LEGO. This part could be a fun activity to do with young children.
Warning: USB CableWhen writing programs, use only one USB cable at a time — swap it between devices.
The Key Device and the Speaker Unit each have a USB port, and it's physically possible to connect both simultaneously. It's tempting to do so for convenience — but this is dangerous.
When two USB cables are connected at the same time, power is supplied from two sources. Each source has a slightly different voltage level. In theory, even the smallest voltage difference produces infinite current. Normal semiconductors and electronic components cannot survive that. Whether protective circuitry is built in is unknown.
In my own testing, simultaneous connection did not cause damage. But that is not proof that it is safe.
Note: in the completed assembly, the Key Device supplies power to the Speaker Unit through the Chain connection. There is no need to connect USB to the Speaker Unit at all. One cable. Swap it. That's all.
Instructions for Creation — softwareSTEP 1: Build the sound source on the Speaker UnitI'm not incapable of writing code. I could write it myself. But it would require researching audio output theory first — a high cost. So I proceeded by giving instructions to Gemini without touching the code myself, running the output, and reporting results back to Gemini.
The only thing decided at the start: sound must come out of the Speaker Unit.
Everything else was undefined. So I organized the input/output roles here.
Output assignmentsThe speaker outputs sound. That's clear. One LED shows the current note as a color. The other LED — it can show Major or Minor as a color. Both LED roles were now defined.
Input assignmentsThe two buttons on the Key Device are for frequent pressing. The encoder is for rotating; its button is not pressed often. I kept this difference in mind. Different usage frequency means different roles.
Sound source design
I set the base frequency to 41.2Hz — one octave below the lowest note of a bass guitar. From there, I generate the Do Re Mi Fa Sol La Si scale (Do=C, Re=D, Mi=E, Fa=F, Sol=G, La=A, Si=B).
One prerequisite: Do Re Mi cannot be generated with a linear frequency distribution. Within one octave, there are 12 semitones. Mi-Fa and Si-Do have only 1 semitone between them; all others have 2. So each frequency was calculated from a formula — not an array.
I had Gemini generate this formula. A purely mathematical task. This worked perfectly.
Serial control
If a loop can play notes, the next step is playing only the commanded note. Via USB serial: "1" = Do, "7" = Si, "S" = stop.
Major / Minor toggle
Scale type affects the semitone pattern. Switching between them is infrequent — so this became the role of the encoder button.
Two-button differentiation
One button was still unused — and it's one that gets pressed frequently. So: Key A for slow decay, Key B for fast decay. Format: letter + number specifies note and duration.
A4 → Key A, note 4, slow decay B4 → Key B, note 4, fast decay
The Speaker Unit specification was now complete.
STEP 2: Build the Key DeviceThe most important role of the Key Device: when Key A or B is pressed, send the note number following A or B via serial.
First experiment without the Encoder Unit connected. Success immediately. LED color changes on button press also worked.
Trap 1: Connection direction
Connecting the Encoder Unit — nothing worked. Gemini kept asking me to try various possibilities. Eventually it said "this device simply doesn't work — that's by design."
That couldn't be right. There were plenty of working examples in the world. I pushed that fact back at Gemini, brought it back to reality — and the same cycle repeated.
I gave up on Gemini and read the product page thoroughly. The Encoder Unit has a directional requirement for connection. It was written as a note on the product page.
I had given Gemini that URL. I assumed it had read it. I over-trusted and over-relied. After reconnecting in the correct direction, it worked immediately.
Trap 2: Encoder output value
The button responded, but rotation was invisible. I had implemented it to output to serial when up or down was detected. But what was actually coming out of the encoder was a cumulative count — how many rotations had occurred.
I noticed this before Gemini did.
Gemini had taken the sample program and rewritten it based on what it assumed would be better — without flagging the change.
Communication protocol design
I had been toggling Major/Minor with a single "C" character. If even one transmission failed, Major and Minor would swap permanently.
I come from an analog engineering background — measuring sensor values as voltages. In that world, a single digital line carries only one bit of information. That background made me notice the risk of even a single transmission error.
So the protocol needed to carry the complete state every time.
The communication protocol was now defined.
- J : Major scale
- N : Minor scale
- A : Sustained (slow decay)
- B : Percussive (fast decay)
- 1–7+ : Note number
Example: JA1 = Major, sustained, Do Example: NB7 = Minor, percussive, Si
Key Device program fixed to this specification:
- Continuously read encoder increment value → accumulate → clamp to 1–32
- LED1: 7 colors mapped to note positions
- LED2: Red = Major, Blue = Minor
- Encoder button: toggle Major/Minor
- A/B buttons: output in
JA1format via Grove serial
Key Device complete.
STEP 3: CommunicationWith the protocol updated, the Speaker Unit's receiver needed to handle Major/Minor as well. Then switch USB serial to Grove pins on both sides. That was all.
That was supposed to be all. But it didn't work.
Gemini began drifting in strange directions. Despite solid block connections, it started suggesting broken wires, internal connection failures, hidden pins that needed to be manipulated.
I dismissed all of it as pseudoscience.
The probability wasn't zero. But there were far more likely explanations.
The M5Chain.h trap
Gemini insisted: since the Speaker Unit is connected via the Connection Base to the Chain series, it must also include M5Chain.h. It sounded plausible. But wait — the Speaker Unit connects to the Key Device via Grove. That's just standard UART.
After several exchanges, I tested something. I asked Gemini to list every device currently in our conversation.
Answer: Speaker Unit and Encoder Unit only. "Where are the two keys and LEDs?" "On the Speaker Unit."
At some point, Gemini had merged the Speaker Unit and Key Device into one.
Rebuilding the Key Device program from scratch, rebuilding the Speaker Unit program from scratch — Gemini could no longer produce either correctly.
I had been careful with my prompts. But when human dependency and fixed assumptions compound on top of each other, prompting skill is neutralized. I had produced a perfect example of this myself.
One more attempt at the easy path: I gave Gemini the broken code, the specification, the product pages, the sample programs — and asked for a full rebuild from zero.
This also failed.
The reason: I had lost my debugging capability. Gemini had warned me that simultaneous Grove UART and USB UART communication was dangerous. The warning was triggered by my own question — "is simultaneous communication dangerous?" — and Gemini kept echoing "dangerous" in response.
I realized this, and added USB serial debug output to both devices.
The cause became clear. I had configured the Speaker Unit to communicate via its own Grove pin. But the actual signal path was the UART coming from the Connection Base.
I fixed that one point. Sound came out on button press. Immediately. Almost anticlimactic.
The rest was fine-tuning. LED1 set to always-on. Added simultaneous A+B press to send "S" — stop sound at any time.
Complete.
correctionTwo issues emerged during testing. High notes were painful to hear. Very low notes produced no sound. I set upper and lower limits: 1 to 32 — approximately 3 octaves.
However, a problem remained with the absolute value implementation. If the encoder was spun too far, it exited the 1–32 range and required spinning back the same number of turns.
This was resolved by switching to the increment value (getEncoderIncValue): read increment → accumulate → clamp → reset increment register. According to the official protocol specification, Reset encoder increment value (0x14) clears the increment to 0. The register also auto-clears after reading, so manual reset is often unnecessary in practice.
Bug: scale array design error
A bug was discovered after completion: notes 8 and 9 produced the same pitch.
The cause was in the Gemini-generated scale array:
cpp
// Buggy array (Gemini-generated)
const int MAJOR_SCALE[] = { 0, 2, 4, 5, 7, 9, 11, 12 };
The instruction "make a Do Re Mi Fa Sol La Si Do scale" caused Gemini to include the upper Do in the array. With 8 elements and index % 8, notes 8 and 9 both resolved to semi = 12.
Fix: remove 12 from the array, change to % 7 and / 7.
cpp
// Fixed
const int MAJOR_SCALE[] = { 0, 2, 4, 5, 7, 9, 11 };
The correct instruction would have been: "7 notes only — Do through Si — upper Do is handled by octave calculation." A matter of prompt precision.
resultThe device operates as specified.
The encoder selects the note. Key A plays a sustained note. Key B plays a percussive note. The encoder button toggles Major and Minor. LED1 shows the current note as a color. LED2 shows Major or Minor. Pressing A and B simultaneously stops the sound.
It hangs from a bag. It runs without external power. As specified.
conclusionA minimum understanding of ArduinoIDE, M5Stack, and ESP32 is absolutely required. But anyone who has built something with ArduinoIDE even once should find this document sufficient to reproduce the project.
So — is what I built a keyboard?
An organ in the shape of a computer keyboard. More simply: a rhythm box that remembers no notes.
It's not easy to play. You have to memorize what each LED color means. Fast playing is completely impossible.
So what is this?
To me, it still looks like a musical instrument.
Future Possibilities
A minor caveat first: there is slight heat generation and a battery limitation. In the current hardware configuration, continuous operation is limited to approximately 3 minutes. External battery connection can extend this. A topic for future work.
The room for expansion is significant:
- Sampler functionality using the Speaker Unit's built-in microphone
- Waveform synthesis and mixed-frequency generation for a fuller analog synth
- Status display on the Encoder Unit's RGB LED
- Sequencer functionality — the ESP32-S3N8R8 has plenty of headroom
- Wireless configuration using Bluetooth LE Audio earphones (Atom-free build)
- Absolute angle reference using M5Chain Dial
When that time comes, AI may finally be useful.
The Speaker Unit was designed as a smart speaker. But its performance makes it the most suitable device for building a standalone pseudo-analog synthesizer. Misuse of a tool, one more time.
Proposal
Please add UIFlow support for Chain DualKey. The Chain Encoder can already be added directly to other M5Stack devices via UIFlow. The next step is UIFlow support for the Key Device.
The Key Device's default firmware allows key assignment via a web-based interface. However, the range of customizable key types is limited. More flexible customization currently requires ArduinoIDE — which is disproportionately heavy for the simplicity that defines the Chain series. UIFlow support would solve this.
Instructions for ReproductionInstalling ArduinoIDE
To write programs to M5Stack devices, ArduinoIDE must be installed on your computer. This is the first hurdle.
Many versions exist. This project used version 2.3.6. Other versions may or may not work — reproducibility is not guaranteed outside this version. Even with two devices (Speaker Unit and Key Device), only one installation of ArduinoIDE is needed.
Detailed setup instructions are available via the tutorial links on each M5Stack product page. The content evolves continuously, so specific steps are not listed here — but they will always exist. Below is the conceptual foundation that tutorials don't cover. When reading the tutorial, keep the keywords in < > in mind.
Setup flow
Use <Board Manager> to add board information for your M5Stack device to ArduinoIDE. This enables <Board Selection>.
Then perform <Port Selection> — selecting the USB port your device is connected to. It appears as a number prefixed with <COM>. Note: "Board" and "Port" sound similar — do not confuse them.
If no port appears, follow the <Reset> procedure in <Quick Start> on the product page. If it still doesn't appear, your USB cable may be charge-only and not capable of data transfer.
Next, add the required <Libraries>:
For Speaker Unit (Atom VoiceS3R)
cpp
#include <M5Unified.h>For Key Device (Chain DualKey)
cpp
#include <M5Unified.h>
#include <M5Chain.h>
#include <Adafruit_NeoPixel.h>
These must also be declared as includes at the top of each program file.
Writing programs
<Verify> checks for errors in the code. If none are found, <Compile> (optimization) and <Link> (assembly) are performed. The first compile takes a long time. Subsequent compiles are faster. Then <Upload> writes the program to the device.
Steps:
- Copy the Speaker Unit code from this article → create Speaker Unit file → configure Speaker Unit settings → compile, link, upload
- Copy the Key Device code from this article → create Key Device file → configure Key Device settings → compile, link, upload
- Assemble the hardware
Reproduction complete.
Notes on Using AI for ModificationsTo modify the project: paste the code from this article into an AI, describe what you want, ask for a "full rewrite, " paste the result into ArduinoIDE, and follow the same steps.
If ArduinoIDE shows an error, paste that error into the AI and ask for guidance. The harder situation is when there is no error, the upload succeeds, but the behavior is wrong. In that case, describe what you expected versus what happened, and work toward the correct behavior with the AI.
However: AI lies.
AI is trained on internet data — including outdated information that no longer works, and in some cases, information that was never correct. To bridge the gap with reality, AI infers. The result is frequent confident assertions: "This will definitely work now. Don't worry."
Do not trust this.
Saving a working copy of your program somewhere before making changes preserves a safe fallback.
Letting AI handle everything means accepting that if nothing works out — if hours dissolve with no result, or if misunderstandings take root — recovering from that state is extremely difficult. Assume this will feel approximately ten thousand times heavier than you currently expect.
This is how to use this article.


Comments