

Hardware components | ||||||
| × | 1 | ||||
 |
| × | 1 | |||
| × | 1 | ||||
Software apps and online services | ||||||
| ||||||
Dripping coffee is my big hobby.
Coffee drip is not just a sensation or experience, but a science. That's why it makes sense to record the extraction process while taking data.
Conventionally, a special device called a "coffee scale" is used to measure the amount of extraction. However, existing coffee scales only display the weight at the moment and cannot record or analyze the brewing process.
I thought, "I want to visualize how hot water was poured and the process." However, there were no scales on the market with such capabilities.
――So I decided to make my own.
purposeThe era when only engineers and programmers can develop new things is coming to an end. Now anyone can become a manufacturer. It is an era of making new things and delivering them into the hands of citizens.
That's where M5STACK comes in.
This time, we focused on the new product M5TAB5. It is a device that makes it very easy to create a cool UI.
There is no point in writing program code. Although the functionality may be somewhat limited, you can use UIFlow2, which can be programmed visually, to create designs and movements intuitively.
Of course, even if you say "easy", you need a design concept. This is because the foundation of the program is "design of the order of actions".
However, with UIFlow2, even the parts that would otherwise be penance turn into excitement and fun to proceed with trial and error.
This time, since we have an "easy environment" in place, we decided to limit ourselves to an environment that everyone can enjoy and develop.
Configuration DesignIn this project, the policy of machining and modifying parts (soldering, drilling, sawing, etc.) was avoided as much as possible. This is because changing the prototype of the purchased part is a high hurdle and less reproducible for beginners. The goal was to use a minimum of tools such as a screwdriver.
As for the configuration, I was convinced that if I could read the value of the load cell, which is a weight sensor, and display it on the screen, I would be able to realize various functions depending on the design.
Therefore, in this project, we set a flexible goal of "to the point where M5TAB5+UIFlow2 can be done" and proceeded with development without deliberately fixing the goal.
material- M5TAB5 (SKU: K145) A new product with high performance and style. ESPNOW was found unavailable after the purchase, forcing a design change.
- Unit Weight (SKU: U030) module to read the value of the load cell. Originally, some have a load cell, but in order to avoid housing processing, a single transducer is used. (I accidentally purchased a non-I2C compatible product, but I used it as it was because it worked simply.)
- Load Cell Kit (Amazon: https://amzn.to/4mo5dzP) set of 5kg load cell + enclosure. The housing has been drilled with holes. The included display board (with 7 segments) was not used this time, but it can be diverted for other purposes in the future. What was especially good was that it had a hole and a plastic pin to fix the Unit Weight as it was. It can be fixed with one touch without tools, and it perfectly matches the policy of easy reproduction this time.
- M5STACK AtomS3 Lite (SKU: C124) [Unused] Originally, the Unit Weight was connected to this side and transmitted to the M5TAB5 via radio communication (ESPNOW). However, it turns out that M5TAB5 is not compatible with ESPNOW. Other communication methods were considered, but the adoption was abandoned because of concerns about stability for beginners. This time, we used a method of connecting the Unit Weight directly to the M5TAB5. The AtomS3 Lite itself can be used for other purposes, so your investment will not be wasted.
The total cost is about 82US$(12, 000 yen). It's expensive compared to commercial coffee scales, but it's worth a lot of money as a product with one-of-a-kind features.
Instructions for Creationhardware1. Preparing the M5TAB5
- The M5TAB5 comes with a factory demo set up at the time of purchase, and it cannot be programmed with UIFlow2 as it is.
- Download a writing program called M5Bunner to Windows and write firmware for UIFlow2.
- This process will make the factory demo disappear, but you can rest assured that you can return it to the factory state again with the M5Bunner.
- Go to the UIFlow2 web page and register as a program using M5TAB5.
- So far, M5TAB5 is ready.
2. Connecting the Load Cell to the Unit Weight
- Connect the load cell to the Unit Weight wires.
- Requires a precision Phillips screwdriver.
- Unit Weight can be separated from the main unit and connector.
- In a separate state, connect from the left to red, black, white, and green with the threaded surface up.
- Insert it a little deeper and screw it in.
- Install the connector on the unit weight body.
3. Fixing the Unit Weight Enclosure
- Secure the Unit Weight to the Fenclosure.
- Pins for the load cell are included, and the housing has holes in just the right place, so it's easy to fix with the pins.
- Screw the load cell to the housing.
- The screws are M5 and M4 sizes, so a regular screwdriver is enough.
- There is no manual on how to assemble it, but it is easy to understand if you refer to the photos on the sales page.
- Don't forget to put spacers between the top and bottom of the load cell .
- Finally, attach the pins that serve as legs and the assembly of the load cell side is complete.
4. Connecting with M5TAB5
- Use the Grove cable that came with the Unit Weight to connect the Unit Weight to the M5TAB5.
1. Software Design
- Phased development
First, read out the weight value with a USB serial →, then display it on the screen → Challenge the graph display. - Graph alternatives
I gave up on the line graph due to the problem of drawing speed.
Use sliders and scale bars to set values every 30 seconds to create a pseudo-graph.
The standard widget of UIFlow2 was repurposed in the direction of "showing the value to humans" instead of "receiving values from humans". - Scale reset function
Set the reference value with the Reset button → Reset the value of the slider and ScaleBar. - Advantages of UIFlow2
- Create advanced UIs without a block editor and with just standard widgets.
The development speed is overwhelmingly fast and the code is simple.
2. UI Design
- Thermometers and dripper weights are also measured and displayed individually
Individual metering using ARC and sliders. - Multiple sliders
10 sliders are installed at 30-second intervals to visualize weight changes over time. - Switching Options
The Switch widget allows you to turn the dripper display and thermometer display on or off.
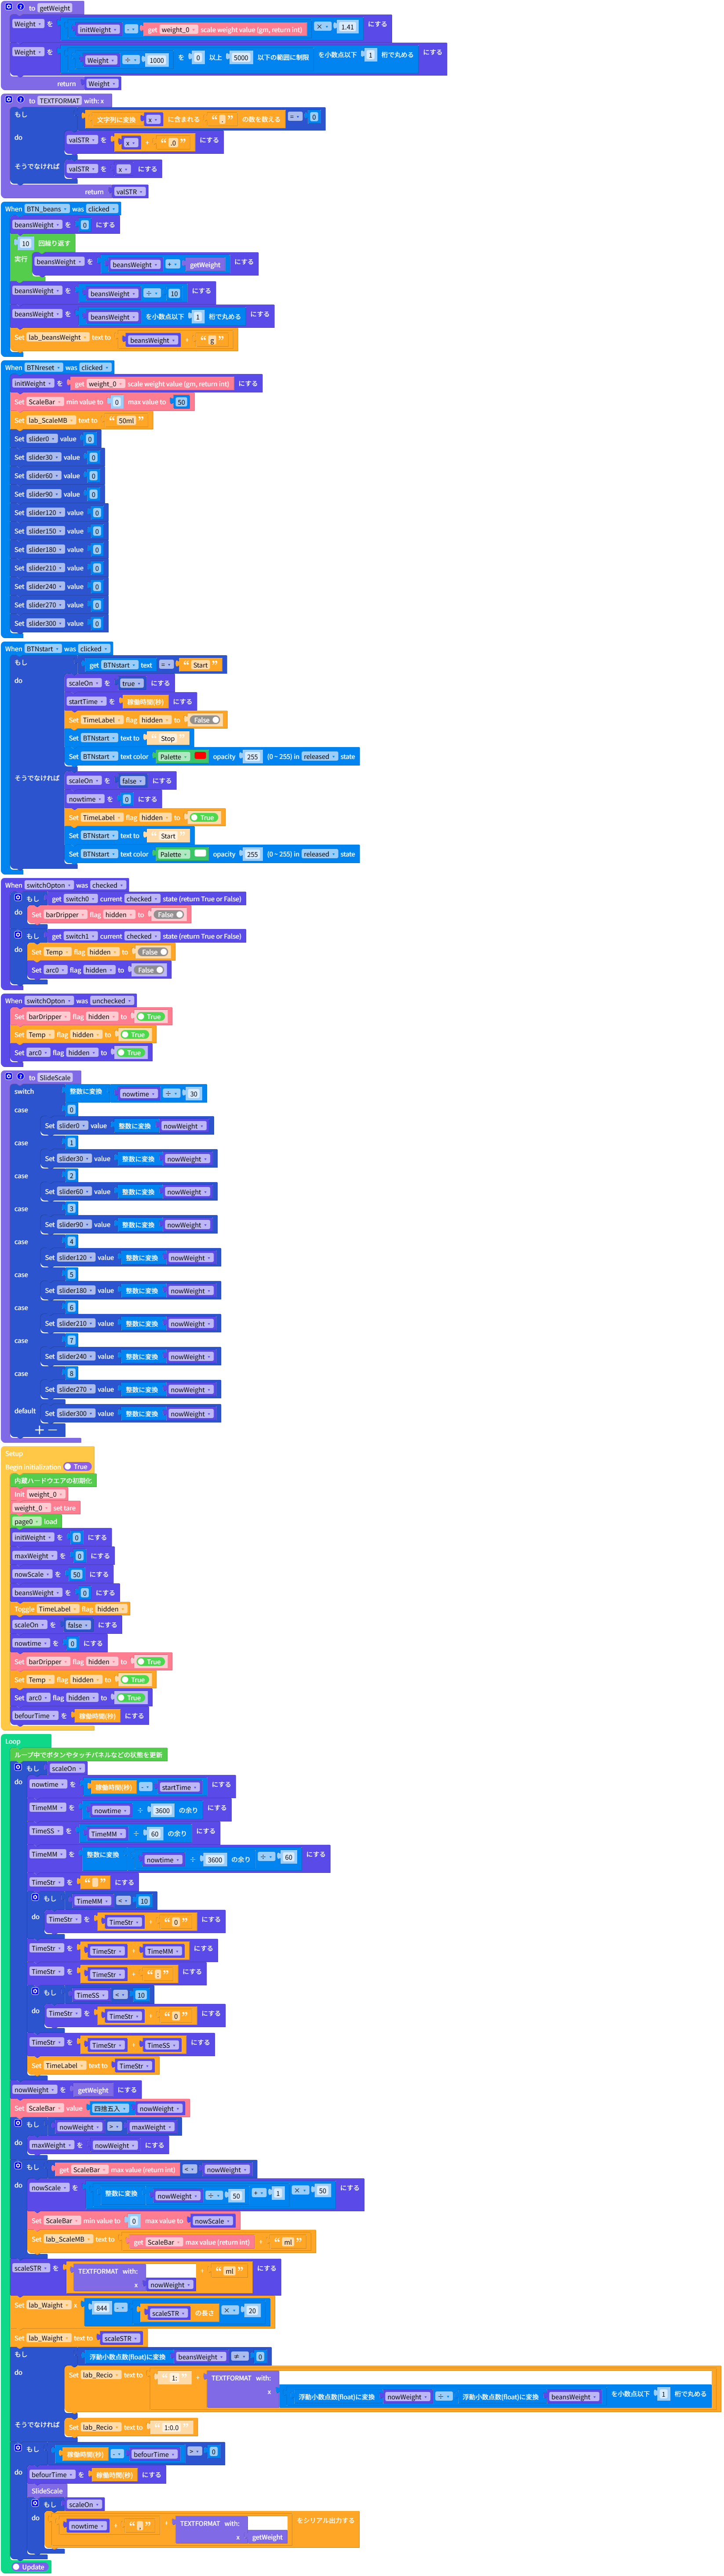
3. Ideas on MicroPython code
- getWeight() to get the current weight, limit the range and round it off.
SlideScale() updated sliders according to the current time → to achieve pseudo-graphs.
Handle button and switch events in detail.
There are a lot of global variables, but there are some parts that are unavoidable due to the automatic generation of UIFlow2 and the specifications of M5Stack.
4. technical fun
- Reverse use of UIFlow2 widgets
The idea of using the slider for "input" for "graph display" is novel. - Simple integrated weighing UI
Manage the weight of the scale, thermometer, and dripper on one screen. - Successful examples of high-speed development
Build UIs that work well as prototypes without block editors or custom drawings.
For the future, I made a thermometer with Arc and placed that meter because I wanted to measure the weight of the dripper alone.
Due to the structure of the scale, the value does not always come out accurately. Accurately measuring the amount of coffee beans and the amount of extract is crucial in making delicious coffee. In general, 14 to 15 times the amount of coffee liquid per bean is considered appropriate. Therefore, a function to display the yield (actual amount of liquid extracted ÷ amount of beans put in ×100) was also added.
Typically, weight sensors are generally linear, but the measurements need to be corrected. Therefore, compared with the scale used in the past, the magnification of the measured value was examined in the range from 8g to 750g. As a result of regression analysis in Excel, it was found that 1.41 times the actual measurement was equivalent to the actual weight.
- Before the change
Display sensor values as they are - After the change
Corrected weight = Measured × 1.41
View Corrected Values
Yield is also updated based on corrected values
Based on this result, a block for correction calculation was added to the block of UIFlow.
<Before change>
< After the change>
When created with UIFlow2, real-time graph rendering on the M5Stack side alone was slow, making it difficult to update the graph every second, for example. Therefore, I gave up graph drawing, which can only be completed on M5TAB.
However, it is not completely impossible. Real-time display is possible by using the values serially output from the M5Stack via USB and drawing graphs on the computer.
Specifically, there is a way to use the add-in "DataStreamer" for Excel. When this add-in is enabled, the serial input value can be automatically captured into the cell and the change in weight can be recorded as a table. By creating graphs with the ingested data, the data from M5TAB can be visualized in real time.
Ideally, I would like to complete the graph display with only M5TAB, but since it is difficult in terms of performance at present, I adopted a method using Excel.
resultBy being able to manage time and the amount of hot water used, it is now possible to brew slowly during the time when the flavor you want to produce is extracted. I like to use unstable beans that change their taste depending on how they are brewed. This is because you want to enjoy a variety of flavors depending on your mood. As a result, I was able to express the taste I wanted to drink at that time.
However, it is not perfect. The biggest challenge is that the operation is unstable and restarts are common. This seems to be due to the fact that it was created in UIFlow2. To make it more stable, you need to optimize UIFlow2's program, but it's not difficult. If you hand over the current program to generative AI, you will be able to create an organized and secure program.
If you want to stabilize further, it is desirable to write in C++, but since it is not for beginners, this is a complete form first. In the future, it will be possible to experiment with ESPNOW and BLE communication, and use sensors and M5STACK ATOMS3 Lite to improve the water temperature and dripper weight that have not yet been implemented at the same time.
l It is possible to manage time and grasp the amount of hot water to be used, and it is possible to extract for your favorite flavor.
l Even unstable beans can now express the taste they want to drink.
l The current problem is the instability of the program due to UIFlow2 (frequent restarts)
l As a way to improve it, it is effective to optimize the UIFlow2 program and organize it with generative AI.
l For more stability, implementation in C++ is preferable, but not for beginners
l As a future improvement, ESPNOW, BLE communication, and water temperature and dripper weight measurement can be added
ConclusionIn fact, I have made a similar coffee scale twice in the past. One development took two months to complete. However, this time it was completed in just one week. This is thanks to the combination of M5Stack and UIFlow. In the past, it was necessary to electronically work from the component level and compile and write programs, but now almost complete forms are prepared in blocks.
Using this system, you can easily try out hacking tools that are useful in everyday life and business, use them if they are effective, and dismantle them and replace them with the next one when they are done - this is truly an ecosystem that citizens can realize themselves. What was once a story of a dream and a magical world is now a reality.
After all, it is wonderful that we are now in an era where the citizenization of products is progressing. I make things that don't exist in this world. I strongly felt that this mindset is necessary for the world in the future.


Comments