


Hardware components | ||||||
 |
| × | 1 | |||
| × | 1 | ||||
| × | 1 | ||||
| × | 1 | ||||
| × | 1 | ||||
 |
| × | 1 | |||
 |
| × | 1 | |||
Software apps and online services | ||||||
| ||||||
Had a busy day at work today? Exhausted right? We know how it feels coming back home after such a long tiring day from work. All you want and hope for is everything to be done on its own. You want to control the lights, fan or AC at just the tip of our fingers, click a button and food is right in front of you, served hot and delicious, tap your feet and the music is on letting you enjoy the night. Isn't that really cool. But alas, even if most of us work with technology, we forget to implement it even with the smallest of things which could make our life easier. But as it is rightly said when there is a will there's a way, here's a simple way out for you to control the lights of your home at just a click.
What is Bolt?Bolt IoT platform gives you the capability to control your devices and collect data from IoT devices safely and securely no matter where you are. Get actionable insights by deploying machine learning algorithms with just a few clicks to detect anomalies as well as predict sensor values.
To know more visit boltiot.com.
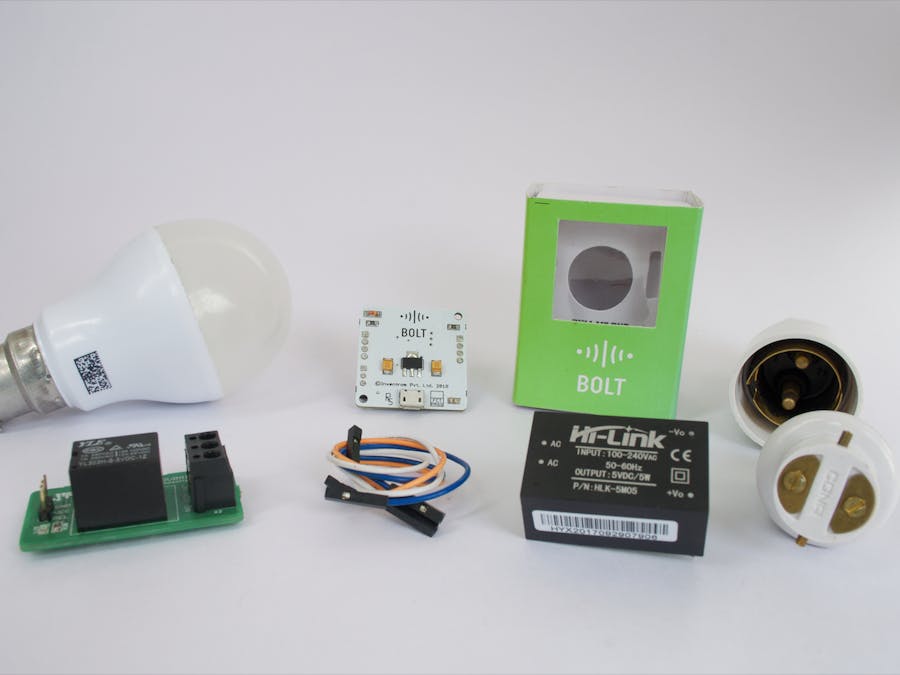
Step 1: Gathering all the required componentsYou can buy Bolt from https://www.boltiot.com/index.html#store and rest of the components from either Amazon or local electric store.
Also make sure your register yourself on https://cloud.boltiot.com.
Step 2: Setting up the BoltLet's setup the Bolt once you have received it, using the bolt mobile app which is available for both android as well as ios. Search for "Bolt IoT" to download the setup app.
Watch below video to know how to setup the device.
Step 3: Creating mobile web app to control BoltWe shall create the application to control the device using Bolt's templates on Bubble.
Bubble.is is a robust visual programming platform that enables users to create innovative web applications in a quick and hassle-free way.
Let's create an account on Bubble.is and build our app. We shall first learn how to control a LED connected to the Bolt using the app.
Step 4: Assembling the hardwareSince we have already learnt how to control led connected to Bolt using mobile, we shall now use the same concept to control an AC bulb.
We have designed the setup in such a way that you can directly plug it in the bulb holder mounted on wall and make it IoT enabled.
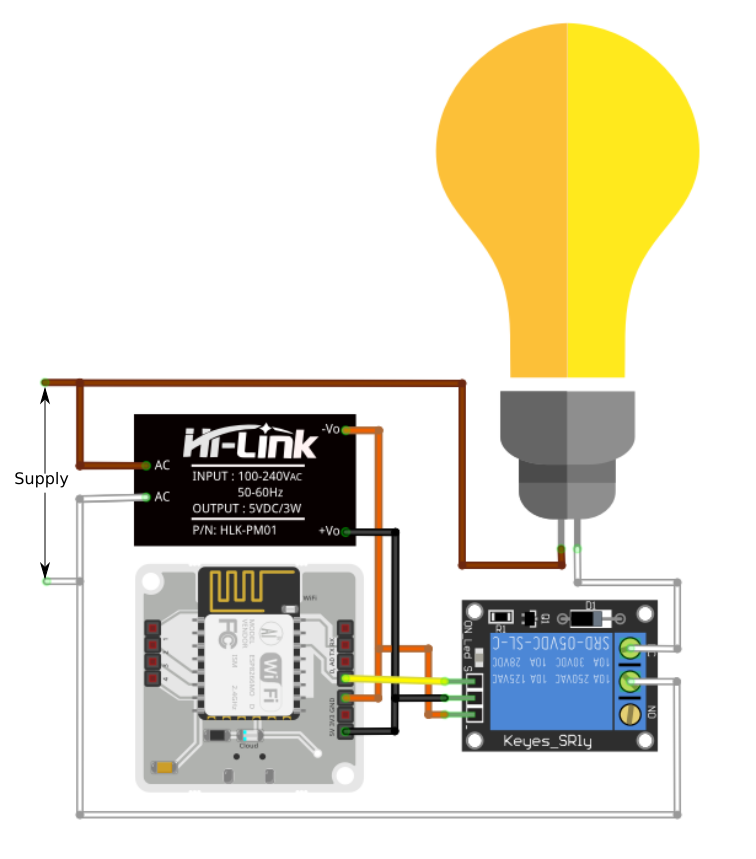
A]Power module connections:
Advantage of the AC/DC converter is that it eliminates the use of adapter to power on Bolt and relay. We shall use 5V DC o/p from this module to power on Bolt and Relay.
In order to do that cut two male-to-female jumper wire in half, and solder them to +ve and -ve of the power module. So that we will have male as well female connections from both +ve and -ve.
Solder two small wires to the AC pins as well.
B]ConnectionsofACCircuit:
Connect wires from the AC pins of power module to male bulb holder, which will act as AC power source as we will connect it to wall mounted bulb holder.
Connect two more pins to the male bulb holder.
Connect one wire from the male bulb holder to the female bulb holder. Keep the other wire of female holder open.
Connect open wire from male holder to Common PIN of the relay and wire from female holder to Normally Closed(NC) PIN.
C]ConnectionsofDCCircuit:
Connect +Ve [female] to Vcc of relay and [male] to 5V of Bolt.
Connect -Ve [female] to GND of relay and [male] to GND of Bolt
Connect Pin 1 of Bolt to Input pin of relay using male-to-female jumper wire.
The final circuit will look like this.
Watch the video to know how the system works.
Step 4: Creating a casing for wall mounting.Take a small box or any plastic container and make holes for the holders to fit in on opposite sides.
Cut the outer covering of the two holders and keep the threaded ring intact. We shall use it to fit the holders onto the box. [You can use glue gun to fix the holders on the box.]
Put the entire circuit inside the box. Fix the components using a double sided tape. [You might require to reconnect the holder wires after fitting them to the box]


Comments