
Hardware components | ||||||
_ztBMuBhMHo.jpg?auto=compress%2Cformat&w=48&h=48&fit=fill&bg=ffffff) |
| × | 1 | |||
 |
| × | 1 | |||
 |
| × | 1 | |||
 |
| × | 1 | |||
 |
| × | 1 | |||
 |
| × | 1 | |||
 |
| × | 1 | |||
 |
| × | 1 | |||
Software apps and online services | ||||||
 |
| |||||
ATMega328P features an on-chip Successive approximation ADC which is of 10-bit resolution.
A successive-approximation ADC is a type of analog-to-digital converter that converts a continuous analog waveform into a discrete digital representation using a binary search through all possible quantization levels before finally converging upon a digital output for each conversion.
Features of the ADC in ATmega328P:The ADC is connected to an 8-channel analog multiplexer which allows eight single-ended voltage inputs constructed from the pins of Port A. The single-ended voltage inputs refer to 0V (GND).
Block Diagram:As shown in the figure, the ADC contains a sample and hold circuit which ensures that the input voltage to the ADC is held at a constant level during conversion.
The input of the ADC is fed through a multiplexer which is connected to the PINA of the ATmega328P which is very famously known as the Analog pins of the Arduino. These inputs can be chosen by selecting the respective bit values in the ADMUX register.
The ADC has a separate analog supply voltage pin, AVCC. AVCC must not differ more than ±0.3V from VCC.
The ADC is enabled by setting the ADC Enable bit, ADEN in ADCSRA. Voltage reference and input channel selections will not go into effect until ADEN is set.
Digital Output?
The ADC generates a 10-bit result which is presented in the ADC data registers, ADCH and ADCL. By default, the result is presented right adjusted, but can optionally be presented left adjusted by setting the ADLAR bit in ADMUX.
Programming the ADC Module:Registers and working:
Reference Voltage Selection:
The reference voltage for the ADC (VREF) indicates the conversion range for the ADC. Single-ended channels that exceed VREF will result in codes close to 0x3FF. VREF can be selected as either AVCC, internal 1.1V reference, or external AREF pin. To get the AVCC mode, we need to write the bits 0 and 1 in REFS1 and REFS0 respectively.
ADLAR: ADC Left Adjust Result
The ADLAR bit affects the presentation of the ADC conversion result in the ADC data register. Write one to ADLAR to left adjust the result. Otherwise, the result is right adjusted, hence we need to write bit 0 to have it right justified.
The multiplexed input selection:
Note that ADC0 to ADC7 is the analog pins of Arduino as shown in the figure below:
We would be connecting a potentiometer for the first experiment, thus we need to write the bits 0000 for MUX3 to MUX0 bits.
Combining all these bits we arrive at a binary value of B01000000 = 0x40 in hex.
ADMUX = 0x40;ADEN is the ADC Enable bit, thus to turn on the ADC, we need to write a logical 1 to it. Next comes the ADSC which is the ADC start conversion bit, to start the conversion, this bit has to be written a logical one, and it'll be read as a logical one until the conversion is complete.
ADATE is the ADC Auto trigger enable and ADIF and ADIE are ADC interrupt flag and interrupt enable bits respectively, but since we are not going to use interrupts, these bits have to be written a logical 0.
Next comes the ADPS2 to ASPS0 which are the ADC Prescalar bits that are used to adjust the input clock frequency.
By default, the successive approximation circuitry requires an input clock frequency between 50kHz and 200kHz to get maximum resolution. If a lower resolution than 10 bits is needed, the input clock frequency to the ADC can be higher than 200kHz to get a higher sample rate.
Since we are going to use all the 10-bits of the ADC, the clock frequency has to be adjusted to 50kHz to 200kHz, Arduino Uno operated at 16MHz, thus a prescalar has to be used. Take a look at the table below:
Using the prescalar 128, we get 16MHz / 128 = 125kHz which is in the range of 50kHz to 200kHz.
Combining all bits we get a binary value of B11000111 = 0xC7
ADCSRA = 0xC7;ACME is a part of the Analog Comparator which is used to manipulate the input bits of the analog comparator, thus it should be written a bit 0 since it's not required in ADC. The ADTSx is the ADC Auto Trigger Source bits, should be set as shown in the figure below:
Since we are going to use the free-running mode, we shall set bits 000.
Thus the final binary value of B00000000 = 0x00, we can either leave it as such since the default value of these registers is 0x00, but it's also a good practice to write 0x00.
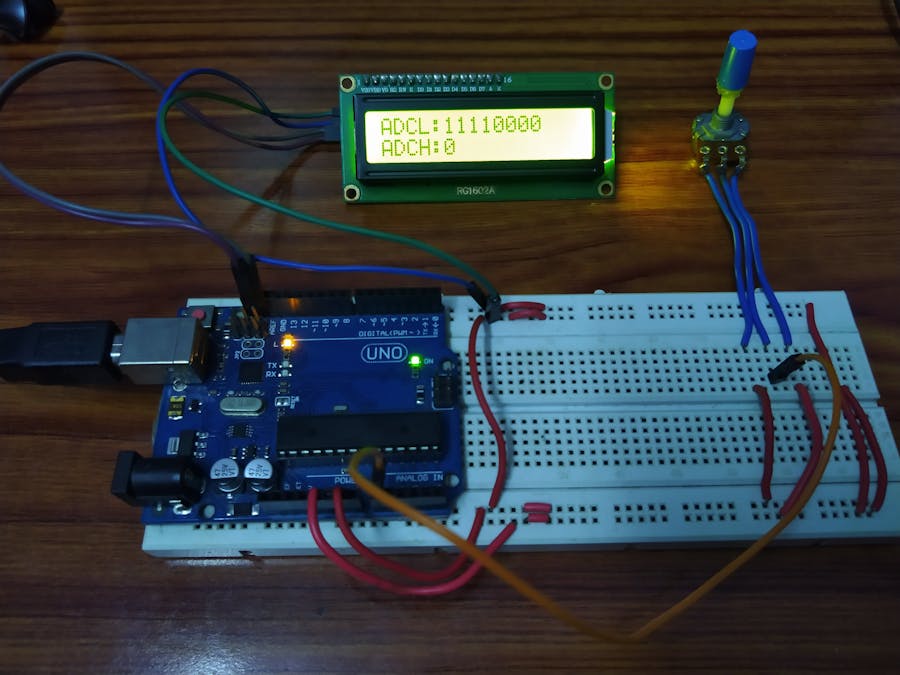
ADCSRB = 0x00;The output can be read from the ADCL and ADCH registers as right-justified as we write a logical 0 to the ADLAR bit in ADMUX.
The output should be read from the registers only when the conversion is complete, hence it can be found by checking the ACO bit of ADCSRA by masking it.
if ( (ADCSRA & 0x40) == 0 )
{
    ADC_O_1 = ADCL;
    ADC_O_2 = ADCH;
    ADCSRA |= 0x40;
    _delay_ms(600);
} #include<avr/io.h> // AVR/IO.H header file
#define F_CPU 16000000UL // Setting CPU Frequency 16MHz
#include <util/delay.h> // Delay Library
#include <LiquidCrystal_I2C.h> // I2C Module for LCD
LiquidCrystal_I2C lcd(0x3F,16,2); // Address of the I2C module and LCD size
int ADC_O_1; // ADC Output First 8 bits
int ADC_O_2; // ADC Output Next 2 bits
void setup() {
lcd.begin();
lcd.clear();
lcd.backlight();
lcd.setCursor(4,0); //Set cursor to character 4 on line 0
lcd.print("ADC Demo");
_delay_ms(1000);
ADMUX = 0x40;
ADCSRA = 0xC7;
ADCSRB = 0x00;
}
void loop() {
if ( (ADCSRA & 0x40) == 0)
{
ADC_O_1 = ADCL;
ADC_O_2 = ADCH;
lcd.setCursor(0,0);
lcd.print("ADCL:");
lcd.print(ADC_O_1, BIN); // Converting to binary form
lcd.setCursor(0,1);
lcd.print("ADCH:");
lcd.print(ADC_O_2, BIN);
ADCSRA |= 0x40;
_delay_ms(600);
}
} Concept:
Different colors have different wavelengths and hence different energies as the energy of an electromagnetic wave are dependent on its wavelength and frequency.
Working of LDR (Light-dependent resistor) :
Now, the resistance of the LDR varies as the energy of the light falling on the LDR changes, this change in resistance, in turn, can be converted to an analog voltage by designing a simple voltage divider network as shown below:
This Vout is fed as an input to the Analog to Digital converter in the Arduino Uno.
Converting back to analog:
As we are using all 10-bits of the ADC, we get the above result. After conversion, each color would have a corresponding voltage. As calibrated, writing a simple code to map the corresponding colors to the voltage, we finally complete the color detector.
Schematic:Note: This code might not work exactly as you need to calibrate the LDR according to your device.
Uno:
#include <LiquidCrystal_I2C.h>

LiquidCrystal_I2C lcd(0x3F,16,2);   // set the LCD address to 0x3F

const int sensor_pin = A0;
int value;
float volt = 0;

void setup()
{
  lcd.begin();
  lcd.clear();
  lcd.backlight();
  pinMode (sensor_pin, INPUT);
  lcd.setCursor(1,0);              //Set cursor to character 2 on line 0
  lcd.print("Color Detector");
  delay(1000);
}

void loop() {
  value = analogRead(sensor_pin);
  val = value;
  volt = ((float(value))/(1023.0))*5.0;  // Converting to voltage
  if( value > 75 && value < 85)
  {
    lcd.clear();
    lcd.setCursor(0,0);
    lcd.print("Voltage: ");
    lcd.print(volt);
    lcd.print("V");
    lcd.setCursor(0,1);
    lcd.print("Color: Red");
  }
  else if( value > 144 && value < 155 )
  {
    lcd.clear();
    lcd.setCursor(0,0);
    lcd.print("Voltage: ");
    lcd.print(volt);
    lcd.print("V");
    lcd.setCursor(0,1);
    lcd.print("Color: Green");
  }
  else if( value > 188 && value < 200 )
  {
    lcd.clear();
    lcd.setCursor(0,0);
    lcd.print("Voltage: ");
    lcd.print(volt);
    lcd.print("V");
    lcd.setCursor(0,1);
    lcd.print("Color: Blue");
  }
  else if( value >= 67 && value <= 71 )
  {
    lcd.clear();
    lcd.setCursor(0,0);
    lcd.print("Voltage: ");
    lcd.print(volt);
    lcd.print("V");
    lcd.setCursor(0,1);
    lcd.print("Color: Purple");
  }
  else if( value > 118 && value < 130 )
  {
    lcd.clear();
    lcd.setCursor(0,0);
    lcd.print("Voltage: ");
    lcd.print(volt);
    lcd.print("V");
    lcd.setCursor(0,1);
    lcd.print("Color: Cyan");
  }
  else if( value >= 65 && value< 67)
  {
    lcd.clear();
    lcd.setCursor(0,0);
    lcd.print("Voltage: ");
    lcd.print(volt);
    lcd.print("V");
    lcd.setCursor(0,1);
    lcd.print("Color: Yellow");
  }
  else if( value >= 60 && value < 65 )
  {
    lcd.clear();
    lcd.setCursor(0,0);
    lcd.print("Voltage: ");
    lcd.print(volt);
    lcd.print("V");
    lcd.setCursor(0,1);
    lcd.print("Color: White");
  }
  else
  {
    lcd.clear();
    lcd.setCursor(0,0);
    lcd.print("Voltage: ");
    lcd.print(volt);
    lcd.print("V");
    lcd.setCursor(0,1);
    lcd.print("Color: Unknown");
  }
  delay(200);
}
Nano:
const int red = 2, green = 3, blue = 4;

void setup()
{
  pinMode(red, OUTPUT);
  pinMode(green, OUTPUT);
  pinMode(blue, OUTPUT);
}

void loop()
{
  digitalWrite(red, HIGH);
  digitalWrite(green, LOW);
  digitalWrite(blue, LOW);
  delay(5000);
  digitalWrite(red, LOW);
  digitalWrite(green, HIGH);
  digitalWrite(blue, LOW);
  delay(5000);
  digitalWrite(red, LOW);
  digitalWrite(green, LOW);
  digitalWrite(blue, HIGH);
  delay(5000);
  digitalWrite(red, HIGH);
  digitalWrite(green, HIGH);
  digitalWrite(blue, LOW);
  delay(5000);
  digitalWrite(red, LOW);
  digitalWrite(green, HIGH);
  digitalWrite(blue, HIGH);
  delay(5000);
  digitalWrite(red, HIGH);
  digitalWrite(green, LOW);
  digitalWrite(blue, HIGH);
  delay(5000);
  digitalWrite(red, HIGH);
  digitalWrite(green, HIGH);
  digitalWrite(blue, HIGH);
  delay(5000);
}Next time when you use functions like analogRead( ), try to appreciate the ADC module of the ATmega328P!
Thanks for reading!


Comments