

I bet that you have ever thought about buying a personal dosimeter to measure the level of radiation at home, while walking or traveling.
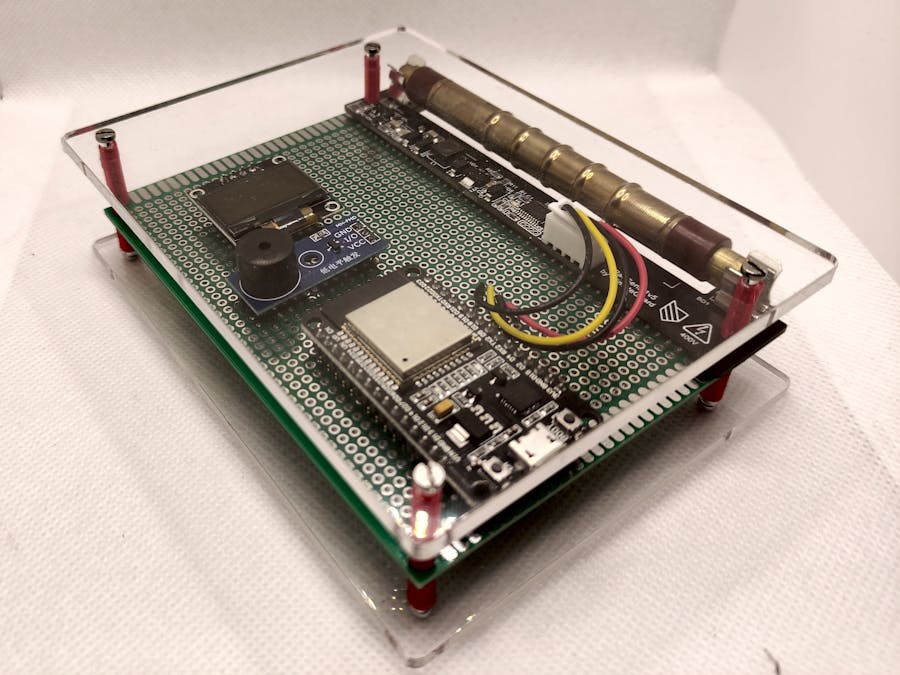
Today we will assemble a simple cheap dosimeter based on the ESP32 WiFi-controller and the RadSens board. RadSens is a ready-made I2C module for a gas-discharge Geiger-Muller counter. A reliable and widespread SBM20-1 tube will be used as a sensor. However, instead of it, any other tube can be connected to the module - J305, M4011, STS-5, etc.
The purpose of the article is to create the most detailed assembly instructions. If the youngest engineers can repeat the described steps, we have achieved the goal.
The most important criteria when choosing a board and components is the cost. Our goal was to make the dosimeter as budget-friendly as possible.
The following components were used:
- Dosimeter module - RadSens (from $50 om Tindie). RadSens is a ready-made module assembled with the popular SBM-20 tube. Requires nothing other than installing the library in the Arduino Library Manager. The dosimeter is ready to work out of the box.
- ESP8266 / ESP32 board (from $10). RadSens module has I2C interface, compatible with Arduino, ESP, Raspberry
- 0.96” OLED display (from $5). You can use any screen with I2C. But the OLED screen allows you to add simple animation and color coding of the current radiation level.
- Boozer (tweeter) module for sound indication of impulses (from $1). Boozer is used for user sound information when there is no access to information on the screen.
- Breadboard 120*80 mm (from $2). The board is used for convenient wiring placement and organization between elements.
Total price - $68.
Required steps:
- Solder the elements to the breadboard in the desired position.
- Connect all the elements according to the proposed scheme.
- Check the connection first visually, then by connecting the ESP to USB.
- Connect the RadSens library and the ESP32 board to the Arduino IDE.
- Add code to IDE and upload it.
Step 1. Connection
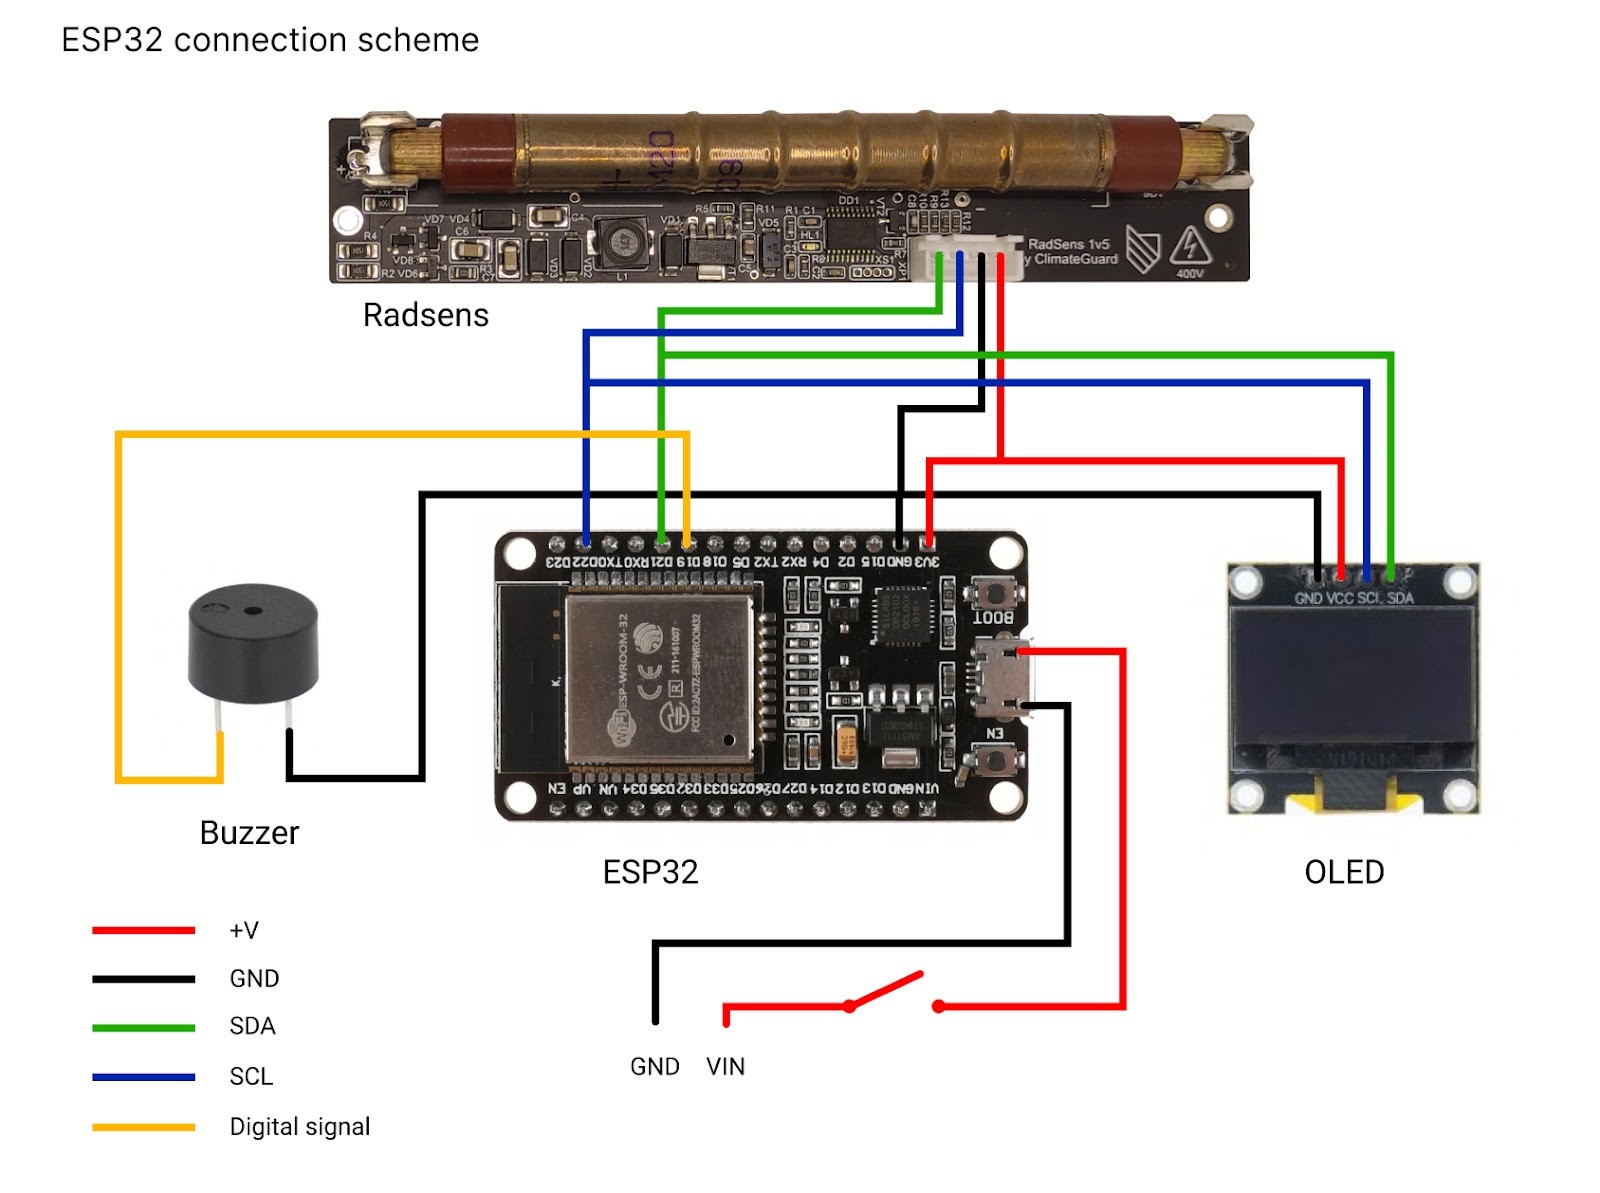
We need to solder all the elements and connect them. The SDA and SCL pins on the RadSens and the OLED screen must be connected to the D22 (SCL) and D21 (SDA) ports, which communicate via the I2C interface. Connect the rest according to the diagram below.
Step 2. RadSens, ESP32, GyverOLED libraries connection
Before installing ESP32 tool you need to open preferences and type “https://dl.espressif.com/dl/package_esp32_index.json" in the Additional Boards Manager URL’s line
Extensions connection in the Arduino IDE for the ESP32 board is as follows:
Arduino -> Tools -> Board -> Board Manager -> type “ESP32” in the search bar.
After the installation, you need to specify “ESP32 Dev module” in the “Board” section.
Next, we need to select the specific board. To do this, go to the “Tools” tab, select the “Board” section, then select “ESP32 Dev Module” in the “ESP32 Arduino” subsection.
Almost done! Let's move on to the library installation.
To install the RadSens library, you need to follow almost the same steps:
Arduino -> Sketch -> Add Library -> Manage Libraries -> Type “RadSens” in the search bar.
Next, you need to install the GyverOLED library in the library manager.
Now we are ready to move on to development.
Step 3. Code
The code was written using the OLED library by Alex Gyver that I think is one of the easiest to use. But it is acceptable to use U8G2, Adafruit or any library convenient for you.
// Connecting the libraries
#include <radSens1v2.h>  // RadSens library
#include <Wire.h>        // I2C library
#include <GyverOLED.h>   // One of the easiest-to-learn OLED libraries by Alex Gyver
#define buz 18   // Initializing the buzzer pin. You may change it if you connected buzzer to another pin

GyverOLED<SSD1306_128x64, OLED_NO_BUFFER> oled;   // Initializing OLED screen
ClimateGuard_RadSens1v2 radSens(RS_DEFAULT_I2C_ADDRESS);   // Initializing RadSens


uint32_t timer_cnt; // Timer for updating count of pulses and intensity
uint32_t timer_imp; // Timer for updating pulses for buzzer
uint32_t timer_oled; // Timer for updating OLED data

float dynval;  // Variable for dynamic intensity value
float statval; // Variable for static intensity value
uint32_t impval;  // Variable for count of impulses
uint32_t pulsesPrev;  // Variable for count of impulses at previous cycle

void setup() {
 pinMode(buz, OUTPUT);  // Initializing buzzer as an output
  ledcSetup(1, 500, 8); // Initializing PWM for buzzer (ONLY FOR ESP DELETE THIS STOKE FOR ARDUINO)
  ledcAttachPin(buz, 1); // Initializing buzzer pin for PWM (ONLY FOR ESP DELETE THIS STOKE FOR ARDUINO)
  oled.init();           // Initializing OLED in code
  oled.flipV(1);         //I has flipped the screen for comfortable use
  oled.flipH(1);         // For normal appearance of text we need horizontal inverting
  oled.clear();
  oled.setScale(2);      // Setting scale of text
  radSens.radSens_init();
  oled.clear();
  radSens.setSensitivity(105);     // Setting sensitivity of Heiger’s tube (in case of not default tube, check technical specifications of your tube to find sensitivity)
  int16_t sensval = radSens.getSensitivity();
  oled.setCursor(10, 2);
  oled.print("Sens:");
  oled.setCursor(42, 4);
  oled.print(sensval);
 delay(4000);
  oled.clear();
  pulsesPrev = radSens.getNumberOfPulses(); //Setting number of pulses to zero
}

void beep(int deltime) {     // Setting time and frequency of buzzer beeps
  ledcWriteTone(1, 500);  // Switching on (freq = 500Hz)
 delay(3);
  ledcWriteTone(1, 0);   // Switching off
 delay(deltime);
}
/*
  void beep(int deltime){
    tone(buz, 500, deltime)
  }                                            same function but for Arduino */

void loop() {

 if (millis() - timer_imp > 250) {  // This function creates crack of buzzer
    timer_imp = millis();
 int pulses = radSens.getNumberOfPulses();
 if (pulses > pulsesPrev) {
 for (int i = 0; i < (pulses - pulsesPrev); i++) {
 beep(30);  // You may change this parameter if you need longer cracks
      }
      pulsesPrev = pulses;
    }
  }

 if (millis() - timer_cnt > 1000) {      // Writing values to global variables
    timer_cnt = millis();
    dynval = radSens.getRadIntensyDyanmic();
    statval = radSens.getRadIntensyStatic();
    impval = radSens.getNumberOfPulses();
  }

 if (millis() - timer_oled > 1000) {  //Writing variables to a strings and display them on the screen
    timer_oled = millis();
 String dynint = "Dyn: ";
    dynint += dynval;
 String statint = "Stat:  ";
    statint += statval;
 String nimp = "Imp: ";
    nimp += impval;
    oled.setCursor(0, 1);
    oled.print(dynint);
    oled.setCursor(0, 3);
    oled.print(statint);
    oled.setCursor(0, 5);
    oled.print(nimp);
  }
}// Connecting the librariesToday we have considered the most budget version of the dosimeter-radiometer. Out of curiosity, we ordered transparent plexiglass plates to make the device more convenient and descriptive. Potassium sulfate was used for testing. The fertilizer is rich in the radioactive isotope potassium-40, which actively emits beta radiation.
The standard level of radiation in a room is 15-20 μR/h. With direct contact of potassium sulfate, we get 32-39 μR/h, two times higher.
As a conclusionIn the next article, we will try to develop a portable and multifunctional dosimeter with the ability to display information (graphs, min, max) on the screen and upload statistics to a mobile application on Blink.
And what features would you like to see in the next version of the DIY dosimeter? Leave your suggestions in the comments!


Comments