
Hardware components | ||||||
| × | 1 | ||||
 |
| × | 1 | |||
 |
| × | 1 | |||
 |
| × | 1 | |||
 |
| × | 1 | |||
Electricity is an essential part in the world. Nowadays electrical machinery is used every day, so the impact of the electricity consumption is an essential too. Here there is a smart device which connect with internet and shows the live energy consumption through a hosted website.
However, it is also necessary to measure the power consumed by the customer, who is responsible for taking readings and generating billing. Here we have come up with an idea to solve the issue smarty. There is an IOT process to check the current usage and take an idea about the energy consumption of any house based electrical device.
The same operation may be accomplished by an IOT-Based Smart Electricity Consumption Meter without the involvement of humans. The Node MCU ESP-32 microcontroller module, which is used in the IOT Based SECM system, controls the system. This is used of the processing of current sensor.
When it comes to day-to-day activities, electricity is essential. Keeping track of one's power use has become a time-consuming effort. Because it is necessary to travel to a meter reading room in order to record readings. By allowing users to monitor energy meter readings through the internet, it is possible to automate the system and avoid issues. In this study case we gathered many information related to IOT and Electricity. The concept of a smart energy consumption meter based on the Internet of Things.
Introduction to IOT
This is a smart system for managing energy consumption of any electronic device. The system begins with an ESP32 with current sensor, which accurately measure the current the number of units from the energy meter of the electrical device, then sends the analyzed data to the web application. The data are cloud based so the data is protected and secured.
The Smart Energy Consumption Meter is an electronic gadget that captures information such as voltage level and power factor while consuming electricity. This is accomplished through conveying information to customers in order to have a better understanding of their behavior. It also keeps an eye on the system. In most cases, a smart meter monitors energy in near real time.
Key Words: PZEM, IOT (Internet of Things), SECM, ESP-32, AC Current Sensor, CVMM.
Problem Scenario
The purpose of the project is to see the energy consumption of any house based electrical device and manage it. As a result, you can see the current usage and manage the electricity consumption by looking at the consumption as the user prefers. The primary obligation of the electricity board is the generation and distribution of energy. However, it is not separately mentioned the current consumption of household devices that we used day to day. Therefore, the Smart Energy Consumption Meter is an excellent device to measure the energy consumption in any household device which is electrical used.
Objectives
A smart meter is an electronic device that records information such as the amount of electricity used, the voltage levels, the current flowing through it, and the power factor. Smart meters provide information to consumers, allowing them to see their use patterns more clearly, as well as to energy suppliers, who use the information for system monitoring and customer invoicing.
Mentioning the functionality of the tool we have designed; we have the ability to measure the electricity consumption of the house based electrical devices. But in order to get the accurate reading, we needed to make a separate calculation and check the current meter reading.
Here our smart energy consumption meter is the best tool to use and check the power consumption accurately. So, you can power up any electrical device and working on it. Form the website you can check the energy consumption as show below.
It is also important to have regular internet access at home. It must also be connected to the Internet. Here the power consumption can be measured after entering the relevant measurements. With this we can measure the daily power consumption and control the power consumption in such a way that it does not exceed the relevant unit. This allows you to use electricity sparingly.
Advantages of the System
- Thus, with a computerized or smart electricity meter we can get the measurements more accurately and more robustly
- It can also be used to limit energy consumption when it is known that the household electricity consumption has exceeded the relevant units, thus saved energy as well as controlled the power consumption.
- We can monitor the electricity system more quickly.
- We also need to ensure the safety of the home so that no outsider is required to measure the power consumption.
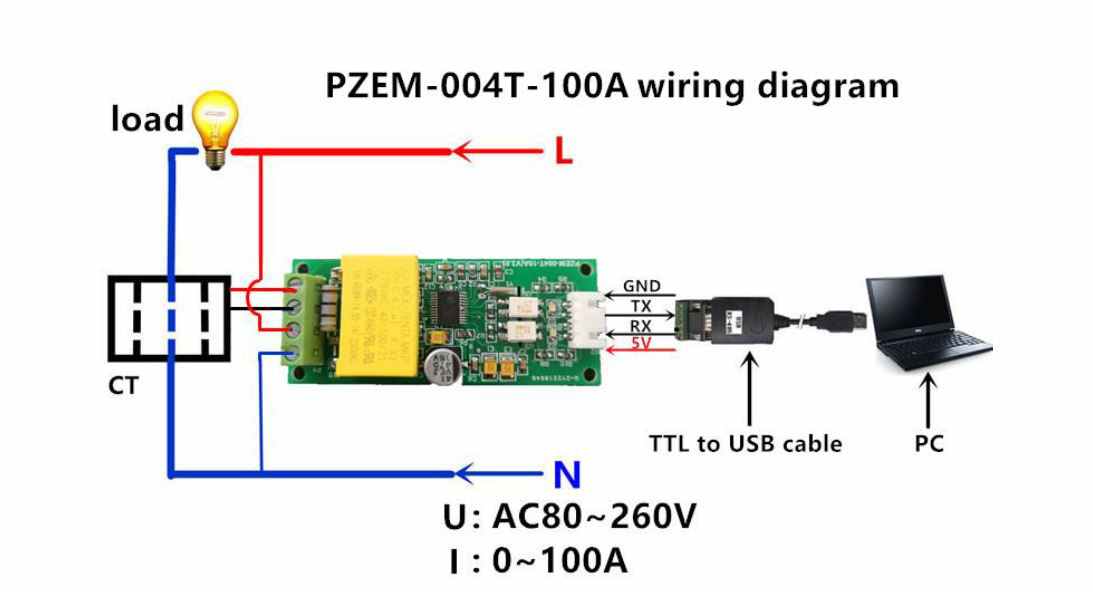
Current Voltage Multimeter Module
This is a test module for electric monitoring that has a split-core current transformer. The module is capable of testing power, energy, voltage, and current, and then displaying the results on a PC or other terminals. With its one-button reset feature, you can easily reset your energy statistics by pushing a single button. Additionally, it can retain data when the power is turned off and the collected energy data prior to powering down, making it very simple to use. It is extensively compatible with electricity distribution boxes, distribution cabinets, voltage regulators, instructional aids, and tiny distribution boxes for residential usage.
Features
- AC 80-260V voltage test range, 80-260V working voltage, maximum current can reach to 100A.
- Electrical parameter measurement function including voltage, current, active power and energy measurement.
- Designed to test high power equipment and you can observe the accumulative process intuitively for the low-power (within 100W) load test.
- Equipped with TTL serial data communication interface, you can read and set the relevant parameters via the serial port.
There are several advantages to such a system. Such a system provides space to assess the quality of power. It is also possible to identity problems such as voltage drops, swelling, and existing transition. Moreover, it has potential to reduce energy efficiency in such problematic situations. It can also lead to higher utility bills and damage to equipment, as well as costly malfunctions.
Specifications
- Working Voltage: 80~260V AC
- Test Voltage: 80~260V AC
- Rated Power: 100A/22000W
- Working Frequency: 45-65Hz
- Measurement Accuracy: ±1.0%
- Board Size: 7.3x3cm/2.87x1.18"
- Current Transformer Size: 3.1x2.9x4.7cm/1.22x1.14x1.85"
- Wire Length: 20cm/7.87"
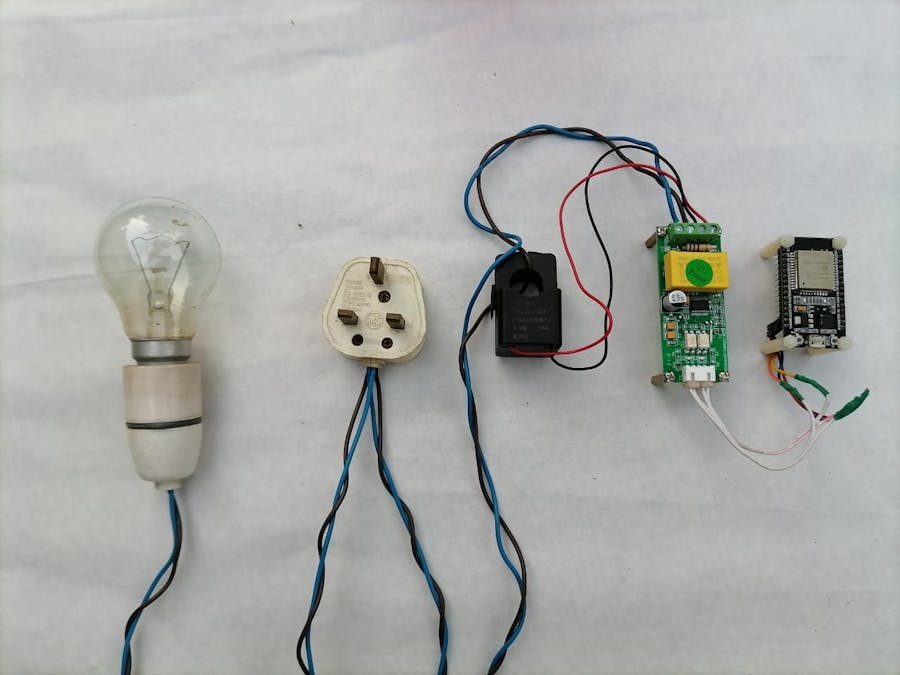
Fully Functioning Working Product
Above is a setup used to show the complete product we have created. As mentioned earlier, this system measures the power consumption of a device. Residents can check this by connecting it to any electrical appliance. Therefore, we have used a bulb to show the functionality of the whole system. The special thing is that the CT sensor is used outside the system. The internal system inside the sun box consists of a current-voltage multimeter and a Node MCU. The system is powered by a neutral. Electricity for the bulb is also received through the load. The entire system must be supplied with an external power supply for this purpose. The expected result can be seen in the output by making everything happen this way.
Smart Energy Meters Have a Lot of Benefits
- Manual meter readings are no longer necessary.
- Increasing the monitoring speed of the electrical system.
- Providing real-time data for balancing electrical loads and reducing power outages.
- Making it possible to make more efficient use of power resources.
- Saving money by not having to build new power plants.
Smart Energy Meters Have Drawbacks
- Making the transition to new technology and procedures.
- Managing the public's reaction to the new meters, as well as consumer acceptance.
- Managing and archiving massive amounts of metering data.
High-Level Architecture Diagram
Above is a high-level architecture diagram of the system we created. According to the note here, the Bulb, CT sensor, Multimeter, Node MCU and Web Server occupy a special place. The procedure for the entire system is as follows.
An external power supply must be provided for the complete system. The CT sensor should be mounted to the device for which you wish to obtain energy consumption. According to the note we have used a bulb. The power supplied by it travels to the CT Sensor.
At the end of all the above operations, the data is then transferred to the web server. But at some point, the web server may crash unexpectedly. If that happens, all data will be lost. Due to that, we intend to store all the data in one database to prevent it. Therefore, even if the web server breaks down, the data is safe because the database contains that data. Then we can get information through the system unit when needed.
Functional Block Diagram
Lines and blocks are used to show the relationships between the main parts of a system or the function blocks that make up it. These blocks are connected to each other by lines. Such a diagram is called a Block Diagram. This type of diagram is often used in hardware design, electronic design, and software design. Above is a block diagram related to the system we have created.
Here it seems to be on one side as CT, N and L. Its CT is the CT Sensor. N is the Neutral wire. Also, L is the wire for the load side. These are connected to the multimeter. The multimeter then supplies an AC current supply to the measurement system.
Networking
The network diagram for the entire system is shown above. This mainly consists of several parts. This network diagram is designed so that the CT sensor travels to the Node MCU and serves to the host server with the help of a Wi-Fi router.
The procedure here can be described as follows. The calculated data is received by the CT sensor with the help of a multimeter. The two red and black wires in the CT sensor are then connected to the Node MCU port. The Wi-Fi router will then power up after an external power supply. Once the Wi-Fi is set up with the help of Node MCU, the data is sent to the hosted server via the CT sensor.
A hosted server is a website that was previously hosted. The data so entered is stored in the database via a PHP Script. The reason for using a PHP Script is to have a PHP Login for the system. This data is also received through the client's pc via a PHP Script. It allows the client to view data as well as compute it.
Screenshots of the WEB Application
Web Application is developed using HTML\CSS & PHP computer languages. It is hosted in a free domain the link is below you can visit the site;
Website:http://www.vishwasdiaries.c1.biz/EnergyMeter/
Sign-in Page
The main reason why this system in not so complicated is that it is implemented by a web application. All you need is your fingertips. Because is a web application, it can be accessed from any source. It does not matter if it is a mobile phone, laptop, or android system. To make it easier and more understandable for the user, only a few interfaces have been incorporated into the web application so that the full description can be understood in an instant without having to create a large interface.
The above is the login page that can be accessed by any user for the system according to the created interface. Anyone can enter the entire system by entering their username and password.
Dashboard Page
By entering the username and password. The user logged in to the system and then redirected to the dashboard. The dashboard is divided into four main categories. These are voltage usage, current draw usage, power draw usage and frequency usage. This grouping allows the user to see very clearly how much electricity is consumed per month.
That is why this system is so special. It is clearer and more accurate. Further, the energy consumption for that month is displayed in a separate column. Added a logout icon to the dashboard page to allow the user to log out of the system more securely after the task.
Future Implementation
This is important as a system to control the power consumption of energy consuming devices such as heating and fan coolers and to monitor that consumption as well. Thus, it can be used in industrial processes such as refrigeration equipment. Energy management can significantly reduce costs. It makes things easier in today’s world.
It is more advantageous to the present world. Such a system makes it easier to monitor over time. Such a device makes it easy to calculate household electricity consumption as well as monitor household electricity consumption such as large apartment complexes. It can calculate power units at any time and measure the average number of units of monthly electricity consumption. Usually, an agent comes to the house to read the monthly electricity bill to measure the number of units of monthly electricity consumption. There they pay according to the bill they pay. But with this system we can calculate the number of units of electricity used in our monthly bill. This allows us to control unwanted power consumption.
This method is also more suitable for home security. Also, when a reader comes home and pays the monthly electricity bill, a large amount of paper is wasted. Improving this system can also be used as a solution to the current paper shortage. By developing such a system, it is not necessary to store unwanted paper in the house.
Also, when an agent comes home to read the monthly bill, they have to pay a large salary. But with this system we have created, there is a great solution for that. The system is fully digitized so that it can be easily read by anyone. Residents can read and view the meter box whenever they want. It also indicates the number of days spent. The government has to spend a lot of money for this whole process. Such a system can save the government a lot of money. It can be used for another purpose.
The same thing happens with time management. In this way it can be explained that the use of such a smart meter box is more advantageous than the other method.
pzem-004t-100a-wiring-diagram_LhS1ncKEP3.jpg
Due to the difference between different monitors, the picture may not reflect the actual color of the item. Thank you!
No Retail Package
Package include:
1 x Multimeter Module (USB adapter is not included)
1 x Split-Core Current Transformer
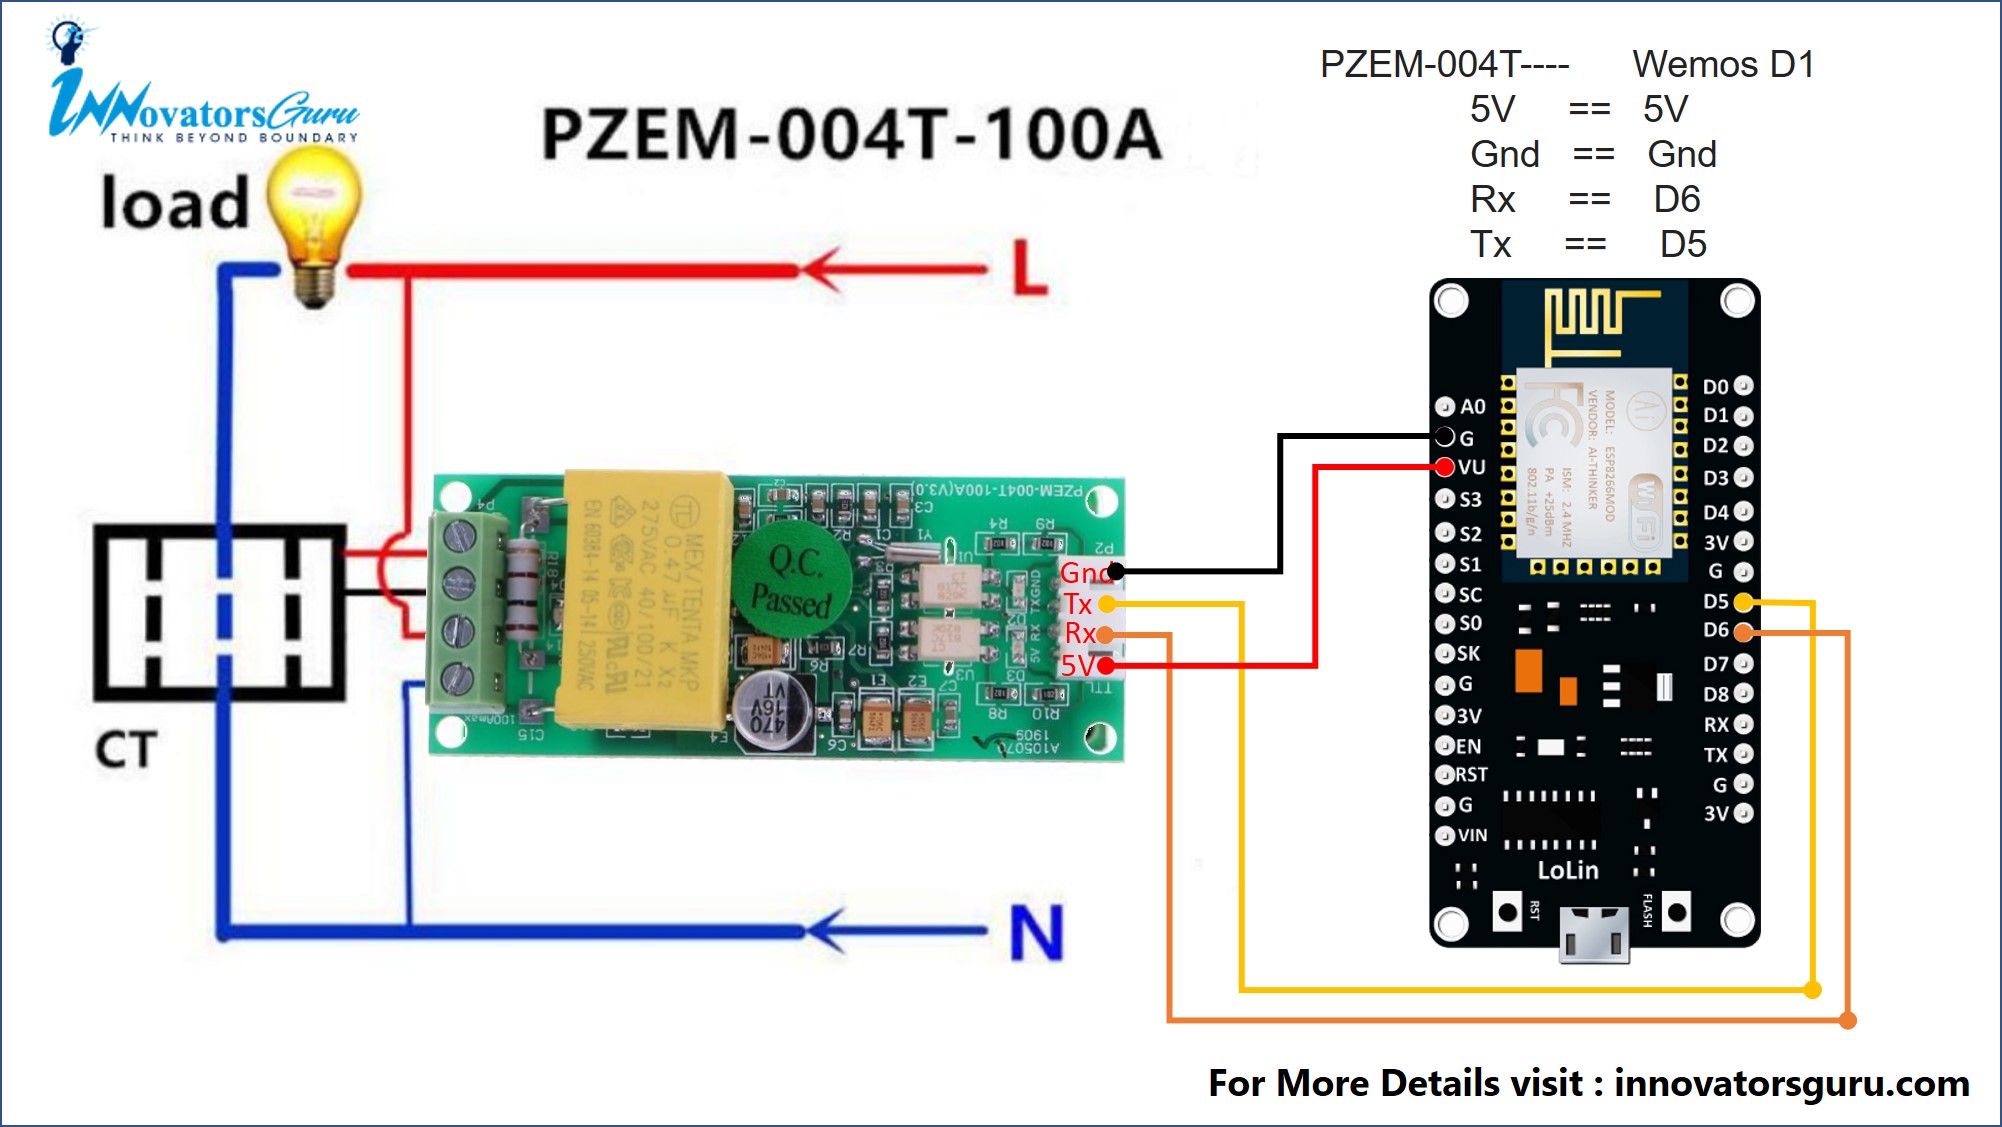
Wiring Diagram with NodeMCU
PZEM-004T V3 and ESP-32 Node MCU are communication works on different voltage level theoretically but in practical life 3.3V Node MCU pins have tolerance of 5V. VU pin is USB 5V pin (only works when Node MCU powered through USB)
Although, Node MCU has 11 pins. Of these, two pins are separated by Rx and Tx, leaving nine more. They are called I/O pins. They are named from D0 to D8. As mentioned above, the multimeter is only connected to a few pins on the Node MCU. They are Gnd, D6, D5 and 5V. The Gnd pin on the CT Sensor connected to the Node MCU itself. Also, the pin Tx is connected to the pin D5 of the Node MCU. The pin Rx in CT Sensor is connected to the pin D6. The 5V voltage supplied by the CT Sensor is connected to the 5V of the Node MCU itself.


Comments