


Hardware components | ||||||
 |
| × | 1 | |||
Software apps and online services | ||||||
 |
| |||||
_4YUDWziWQ8.png?auto=compress%2Cformat&w=48&h=48&fit=fill&bg=ffffff) |
| |||||
| ||||||
Hand tools and fabrication machines | ||||||
| ||||||
Overview
I'm passionate about 3D printing and primarily use FreeCAD to design products.However, I sometimes develop tenosynovitis in my right hand.To address this, I've decided to create a left hand device.The best treatment is to reduce the strain on the right hand.
I attached the short video of left hand device.
Frequently used functions in FreeCAD
FreeCAD provides various navigation styles, and I use the CAD Navigation Style. I frequently ise the following functions, but they've been causing strain on my right hand.
- Zoom IN OUT : Scroll Wheel
- Move:Keep Press Mouse Wheel Button and mouse movement
- Rotation: Keep Press Mouse Wheel Button, Right-Click and mouse movement
The left-hand device has five main functions.
- Left-Click
- Right-Click
- Scroll Wheel Button
- Scroll Wheel
- Up/Slow Down scrolling
For this project, I decided to use the M5 AtomS3 asn the controller for the left-hand device. The M5 AtomS3 has a Type-C USB port, small5963 small screen, and a powerful ESP32 IC. It's the best choice.
And to avoid damaging my hand, I adopted a mechanical key and a rotary encoder, placing them carefully for ergonomic use.
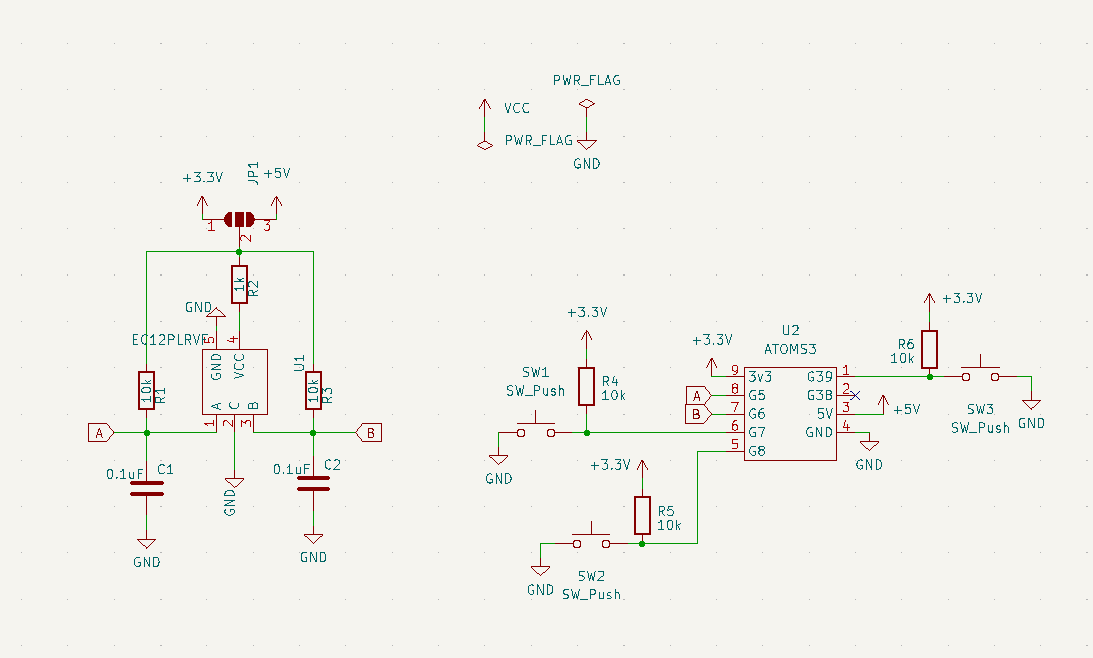
Schematic
The circuit I designed in KiCad for the M5 AtomS3 controller looks like this. The rotary encoder(U1 https://akizukidenshi.com/catalog/g/g105767/) is connected to G5 and G6 on the M5 AtomS3, while the key switch(SW1~SW3) is wired to G7, G8, anf G39 with pull-up resistors.
The layout turned out as shown in the screenshot bellow. I designed the size with my hand in mind, and since I have small hands, the board is slightly compact. I included M3 screw holes to secure it to case, though I ended up not using them...
PCB assembly
I used JLCPCB's service for the PCB fabrication. Lately, it's been so easy to access these PCB manufacturing services even in Japan, which is a real blessing for individual makers.
The black PCB looks pretty cool, too!
I'm going to implement the mechanical key.
Next, I'll implement the rotary encoder.
Next, I'll implement the pin headers for connecting the M5 AtomS3
Finally, I'll connect the M5 AtomS3 to complete the assembly. One issue is that the M5 AtomS3 is slightly wobbly, but I'll address this when designing the case.
Case design
The bare PCB is hard to use and the M5 AtomS3 wobbles, so I'm designing a case to improve usability and stability.
I imported the KiCad PCB layout and CAD data for components like the M5 AtomS3 and rotary encoder into FreeCAD. Accurate component data is key for case design, as it minimizes dimensional errors and imporves ergonomics.
From a top view, the case has this shape. I designed it to securely hold the M5 Atom S3, which has reduced the wobbling.
The back view looks like this, with the four corners fastened using M3.
3D printing
With the CAD case design for the left hand device finished in FreeCAD, I exported a STEP file, sliced it in Bambu Studio, and began 3D printing.
To prevent my hands from getting sweaty, I'll ensure breathability by exposing the infill. In Bambu Studio, I set the Top Shell Layers and Bottom Shell Layers to zero and chose a honeycomb infile pattern.
I printed it using the Bambu Lab X1C.
Printing is complete!
case assembly
The case is complete, so I'll start assembling it.
First, I'll place the PCB on the bottom plate.
Next, I'll place the top plate over it.
I'll flip it over and secure the top plate and bottom plate with M3 screws.
I'll add spacers to prevent the M5 AtomS3 from wobbling.
Finally, I'll connect the M5 AtomS3 to the PCB and attac the caps to the button and rotary encoder.
Code
I included below libraries. Currently, I'm assigning mouse functions to the M5 AtomS3 for FreeCAD's CAD Navigating style, but I added USBHIDKeyboard.h to support keyboard key assignments later.
#include <Wire.h>
#include <M5AtomS3.h>
#include "USB.h"
#include "USBHIDKeyboard.h"
#include "USBHIDMouse.h"
The code below processes the rotary encoder's signals on G5 and G6 of the AtomS3, mapping them to mouse scrolling.
void rotary(int scroll_value) {
    if(digitalRead(rotary_A)== HIGH) {
    val_a = 1;
  }else {
    val_a = 0;
  }

  if (digitalRead(rotary_B) == HIGH) {
    val_b = 1;
  }else {
    val_b = 0;
  }

  new_val = val_a *2 + val_b;

  if(((new_val<<2)+old_val) == ((0b11 <<2) + 0b01)) {
    dif++;
    Mouse.move(0, 0, scroll_value);
  }
  if(((new_val<<2)+old_val) == ((0b01 <<2) + 0b11)) {
    dif--;
    Mouse.move(0, 0, scroll_value*-1);
  }
  old_val = new_val;
}
The operation of the key switch is specified below. It's set to a press action rather than a mouse click.
if(val_key0 == 0) {

    Serial.println("The Key0 is down ");
    AtomS3.Lcd.drawString("Key0", 0,0, 2);
    //Keyboard.print("0");
    Mouse.press(MOUSE_RIGHT);
    delay(100);

    AtomS3.Lcd.drawString("The Key0 is down", 0,0, 2);
  } else {
    Mouse.release(MOUSE_RIGHT);
  }


_Ujn5WoVOOu.png?auto=compress%2Cformat&w=40&h=40&fit=fillmax&bg=fff&dpr=2)
Comments