

Hardware components | ||||||
 |
| × | 1 | |||
 |
| × | 1 | |||
 |
| × | 1 | |||
 |
| × | 1 | |||
 |
| × | 1 | |||
 |
| × | 1 | |||
 |
| × | 1 | |||
 |
| × | 1 | |||
 |
| × | 1 | |||
 |
| × | 1 | |||
| × | 1 | ||||
| × | 1 | ||||
I wanted to build something practical that I would actually use. I have a bad habit of forgetting to water my plants, and I thought an automatic watering system would be the perfect project. Most DIY watering systems I found online just check if the soil is dry and turn on the pump, simple threshold control with no awareness of what kind of plant it is or what the environment is like.
I wanted to go further. Different plants need water at completely different intervals. A cactus and a tropical plant should not be treated the same way. I also wanted the system to respond to how dry the soil actually is, not just whether it crossed a threshold, but how far past it, so it can water more urgently when a plant is really struggling.
Beyond the electronics I also designed a custom 3D printed enclosure that brings the whole system together into one self contained unit. The structure integrates a plant pot on top, a water reservoir built into the body, an enclosed compartment for the breadboard and PocketBeagle, and a sealed lid to protect the electronics. Underneath there is a dedicated drainage area so excess water does not pool around the electronics. Everything fits together as a single object so there are no loose wires or separate boxes sitting around.
The result is a system that knows what plant it is caring for, reads soil moisture every 2 seconds, monitors temperature and humidity for environmental alerts, tracks the reservoir level, and displays everything on a small LCD screen with a countdown to the next scheduled watering. It boots automatically on power-up and runs with no user interaction.
The system reads soil moisture from an Adafruit Stemma capacitive sensor, temperature and humidity from a BME280 sensor, and reservoir water level from an analog water sensor. It selects watering parameters based on plant type with profiles for succulent, flower, vegetable, tropical, and cactus. It automatically runs the pump when soil moisture drops below the plant threshold and uses a dynamic cooldown so that if the soil is critically dry it waters every 15 minutes instead of waiting the full interval. Moisture percentage, reservoir level, and next watering countdown are shown on a 16x2 LCD, and alerts appear on the display for out of range temperature, humidity, overwatering, and low reservo
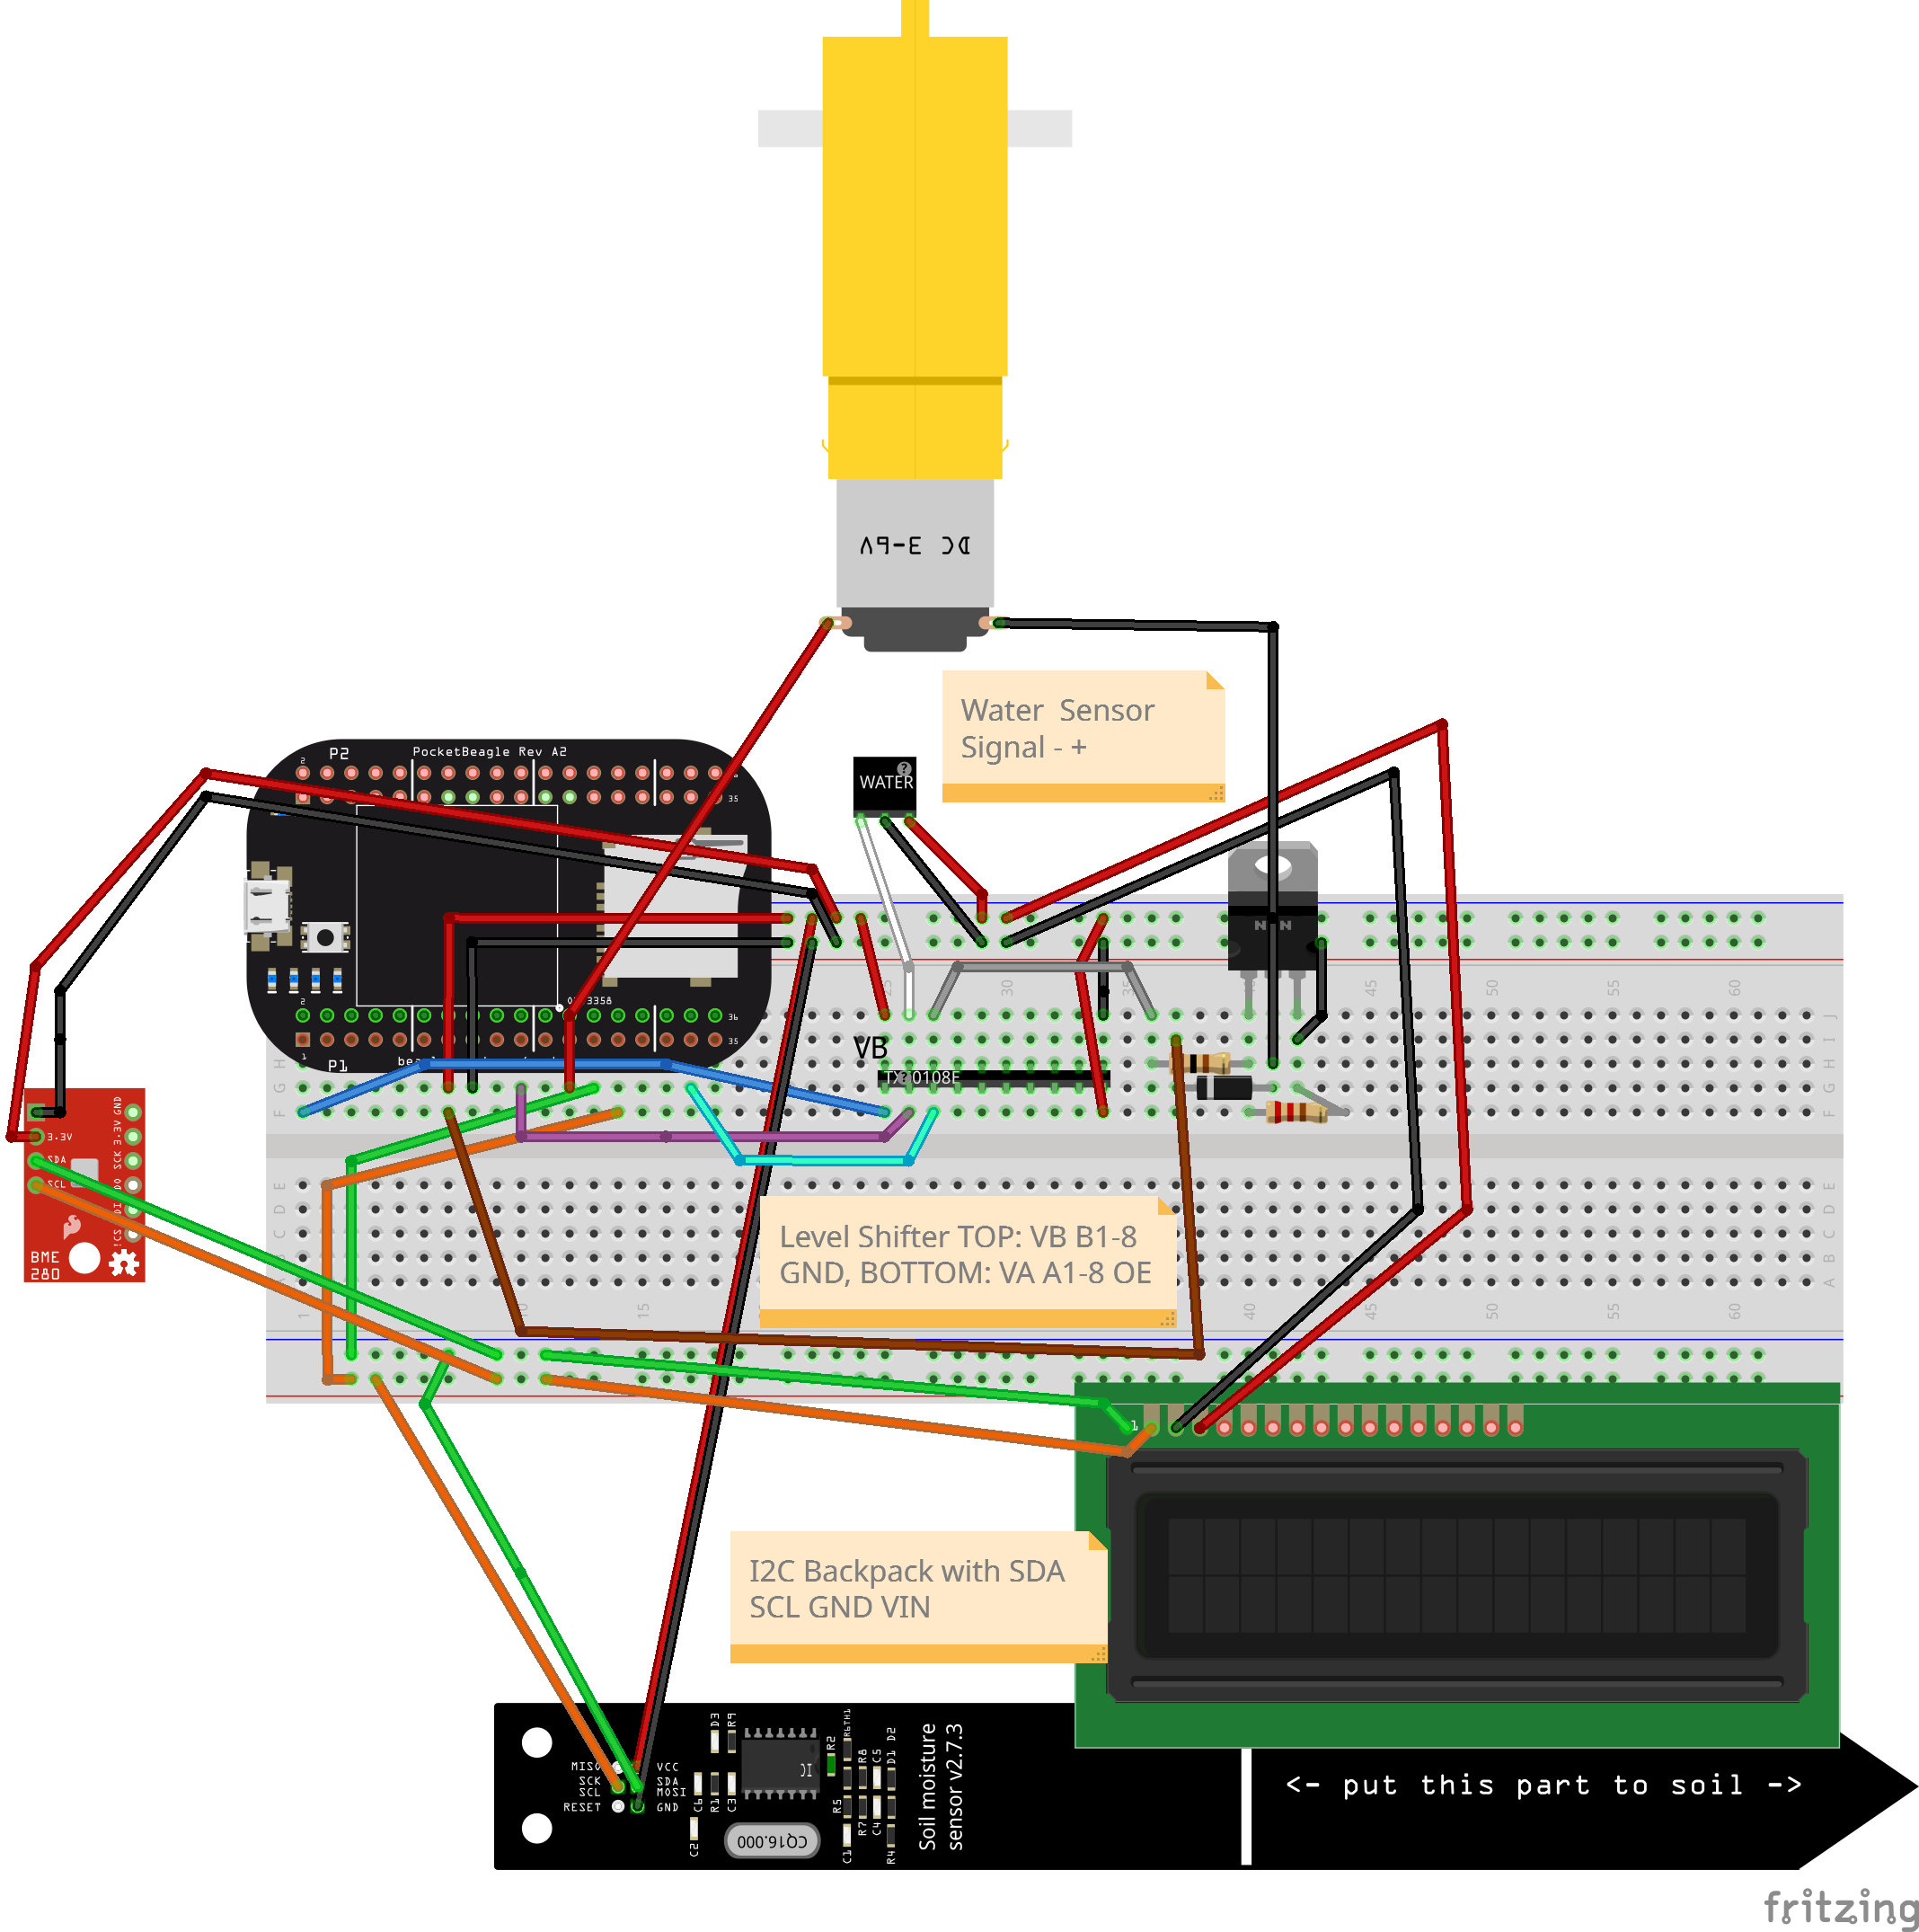
BUILD INSTRUCTIONSStep 1. Wire the level shifter. The PocketBeagle analog pins are 1.8V max but the water sensor outputs 3.3V. The TXS0108E level shifter translates between them and also boosts the 3.3V GPIO signal to 5V for the MOSFET gate. Connect VA to P1.18, VB to P1.14, GND to P1.16, OE to P1.14, A1 to P1.02, B1 to the water sensor signal pin, A2 to P1.34, and B2 through a 100 ohm resistor to the MOSFET gate.
Step 2. Wire the MOSFET and pump. The MTP3055VL TO-220 package has three pins left to right with the flat side facing you: Gate, Drain, Source. Connect the gate to the 100 ohm resistor from TXS0108E B2. Connect the source to GND at P1.16. Connect the drain to the pump negative wire. Add a 10k ohm resistor between gate and source. Add a 1N4007 diode across the pump terminals with cathode to pump positive and anode to pump negative. Connect pump positive to P1.24.
Step 3. Wire the I2C sensors. All three I2C devices share P1.26 for SDA and P1.28 for SCL. For the Stemma soil sensor the JST cable colors are brown for SCL to P1.28, red for SDA to P1.26, orange for VIN to P1.14, and yellow for GND to P1.16. For the BME280 connect VCC to P1.14, GND to P1.16, SDA to P1.26, and SCL to P1.28, leaving CSB and SDO unconnected. For the LCD connect VCC to P1.14, GND to P1.16, SDA to P1.26, and SCL to P1.28.
Step 4. Wire the water sensor. Connect VCC to P1.14, GND to P1.16, and Signal to TXS0108E B1.
Step 5. Verify wiring. SSH into the PocketBeagle and run: sudo i2cdetect -y -r 2. You should see three addresses: 0x27 for the LCD, 0x36 for the soil sensor, and 0x76 for the BME280. If any are missing check that SDA and SCL are not swapped for that device.
Step 6. Install software. The PocketBeagle has no internet access by default so download packages on your computer first. On your computer run: pip download smbus2 RPLCD -d./packages, then scp -r./packages debian@192.168.7.2:/home/debian/. On the PocketBeagle run: sudo python3.11 -m pip install --no-index --find-links=/home/debian/packages smbus2 RPLCD. Then build Adafruit BBIO from source: cd /opt/source/adafruit-beaglebone-io-python and sudo python3.11 setup.py install.
Step 7. Copy and run the code. Run: scp irrigation.py debian@192.168.7.2:/var/lib/cloud9/python/ then ssh debian@192.168.7.2 then cd /var/lib/cloud9/python then sudo python3.11 irrigation.py.
Step 8. Set up autoboot. Run sudo nano /etc/systemd/system/irrigation.service and paste in the service file from the GitHub README. Then run sudo systemctl daemon-reload, sudo systemctl enable irrigation.service, and sudo systemctl start irrigation.service.
OPERATION INSTRUCTIONSOpen irrigation.py and set ACTIVE_PLANT to your plant type. Options are succulent, flower, vegetable, tropical, or cactus. The LCD line 1 shows moisture percentage and plant name. Line 2 shows reservoir level and countdown to next watering. If an alert is active it takes over the display. To manually test the pump, type RUN in the terminal while the script is running and press Enter, and the pump will run for 1 second. To calibrate the water sensor note the reservoir percentage shown at full and empty and update WATER_RAW_FULL and WATER_RAW_EMPTY in irrigation.py. To calibrate the soil sensor note the Raw value printed in the terminal in dry and wet soil and update moisture_min and moisture_max in the plant profile inside the PLANTS dictionary. For the full code and software build instructions visit the GitHub link


_3u05Tpwasz.png?auto=compress%2Cformat&w=40&h=40&fit=fillmax&bg=fff&dpr=2)
Comments