

Hardware components | ||||||
| × | 1 | ||||
Software apps and online services | ||||||
| ||||||
 |
| |||||
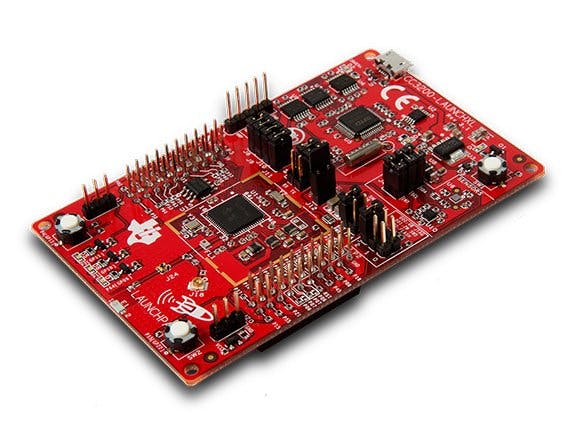
In this project, we wanted to connect a bare metal device to WolkAbout IoT Platform and check its performance. A bare metal device is a computer system without the operating system which means that all of the instructions are executed directly on the hardware. Looking for a small, cheap, easily accessible device we made our choice and gave TI CC3200 LaunchPad a try.
DetailsThe SimpleLink™ Wi-Fi® CC3200 LaunchPad™ is an evaluation development platform for the CC3200 Launchpad wireless microcontroller. Also, it has a temperature sensor and an accelerometer built-in on the board. Furthermore, it comes with its own SDK and can be easily programmed over the USB from the Code Composer Studio or by directly flashing a binary image via the UniFlash application. These are the main reasons why we have chosen that development board.
WolkAbout IoT Platform is the “heart and brain” of an IoT solution which allows customers to easily connect, manage, monitor and control disparate devices, transform real-time readings into meaningful data and combine different devices and services into a complete IoT solution. It includes all of the functionalities needed to navigate data-to-application integration without requiring years of IoT expertise and is capable of handling any scale of IoT implementation, from IoT Prototyping to Industrial Automation, making it the right platform to start the digital transformation with.
To connect this device to Wolkabout IoT Platform, we used WolkAbout library called WolkConnector-C library.
The main goal was to connect TI CC3200 Launchpad to the WolkAbout IoT Platform, send temperature sensor readings and provide functions for actuation on user’s request from the platform. Also, we wanted to enable user to easily see the result of his actuation from the Platform, so we used one LED from the development board and allowed the user to turn it ON or OFF from the Platform.
Additionally, WolkAbout IoT Platform supports great functionality - firmware update. We made a decision to make our application similar to TI's OTA Update example from the SDK. So, we took their simple application bootloader - it safely allows us to always have flashed factory binary image and switch between user's images which were downloaded from the platform. Also, if something in the application goes wrong we would have the opportunity to rollback to the factory image. We had to code firmware update handlers that store downloaded firmware image chunks in SFlash memory, read from it, validate it etc., just as if it is written in WolkConnect-C API. Also, we changed our simple application a bit, so that it is still connected to WolkAbout IoT Platform and sends temperature sensors reading, but now, if the LED is turned on by user actuation, it starts blinking every second. That's an easy way to provide user verification of a successful firmware update.
The last thing was to implement a configuration file parser, so that device key, password, WiFi access point name and password can be easily changed without recompiling the whole project. All that you need to do, is to write new configuration file to the development board's SFlash memory by using the UniFlash. The guide can be found in "Trying the example without rebuilding the project" section of project readme file.
During this process, we tested all functionalities of the WolkConnector-C library as well as WolkAbout IoT Platform and their main advantage was that they allowed us to do multiple things at the same time, such as sending sensor readings from the development board to the Platform or sending an actuation from the Platform to the development board while downloading firmware update file.
It isn't rocket science to connect any bare metal device to the WolkAbout IoT Platform. You simply need to follow its WolkConnector API and code your own handlers for a specific device.
Example how to connect SimpleLink™ Wi-Fi® CC3200 L
Build instructionsStep 1
If you don't have an account on WolkAbout IoT Platform, visit https://demo.wolkabout.com/#/registration and create one.
After you log in to your account, select 'Device Management' from application menu. Change to the 'Device Type Management' tab, and click the + button to add a device type, choosing the import option and import 'cc3200-deviceType.json' file from the project's attachments.
You can now create device from the imported device type. Click on ' + Create device' to do so.
Enter a device name, tick the check boxes for 'Firmware update enabled', 'Supports direct file download' and 'Create Default Semantic'. Set the connectivity type to MQTT and click 'Save'.
New screen will pop up displaying device key and password which you need to connect your device to the Platform, so don't forget to save this information (there are options to download it or send it via email).
That's it! You have now created your device on WolkAbout IoT Platform.
In case you need it, you can find WolkAbout™ IoT Tool Web Application User Manual here.
Step 2
Make sure that jumpers on the TI CC3200 LaunchPad board are mounted as follows:
* J2 in short
  * J3 in short
  * SOP 2 in short
Connect micro USB to the TI CC3200 Launchpad board and to the PC
Open the UniFlash tool, and make a new configuration by choosing Connection: CC3x Serial UART interface, under the "Board or Device" TI CC3200 should be discovered. If it's not discovered, install the FTDI driver which is located in {SDK_ROOT}/tools/ftdi folder.
Next step is to flash to binary images into the devices SFlash memory from the UniFlash. Add new files:
- /sys/mcuimg.bin URL:{SDK_ROOT}/example/application_bootloader/ccs/Release
- /sys/mcuimg1.bin URL:{PROJECT_ROOT}/WolkConnect-C-SimpleLink-Wi-Fi-CC3200-LaunchPad/WolkConnect-C-SimpleLink-Wi-Fi-CC3200-LaunchPad-Factory.bin
- /sys/config.txt URL:{PROJECT_ROOT}/WolkConnect-C-SimpleLink-Wi-Fi-CC3200-LaunchPad/config.txt
If you make changes in this project you will find your new.bin file located here {PROJECT_ROOT}/WolkConnect-C-SimpleLink-Wi-Fi-CC3200-LaunchPad/Release/WolkConnect-C-SimpleLink-Wi-Fi-CC3200-LaunchPad.bin
/sys/config.txt description
The file should look like this:
wifi_network_name=default_value
wifi_network_security_type=default_value
wifi_network_password=default_value
device_key=default_value
device_password=default_value
Change default values with your own. WiFI parameters with your own. For wifi_network_security_type insert one of follow WEP, WPA, WPA2 or OPEN. The device_key and device_password you will get when you create your device on WolkAbout IoT Platform.
Step 3
Remove the SOP 2 jumper from the TI CC3200 LaunchPad board and the device should connect to the platform and send sensor's readings every 30 seconds. You should also be able to turn on and off LED from the platform by switching the actuator state.
Building the example
Open the project properties:Resource
- Linked Resources And change the CC3200_SDK_ROOT to your {SDK_ROOT} - folder where you installed SDK Also, change the ORIGINAL_PROJECT_ROOT to the folder where you downloaded project
Inside project go to the:WolkConnect-Cexamples
- main.c - Exclude from Build
- Open the Code Composer Studio and import the project.
- Now you should be able to build the project
- For trying the example follow the steps from above for Trying example without rebuilding the project
Performing firmware update
The device should reboot itself and load a new firmware image!
Note: The process of downloading and installing can be tracked with serial monitor as described below
- Details can be found in https://wolkabout.com/developers/introduction/
- Upload the file WolkConnect-C-SimpleLink-Wi-Fi-CC3200-LaunchPad/WolkConnect-C-SimpleLink-Wi-Fi-CC3200-LaunchPad-Factory.bin or any other.bin that you previously built for CC3200 LaunchPad
Debugging the example
Debugging from the Code Composer:
- Add taget configuration as described in Getting started guide
- Put SOP 2 jumper in short
- Connect PC and the TI CC3200 Launchpad board
Debugging just with the serial console
- Install some serial monitor or open the serial monitor in CCS
- Set the baud rate to 115200
- You should be able to see all messages from the board which indicate what's happening
Note: This can be done either with SOP 2 mounted or dismounted


Comments