


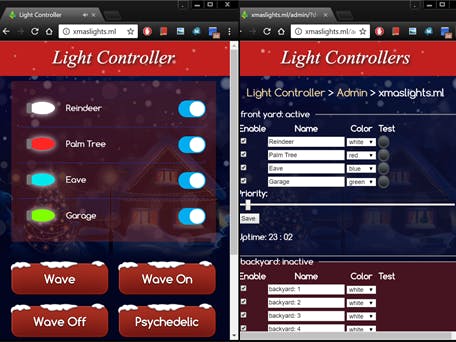
The Holiday Light Controller is a fun project that lets you provide public access to your outdoor lights during the holiday season. Perfect for homeowners, parties, café, restaurants, and church displays to allow admiring visitors a selection of lighting transitions such as Wave, Psychedelic, Sequence On/Off, and Overlapping commands via a mobile phone.
The server solution requires that you use at least one domain name. You can sign up for free domain names using, for example, freenom. A suggestion is to select a name such as your last name or your street address. You could then create a sign and display this sign on your front yard. The sign could for example say:
Control My Lights!
Use your Smartphone and navigate to:
http://mydomainname
The device firmware is designed for NodeMCU ESP8266, and in particular for the ESP8266 WiFi Four Relay board. You can use any Arduino ESP8266 board, but that will require modifications for the GPIO settings in the firmware source code. The benefit in using the ESP8266 WiFi Four Relay board is that it comes ready to use with four relays and a power supply. Other ESP8266 boards may require that you also assemble your own I/O hardware and relay banks.
The ESP8266 WiFi Four Relay board, which supports both U.S. and European voltage, is connected directly to your household electric power (mains). The actual lights must be wired to the ESP8266 WiFi Four Relay board as shown in the following figure:
I have just discovered two boards that can be used as an alternative to the ESP8266 Wi-Fi Four Relay board. The first board comes with four relays and the second board uses triacs as an alternative to using relays. These two boards are a bit difficult to flash with custom firmware since a USB to TTL converter is needed. See the datasheet for details (scroll down to "Uploading custom firmware to the device"). See the eBay store for more information on the two boards. Note that the GPIO pins are different thus the #defines in the sketch file for the four relays must be changed to the following:
#define RELAY_1 12
#define RELAY_2 13
#define RELAY_3 14
#define RELAY_4 15
Download the Light Controller Device Software, unpack the ZIP file and open the Sketch in the Arduino IDE. Compile the code and upload the code to the ESP8266 board.
Note that one ESP8266 is referred to as a light bank, and the ESP8266 WiFi Four Relay board provides a bank of four lights. You can connect any number of light banks to the online server. The server will then merge the light banks into one coherent user interface, enabling you to control any number of lights.
Installing the Light Controller Server SolutionSetting up your own Virtual Private Server (VPS) may sound complicated and expensive, but the reality is that setting up a VPS is very easy and the cost can be minimal. It is possible to find VPS services as low as $8 a year. My favorite site for shopping for a budget VPS is lowendbox.com and one of my favorite VPS providers is securedragon, where you can get a three month lease for less than $6 and a yearly lease for $12.
A budget VPS will be running Linux. If you have never used Linux, you may think that this is not for you; however, nothing can be further from the truth. An online VPS is the best starting point for anyone new to learning command line Linux because no matter what you do with the VPS, an easy to use web based VPS control interface will let you restore the VPS to its original configuration by a button click. For this reason, playing around with an online VPS is a great way to learn command line Linux. If you get your Linux VPS into a state where you are unable to recover it, login to the VPS web control panel and click the re-install button. A fresh Linux VPS will then be available in one to two minutes, and you can start over.
An online VPS enables you to remotely login by using SSH (Secure Shell). If your own computer is running Windows, download the SSH client Putty, and start the executable from any directory. Mac and Windows computers typically include a command line SSH client, thus you can simply type ssh in a command line on Linux and Mac.
When you sign up for a VPS service, such as the budget securedragon VPS, you will receive an email with instructions for how to remotely log into your VPS by using SSH. The instructions include the IP address of your new VPS and the root (admin) password. The following figure shows how to enter the IP address in Putty and how to login as user root in the command line window.
To install the complete Light Controller Server Software, copy all of the following and paste the commands into the SSH console window.
source <(wget -q -O- makoserver.net/apps/LightController/installX86.sh)
The above script will ask you to enter a name for an administrator and the password. When the server is installed, the administrator credentials will enable you to log into the web based administrator user interface. Use your browser and navigate to the IP address of the online server as soon as the installation script completes.
Light Controller ManualThe Manual, which explains how to use the online web interface and how to initially configure the ESP8266 using a browser, can be downloaded as a PDF. The manual is also integrated into the online web interface and can be accessed after installing the Light Controller server solution.

Comments