

Hardware components | ||||||
 |
| × | 1 | |||
| × | 1 | ||||
| × | 1 | ||||
| × | 1 | ||||
| × | 1 | ||||
Software apps and online services | ||||||
 |
| |||||
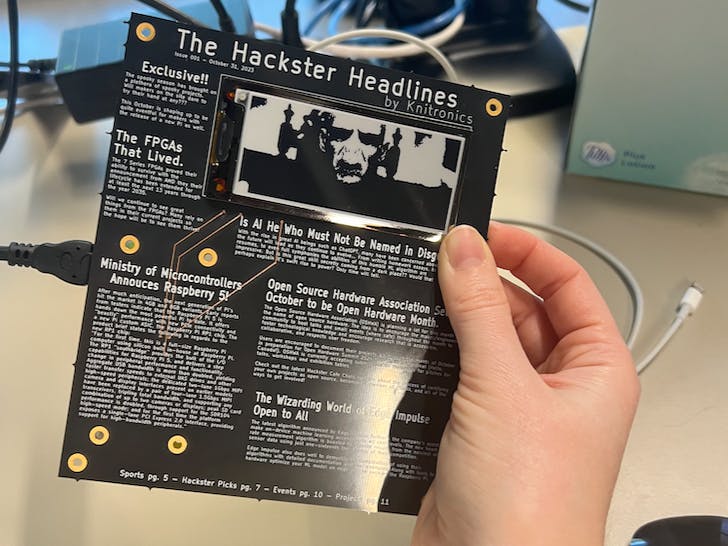
One day I was mindless scrolling social media when I saw an interesting project here on Hackster for the Joey Castillo's reboot of the Open Book Project. And something about the white substrate with black text on the silkscreen of his PCB to describe functions of the board sparked an idea:
I had recently been watching Harry Potter and the white white substrate with black text immediately made me think of a newspaper. And then I thought about how the eInk display could rotate a series of images to appear like they are moving similar to the magical newspapers at Hogwarts.
So off I went to go shopping on Adafruit's website I went to see what eInk display options there were and what components I needed to drive it to put on my own custom Harry Potter Newspaper PCB!
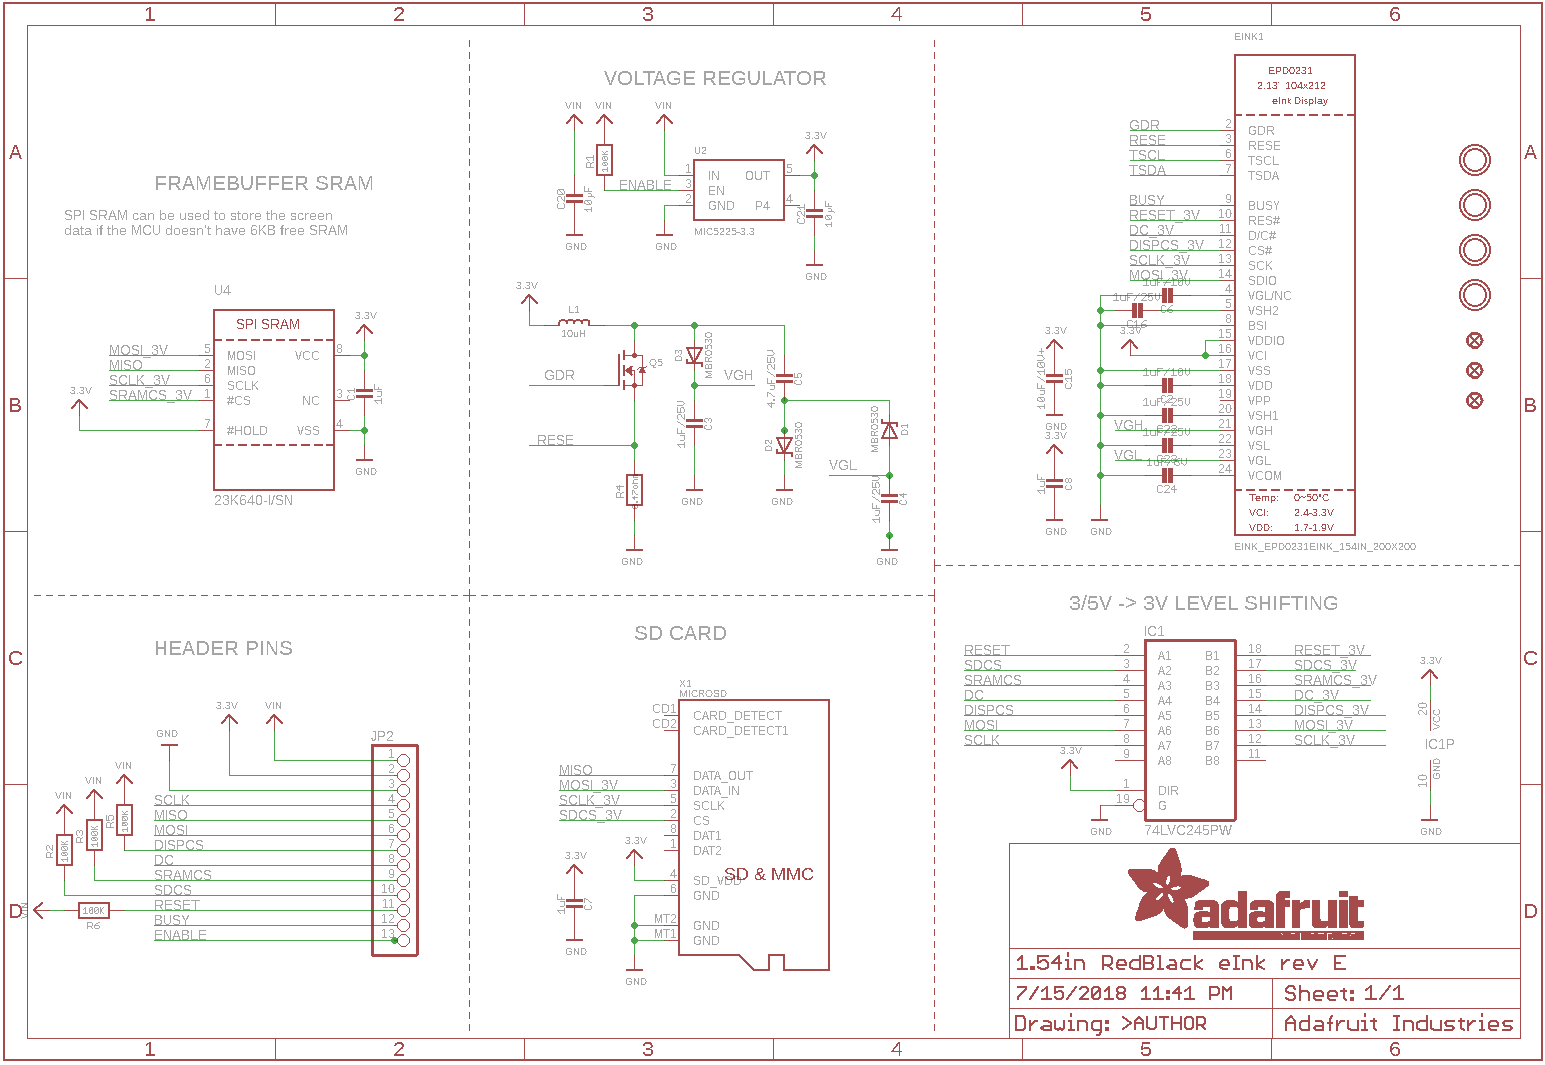
Parts SelectionSo I had originally planned to have the Raspberry Pi Zero as the only external board from my custom PCB. The schematic for the eInk Friend board is available on Adafruit's tutorial page for the board so my original plan was to just copy + paste the circuit to my own schematic then simply redo the layout part (which I personally find to be a relaxing activity in a weird way).
However, at the time that I was doing this project, the SRAM chip, voltage regulator, and connector for the eInk display all had far too long of lead times for this project to get done on time for this Halloween, so I just opted to solder the header for the eInk Friend board onto my custom PCB instead.
This made the parts select super simple. All that I needed was a Pi Zero board, an eInk Friend board, a SMT header for each, and an eInk display. I selected the short female SMT GPIO header from Adafruit for the Pi, and I found a single row, 12-pin SMT male header on Digikey.
The eInk display I chose was the largest of the flexible eInk displays I found on Adafruit: the 2.9" Flexible 296x128 Monochrome eInk Display with UC8151D Chipset.
KiCad is by far my favorite PCB layout software. I started by throwing together the schematic of the connections between the Pi and the header for the eInk Friend.
I also added a total of 10 mounting holes on the board: 4 for the Pi Zero, 2 for the eInk Friend, then 4 for the whole PCB itself so I could use longer standoffs to be able to set it down without it laying on the Pi and Friend boards on the back.
I used the Raspberry_Pi_2_3 symbol from the library since the pinout is the GPIO same as the Pi Zero. I then assigned the 2.54mm SMT footprint to it.
The header for the eInk Friend board is just a 1x12 male header with 2.54mm footprint:
Then I used the same mounting holes as what is on the Pi Zero, which is the 2.7mm M2.5 pad mounting hole.
After exporting the schematic to the PCB, it was time for the fun part: the layout. The overall plan is to have the eInk Friend and Pi Zero boards on one side of the PCB, then the eInk display itself on the opposite side surrounded by all of the "newsprint" on the silkscreen as though the eInk is the headline photo of the newspaper. This means that physical placement of all the components is very critical, particularly where the header for the eInk friend is to make sure the flat flex of the eInk display itself could reach it.
First I drew the perimeter of my board on the Edge Cuts layer since I'd be using the X/Y locations of the edge to base the placements of everything else.
For the measurements for placement of mounting holes in relation to headers, I found the specific dimensions for the Pi Zero's mounting holes here to recreate on my board:
The mounting holes for the eInk Friend board were a bit tricker since the board files from Adafruit are in Eagle instead of KiCad (found in their Github here). Instead of installing Eagle, I just read through the raw code of the board files in Github to find what I needed by keyword searching "mount".
Once the mounting holes were in the places I wanted them, I moved the RPi GPIO and 1x12 Friend SMT headers to the appropriate places relative to them.
At first, I was just going to have the eInk display near the edge of the newspaper PCB to just wrap around. But I ultimately decided to add a slot cutout to the Edge Cuts layer to feed the eInk flat flex through since it just looked better to have the eInk display more centered on the board.
I typed up each blurb for the articles in a Word doc, then copy+pasted them into the text boxes on the silkscreen layer. This was easier since there is no spell check in KiCad and I didn't want any embarrassing typos...
Also, since I placed the SMT headers on the front layer so I put the silkscreen for all of the newsprint on the back silkscreen layer instead of the front.
And the final 3D render did not disappoint:
I submitted my order to Osh Park, opting for their After Dark substrate/mask option since it's Halloween and anxiously awaited their arrival...
Once the boards, arrived I was over the moon excited with how they turned out:
I started by soldering male header pins to Raspberry Pi Zero W. If you are wondering why I didn't buy one with headers already soldered on, the pre-soldered header version of the Pi Zeros all had the headers on the topside of the Pi board, but I wanted them on the bottom:
I then soldered the SMT headers to PCB:
Luckily I did notice before I started that order of operations matter here. I needed to solder the 1x12 SMT header to PCB before soldering eInk Friend to it because I wouldn't have been able to reach the pads on the side of the SMT header that were under the eInk Friend board.
After getting everything soldered, I mounted the Pi Zero with standoff screws. However I didn't have any standoffs short enough for the eInk Friend (I didn't notice the ones in the photos were too tall until I went to solder the eInk Friend board to the male header).
I then fed eInk flat flex through cutout and attached it to front side of PCB:
Finally I just used a looped piece of scotch tape to secure the eInk display down on the other side of the PCB.
Setup Raspberry Pi ZeroI'm using the Raspberry Pi Zero W V1.1 and I specifically chose the wireless model so I could upload new images for the eInk Python script easily using the secure copy command (scp) from my main computer over Wi-Fi. This way, no other physical connections aside from the micro-USB power would be required for the board.
I downloaded the latest version of the Raspberry Pi Imager tool and created a fresh SD card for the Raspberry Pi Zero W V1.1. It's very important that you don't select the Pi Zero W 2 if you're using the the V1.1 because the 64-bit OS for the Pi Zero W 2 does not work on the Pi Zero W V1.1 and you'll forever be stuck on the rainbow boot screen.
When prompted, I chose to edit the settings of the OS to set the hostname, username/password, and configure the wireless LAN with my Wi-Fi's credentials:
For the first boot of the Pi Zero W, I connected to a monitor and keyboard/mouse to to the initial updates and OS configuration:
whitney@raspberrypi:~ $ sudo apt udpate
whitney@raspberrypi:~ $ sudo apt upgrade
whitney@raspberrypi:~ $ sudo raspi-config
Under Interface Options, I enabled SSH and VNC for wireless remote access to the Pi (oddly, SSH didn't work until I enable it here despite the fact that I had enabled it in the Raspberry Pi Imager tool when imaging the SD card). I also enabled SPI and I2C, as SPI is required for the eInk display.
After exiting the Raspberry Pi configuration editor and rebooting, I tested the SSH connection from my main computer before disconnecting the monitor and keyboard/mouse from it (be sure to replace "whitney" with whatever user you specified in the Raspberry Pi Imager tool).
whitneyknitter@Whitneys-MBP ~ % ssh whitney@192.168.1.231Once connected to the Pi, I installed all of the Adafruit Python drivers necessary to talk to the eInk display and eInk Friend board:
whitney@raspberrypi:~ $ pip3 install Adafruit-PlatformDetect
whitney@raspberrypi:~ $ pip3 install Adafruit-Blinka
whitney@raspberrypi:~ $ pip3 install adafruit-circuitpython-epd
And cloned their Circuit Python eInk Paper display repo to have their example scripts as a starting point for my main Python script to rotate the images being displayed:
whitney@raspberrypi:~ $ git clone https://github.com/adafruit/Adafruit_CircuitPython_EPD.gitOnce cloned, I also downloaded the font file into the main location of the scripts (which is the examples directory) to allow the Pillow library to create text in any image it draws on the display.
whitney@raspberrypi:~ $ cd ./Adafruit_CircuitPython_EPD/examples/
whitney@raspberrypi:~/Adafruit_CircuitPython_EPD/examples $ wget https://github.com/adafruit/Adafruit_CircuitPython_framebuf/raw/main/examples/font5x8.binUltimately, I took the epd_pillow_image.py script from the examples directory and placed a while True loop around two instances of drawing an image on the display. So once this script was ran, it would cycle between displaying two images on the eInk display until the ctrl+C keyboard interrupt is received. I found that the underlying drivers for the UC8151D already have time delays built into them so there wasn't any need to put them in my top level Python script.
I decided to have it switch between an image of the ChatGPT logo and Voldemort since I made up a little blurb about ChatGPT secretly being him in disguise (please tell me I'm not the only one who thinks that's funny haha).
Also, since the display is technically upside down when bent over back to the other side of the PCB, I had to rotate the images to be upside down. That way they appeared in the right orientation with the silkscreen newsprint on the back side. The images were simply screen grabs from google image searches and given the.png extension.
Since I had to create the images on my main computer, I decided modifying the epd_pillow_image.py script (renamed to epd_pillow_hp_newspaper.py) on my main computer would also be easier and then to just transfer them to the Pi with scp:
whitneyknitter@Whitneys-MBP ~ % scp -O ./epd_pillow_hp_newspaper.py ./lordV.png ./chatGPT_logo.png whitney@192.168.1.231:/home/whitney/Adafruit_CircuitPython_EPD/examplesFinally, it was time to see it all in action. So I ran the script and held my breath!!
whitney@raspberrypi:~/Adafruit_CircuitPython_EPD/examples $ python3 ./epd_pillow_hp_newspaper.pyHonestly, it turned out cooler than I had imaged. The eInk refresh time built into the EPD driver is a bit slow, but it's still too cool! I'm also just excited that I actually built something that works!!
Unexpected Flex IssueWhile I knew the actual display where the ink lives in the eInk display can only be flexed so far, I didn't think the flat flex cable of the eInk display was that sensitive. However, when I first assembled all of the components of the newspaper board, the eInk display did absolutely nothing.
I had ohm-ed out all of the connections between each of the headers before and after I soldered everything together (ie - I didn't want to waste time if some critical clearly wasn't connected properly) so I knew the issue wasn't anything with the SMT connectors or newspaper PCB itself.
I had also tested the scripts with the Raspberry Pi and eInk Friend board hooked up on a breadboard while I had been waiting for the newspaper PCBs to ship out from Osh Park, so I knew there wasn't any errors there.
This left the eInk display itself as the culprit since it was a new one compared to the one I had been using with the breadboard setup. I switched to the one I had been using in the breadboard setup which worked for a little while, but then faded to nothingness.
With only one eInk display left, I was much more careful with my installation of it this time and had the camera ready to catch the results... And turns out, third time was the charm!
After inspecting the first two, I found that I must have flexed the base of the flat flex cable near the eInk display just enough to break some internal connections. My breath-holding gentle install of the third display must have been what was necessary to avoid this.
Ultimately, if I spin another version of the board, I should probably avoid the flat flex bending back around the slot and just have it feed through.


Comments