What is NeopixelsNeopixels, a term coined at Adafruit for RGB and RGBW strands of single-wire addressible LEDs, can be configured in many different ways to make fun and attractive DIY projects.
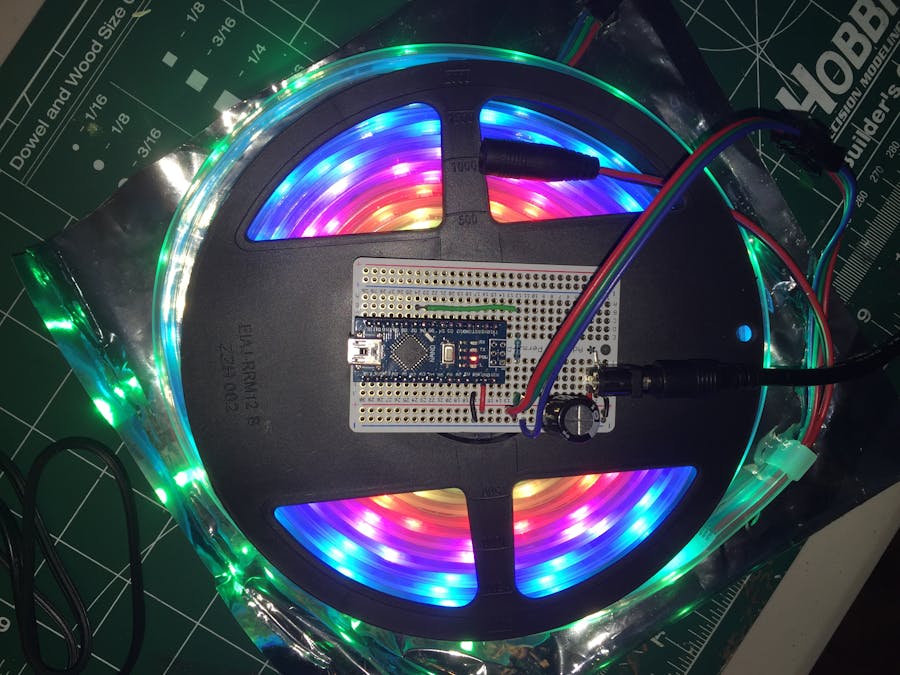
There are limits to the number of these LEDs that can be controlled by a single Micro-Processor. The two major constraints are available memory and power. Neopixels consist of 3 or 4 LEDs, and a dedicated driver chip. They consume about three bytes of memory each and potentially up to 60 milliamps of current when fully lit. Over the last few years, I have completed several installations consisting of 1 to ~250 NeoPixels using the scalable controller design covered in this project.
Adafruit maintains the most excellent Adafruit NeoPixel Überguide and I urge you to study it thoroughly, especially the Best Practices section, before starting your NeoPixel project and refer to it frequently when prototyping. Specifically, I have incorporated the suggestions relative to using a 1000 uF capacitor to smooth power surges and placing a 470 ohm resistor between the Micro-Controller's PWM pin and the NeoPixels data line.
The Adafruit Perma-Proto 1/2 sized board used in this project allows the components to be assembled in the same relative arrangement used on the breadboad prototype. Another advantage of using the Perma-Proto board is that the rows and columns are labeled like a spreadsheet with lettered columns (A-J) and numbered rows (1-30), a feature we will take advantage of to specify the location of the other components.
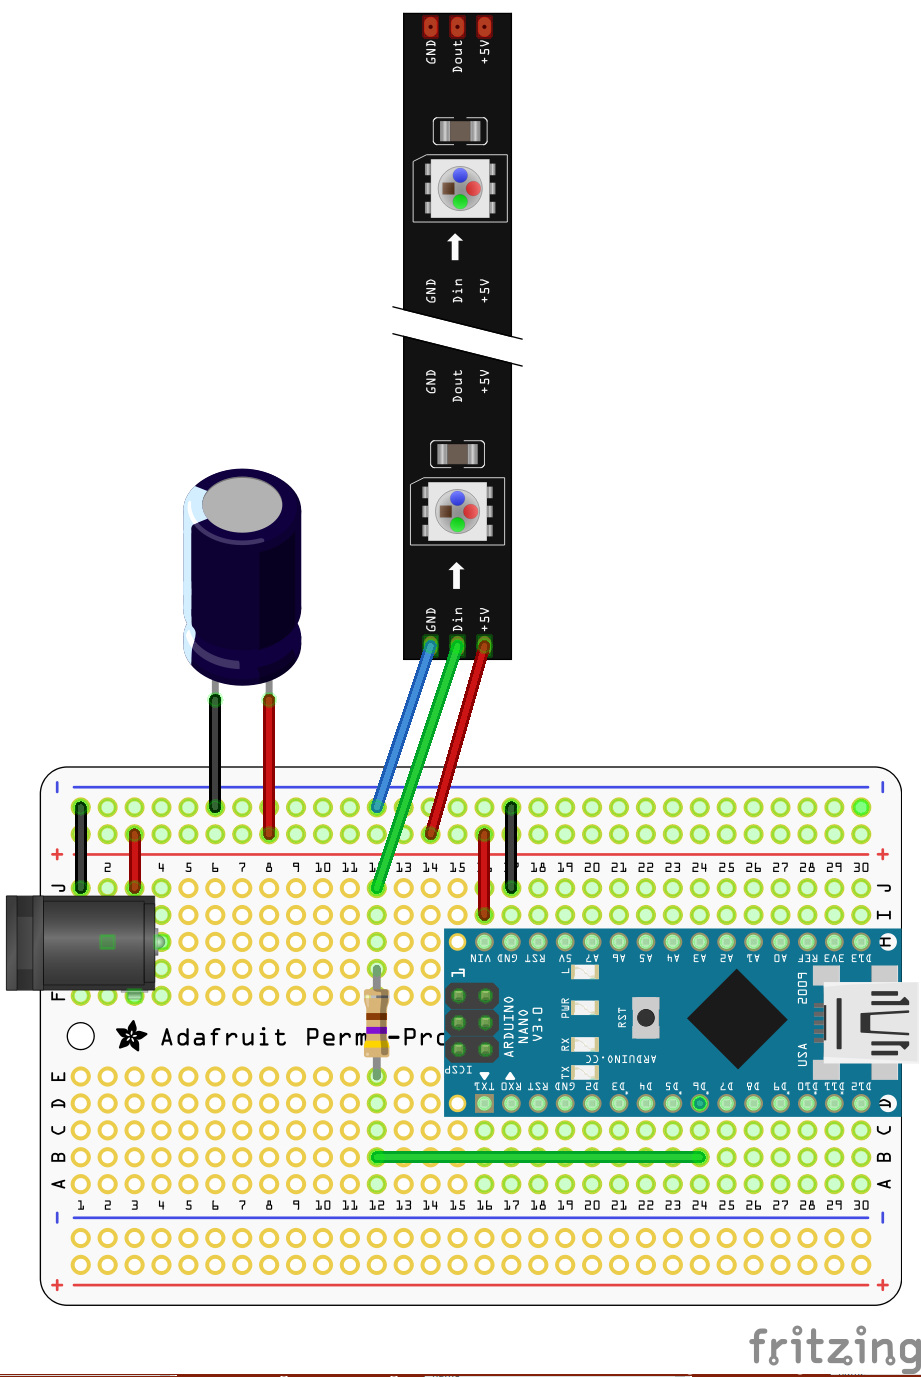
Fritzing diagram of the NeoPixel Controller
If the reader is an experienced Maker, this should be enough information to build or modify the design on your own. To test the project, include the Adafruit NeoPixel Library in your sketch. There are also several test sketches included with the library. The rest of this write-up is intended to go through the project step by step and share some assembly tips.
Getting startedConstruction begins by soldering male headers to the Arduino compatible Nano. Use the breadboard as a jig to hold the headers at a right angle while soldering.
Reusing Breadboard as a Jig for Soldering Nano Headers
Push the male header strips into the breadboard with the long pins facing down, making sure the strips are evenly seated before placing the Nano over the strips. Everything should look even, straight and square before you solder the shorter header pins to the Nano.
Nano Micro-Controller on headers before soldering
It is easier to solder the lowest, smaller components first, so begin with the 470 ohm resistor by placing it's leads through the Adafruit Perma-Proto board holes E12 and F12. It doesn't matter to the resistor what lead goes into which of the two holes. Once positioned, bend the leads on the back side of the Proto-Board to hold the resistor in place. Then turn the board over and solder from the back side. If the resistor doesn't sit the way you want, you can reheat each solder joint while gently pushing on the resistor from the other side until it slips into place.
Resistor leads through Backside of Perma-Proto board
After soldering, clip the excess leads close to the board using your side cutters.
Next, solder a jumper wire between B12 and B24. I used 22 ga. solid core wire with green insulation because it happens to match the color of the data line in the wiring harness that will go to the NeoPixels. This jumper will eventually connect PWM pin 6 on the Nano to the 470 ohm resistor.
TestingUse a multimeter to test the connectivity between E24 and D12 and if successful, test E24 to J12. This second test may not result in a 'beep', if you have an audible multimeter, because it spans the current limiting resistor, but the meter should still register a change that indicates connectivity. If you don't have connectivity between E24 and J12, use the multimeter to find the cause and repair it before continuing. I tend to set my soldering iron to 750F and have occasionally 'lifted' traces that connect holes on the back side of the Perma-Proto board. To minimize this possibility, either lower the temperature and/or place the tip of the iron on the side of the hole that is away from the desired current flow and bend the lead of the component being soldered in the direction of the flow. As always, clip the leads when you have finished soldering.
Holding jumper wires with rubber band for soldering
Now solder two jumper wires from J1 and J17 to the corresponding holes on the ground bus of the Perma-Proto board which is identified by an adjacent blue stripe. To hold short jumper wires in place, I wrap a rubber band across the board over the wires to be soldered. After soldering, use your multimeter to test connectivity between F1 and F17. Do the same with two more jumper wires that will connect J3 and i16 to the positive bus, which is identified by a red stripe. Verify connectivity between F3 and F16 before continuing.
Open end view of 2.1mm Barrel Jack with bent over middle pin
Use needle nose pliars to bend the middle pin of the 2.1mm barrel jack to a 90 degree angle. This will help stabilize the barrel jack on the Perma-Proto board. Insert the two remaining pins into holes H1 and H3 with the open end of the barrel jack facing off the edge of the board and solder in place. Verify connectivity from the center pin of the barrel jack to F16 and the grounded shell of the jack to F17.
Perma-Proto board after attaching Barrel Jack
Plug in a 5V DC center positive power supply into the 2.1mm barrel jack and use your multimeter to check the DC voltage between F16 and F17. The red multimeter probe should be in F16 and the black probe in F17. If you have a digital multimeter and the voltage on the display is preceeded by a minus sign (e.g. -5.16), the polarity is reversed -- either in your project or the leads are backwards on your multimeter. In any event, do not proceed until you can trouble shoot the issue and verify around 5V DC with correct polarity between test points F16 and F17.
Nano Micro-Processor inserted into female socket headers for soldering
The Arduino compatible Nano Microprocessor can be soldered directly to the Perm-Proto board using the male headers you attached earlier. Because of the relatively small size and cost when compared to other Arduino and compatible boards, the Nano has been my go to project board for several years now. I have purchased dozens of Nanos from random Chinese eBay vendors and never had one arrive DOA or go bad. Aside from the hassle of installing the necessary CH340/Ch341 UART drivers for programming the Nano from a Windows PC or a Mac, the Nano is a terrific value in my opinion. However, if there is any chance something could go wrong, it probably will, so I routinely solder female socket strips to the Perma-Project board in order to just plug in the Nano and easily replace it if necessary.
Either cut two 15 pin lengths of female header strip or be lazy like me and just cut a new 36 to 40 pin header strip in half. Push each of the Nano's male headers into the sockets of a corresponding female header strip, trim off any excess and position this assembly on the Perma-Proto board starting one set of headers at D30 and the other at H30. Then hold the whole assembly in place with a rubber band before turning the board over and soldering the headers. Solder each end of the header strips first, check for a good, flush fit and remove the rubber band before soldering the remaining header pins.
1000 uF Capacitor installed on Perma-Proto board
The 1000 uF capacitor is most likely polarized, meaning it matters which way it is hooked up. The shorter lead is usually the negative and should be marked with a grey stripe and a minus sign (-). Push the negative lead through the hole in the negative bus (marked with a blue line) associated with row 6 and the positive lead through the hole aligned with row 8 of the bus identified by the red stripe. The capacitor is the tallest component in the project, so if you are using a shallow enclosure, instead of seating the capacitor base on the board, leave enough of the leads above the surface to allow pushing the capacitor over on it's side. Bend the leads over on the back side of the board to hold the capacitor in place, turn the board over and solder the connections. Trim the excess leads. Be careful not to short any exposed leads to each other or another component.
Wiring harnes soldered in place
The Neopixels I am using for this project, came with a nice, three wire harness with locking connectors. I soldered the wire going to the Neopixel data connection to J12 on the Perma-Proto board and the positive (+) and negative (-) wires to their respective bus, aligning the positive wire with row 13 on the red striped bus and the negative wire to row 11 on the blue striped bus. It just worked out that the data wire was green, the positive wire was red and the negative wire was blue. All that is left to do is program the Nano Micro-Controller and plug in the power supply.


Comments