


Hardware components | ||||||
 |
| × | 2 | |||
_ztBMuBhMHo.jpg?auto=compress%2Cformat&w=48&h=48&fit=fill&bg=ffffff) |
| × | 1 | |||
 |
| × | 1 | |||
 |
| × | 2 | |||
 |
| × | 3 | |||
 |
| × | 1 | |||
 |
| × | 1 | |||
 |
| × | 1 | |||
 |
| × | 1 | |||
 |
| × | 1 | |||
 |
| × | 1 | |||
 |
| × | 2 | |||
 |
| × | 1 | |||
 |
| × | 1 | |||
 |
| × | 2 | |||
We are making application with our hardware device that will show you quality of air in your area. This device could be used as one single unit, for example in small home office, or maybe in large companies with multiple devices. This device is able to read humidity, temperature, amount of CO2 in air etc.
We made it because in better quality of air you are more productive and it is more healthier.
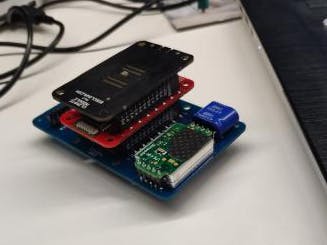
1) First we need to connect CO2 module, core module and climate module together like on this photo:
2) Then we connect it to Raspberry pi with radio dongle + output
Type IP of rasberry to browser (for example: 10.10.1.11.22 )
You will have to press button start pairing and button on Raberry pi untill it appears like this:
Then you type code like this in function folder
We use ESP8266 for connecting to WiFi and send the temperature and humidity to Firebase.
1) Download Arduino IDE from official sites.
We use latest version - 1.8.10
https://www.arduino.cc/en/Main/Software
2) Create new project
In Arduino IDE click on File -> New
3) Download required libraries for our project
For ESP8266 Wifi:
Copy this link to board manager:
https://arduino.esp8266.com/stable/package_esp8266com_index.json
In File -> Preferences -> Additional Boards Manager URLs: -> Paste in the box link -> And click Ok
Now go to Tools -> Board:"Arduino/Genuino Uno" -> Boards Manager -> In top right search bar type ESP8266 and select latest version and click Install. Now you have library for ESP8266 WiFi.
For DHT11/22
Download library from github.com/adafruit/DHT-sensor-library -> Go to Arduino IDE -> Select Sketch -> Include library -> Add .ZIP library -> Select downloaded library and select Open -> Now you jave installed library for DHT sensor.
For Firebase
Donwnoad library from https://github.com/FirebaseExtended/firebase-arduino -> And repeat the same action as with the previous library.
4) Include libraries
We include libraries, because we use component that aren't included in default Arduino IDE.
5) Define DHT sensor
In this step, we define DHT sensor 11 or 22, and Pin where we connect DHT11/22 to ESP8266
6) Declaring variables
We declarate 2 variables for temperature and humidity.
7) Defining WiFi SSID and Password
In SSID write your WiFi name, and define password.
8) Start your serial monitor
This command we type in void setup() {}
9) Establishing connection to network
10) Start measuring of DHT and Firebase
11) Now, let's roll to DHT sensor
For temperature we use dht.readTemperature() and for humidity dht.readHumidity()
But, if the sensors sending wrong data, for that problem there is IF condition and type "Failed to read from DHT sensor!"
12) Getting values from photoresistor
First command declaring sensorValue where we get values from Analog input. In next step we dividing 1023(scale of number of bits) by 3.3(voltage on DHT photoresistor) on Arduino Uno it can be 5V.
13)Sending data to Firebase
Start typing with Firebase and pushFloat, we use float to get decimal number and pushing values to our database. In scopes, we saying where on Firebase will be saved, and typing the variables to be printed on web.


Comments