


Hardware components | ||||||
| × | 1 | ||||
| × | 1 | ||||
_ztBMuBhMHo.jpg?auto=compress%2Cformat&w=48&h=48&fit=fill&bg=ffffff) |
| × | 1 | |||
 |
| × | 1 | |||
Software apps and online services | ||||||
| ||||||
Watch the video tutorial here:
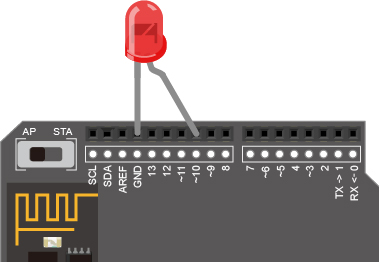
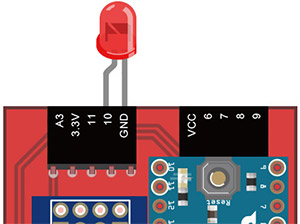
Wiring and PracticeThere are long and short legs on an LED. The long leg should be connected to a "high potential" (a position with a number) and the short leg should be connect to a "low potential" (the GND or Ground). The only setup needed is to plug the LED legs into their positions on the Webduino board or with a breadboard or breadline. Here the long leg goes into 10 and the short leg goes into GND.
Open Webdunio Blockly: https://blockly.webduino.io/?lang=en. For this tutorial, we will use a picture of a light bulb to control the LED. First, click the "Web Demo Area" button on the upper right side of the workspace. Then select "Click Bulb" from the drop-down menu. A webpage with choices of light bulbs will appear.
Drag a "Board" block from the side menu into the workspace. Then type in the name of your Webduino board. Next, find the "Set LED" block under the "Components" menu and drop the block into the blank connection of "Board" block. Then set the "pin" to 10 (because the LED's long leg was connected to pin 10):
The LED has to interact with a web page, so select "Click Bulb" under the "Web Demo Area" menu in the sidebar and drag the "Click Bulb" block to the workspace. This is so you can switch the LED light on and off when you click the picture of the light bulb.
Now, find an "If / Do" logic block under the "Standard" menu and add it to the stack. This will create an "If / then" action for when the "Light Bulb" is clicked. You can edit the "Logic" options clicking the blue gear on the "If / Do" logic block.
If you use the setup shown below, when the "Bulb" is on, the "Click Bulb" will turn off. When the "Bulb" is off, the "Click Bulb" will turn on.
After you finish creating the block stack, check your device's status (check device' status) before you press the button "Run Blocks" on the upper right hand side.
You can easily control the intensity of the LED by clicking the picture of the light bulb in the "Web Demo Area". You can also select the "JavaScript" tab to review the original codes. Copy the codes and paste them to your own code editor and you can do the same exercise. Check your stack setup with this example here: https://blockly.webduino.io/?lang=en#-KTONX73Xz695wEu03DI
Code Explanation (Check Webduino Bin, Check Device Status)Include webduino-all.min.js in the header of your html files in order to support all of the Webduino's components. If the codes are generated by Webduino Blockly, you also have to include webduino-blockly.js in your files.
<script src="https://webduino.io/components/webduino-js/dist/webduino-all.min.js"></script>
<script src="https://webduinoio.github.io/webduino-blockly/webduino-blockly.js"></script>
In the body of HTML, insert a div for placing images with the ID: "demo-area-02-light". In order to show the light bulb changing, there are 2 images of light bulbs: one with the light on and the other on with the light off.
<div id="demo-area-02-light" class="off">
  <img src="https://blockly.webduino.io/media/off.png" id="demo-area-02-off">
  <img src="https://blockly.webduino.io/media/on.png" id="demo-area-02-on">
</div>
We use the CSS rule display:none to control the light-on and light-off images. Below are the CSS codes.
#demo-area-02-light img{
  height:200px;
  display:none;
}
#demo-area-02-light.on #demo-area-02-on{
  display:inline-block;
}
#demo-area-02-light.off #demo-area-02-off{
  display:inline-block;
}
For the most critical JavaScript step we start by using boardReady(). The callback function will be executed when the board goes on-line. Then, you must set up a variable named led and use getLed() to set the pin number to 10. Finally, bind the event by clicking the images to control the LED with its API.
var led;
boardReady('', function (board) {
  board.samplingInterval = 20;
  led = getLed(board, 10);
  document.getElementById("demo-area-02-light").addEventListener("click",function(){
    if (document.getElementById("demo-area-02-light").className == "on") {
      document.getElementById("demo-area-02-light").className = "off";
      led.off();
    } else {
      document.getElementById("demo-area-02-light").className = "on";
      led.on();
    }
  });
});
Because codes are automatically generated by Webduino Blockly, there might be some duplicated and superfluous codes. To simplify the codes, we replaced document.getElementById("demoarea02light") with one single variable: light.
var led;
var light;
boardReady('', function (board) {
  board.samplingInterval = 20;
  led = getLed(board, 10);
    light = document.getElementById("demo-area-02-light");
  light.addEventListener("click",function(){
    if (light.className == "on") {
      light.className = "off";
      led.off();
    } else {
      light.className = "on";
      led.on();
    }
  });
});
This was the example of how to control an LED by clicking the picture of a light bulb. We hope you enjoyed it!
- Webduino Bin: http://bin.webduino.io/nixad/edit?html,css,js,output
More information:
- Tutorials: https://webduino.io/tutorials.html
- Blockly: https://goo.gl/Y8sRkl
- Products: https://webduino.io/buy.html
- Store: http://goo.gl/0Dj9ip

Webduino
 WayneSan
Comments