
Hardware components | ||||||
 |
| × | 1 | |||
| × | 1 | ||||
 |
| × | 1 | |||
| × | 4 | ||||
| × | 6 | ||||
 |
| × | 1 | |||
| × | 1 | ||||
| × | 1 | ||||
| × | 1 | ||||
| × | 1 | ||||
| × | 1 | ||||
 |
| × | 1 | |||
| × | 30 | ||||
| × | 2 | ||||
| × | 7 | ||||
| × | 2 | ||||
| × | 1 | ||||
| × | 1 | ||||
Software apps and online services | ||||||
 |
| |||||
 |
| |||||
| ||||||
| ||||||
| ||||||
| ||||||
| ||||||
| ||||||
| ||||||
| ||||||
| ||||||
Hand tools and fabrication machines | ||||||
| ||||||
| ||||||
| ||||||
We live in a rapidly changing world. People are now more connected than never. Technology is becoming exponentially powerful. Although, surprisingly, there are still enormous inequalities among nations and minorities sometimes stopped from following their dreams.
RCar project will not solve this issue, but it is a remind about the importance of gathering people and fight for a fair world. We believe this is a step forward.
Next lines will make you aware how Arduino and 3D Printing are leading the way by empowering people and spreading science across the globe. #Science4All
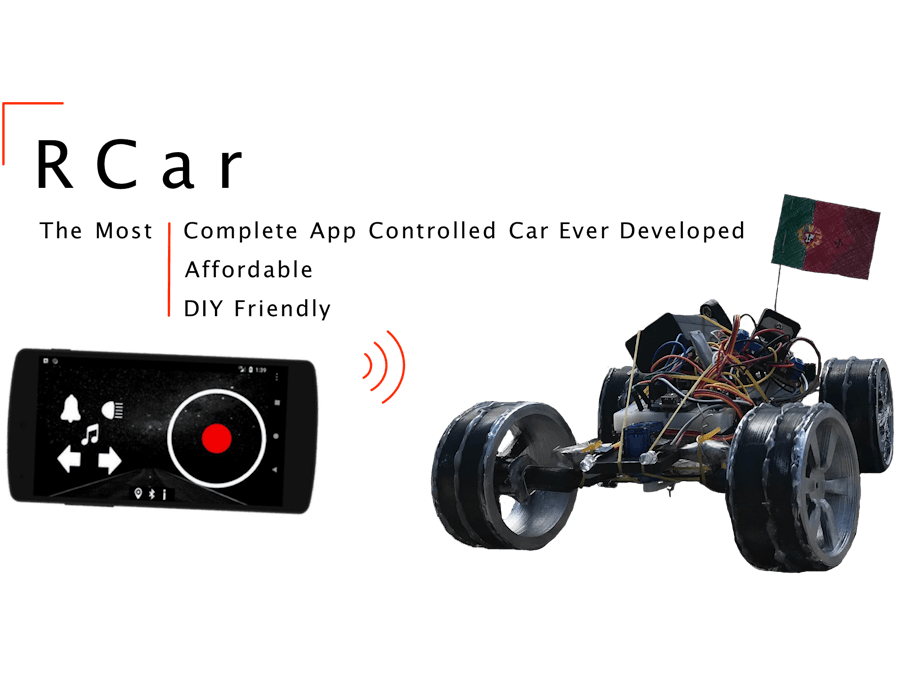
Meant to be simple, meant to be cheap, meant to democratize robots. Print 3D parts, pick up Arduino, download the app and be creative! ;)
Luís Rita & Sara Freitas
Check out RCar website (optimized to Google Chrome).
Car--------------------------------------Remote-Controlled Cars--------------------------------------
This kind of robots has a broad range of uses in our society. Army applications, toys for kids, automation projects and professional competitions are some scenarios we may find such a device. They can be controlled using many technologies, like: wires, Bluetooth, Wi-Fi or 4G/3G signals are some of the most well-known. Generally, they can be powered by oil or electricity. Based on their size, a scale factor is usually attributed. This is done by comparing them with their analogous real models. They can be found in many categories: Street, Drift, Buggy, Truggy and Trucks (Fig. 1).
-----------------------------------------------Electronics-----------------------------------------------
The choice of each component is explained in "Hardware Components" section. Note the driver used (L298N Motor Driver) has a slightly different wiring than the one in Fig. 2. And the DC 3V Motor has an extra axis pointing in the opposite direction (both moving synchronously).
--------------------------------------------------Design--------------------------------------------------
All parts of the RC car were modelled using the CAD software SolidWorks. The complete model (Fig. 3) was divided in several components (which were meant to be 3D printed separately): wheels, chassis, L-shape axles, connecting bar and the body of the car. The shape of the last structure resulted from a funny try to roughly resemble FBI vehicles (check out Fig. 3, 2nd image).
At the beginning, the first parts to be modelled were the back wheels. An initial design was obtained from GrabCad. However, some changes had to be made in order to fit our model. Since these wheels were meant to be attached to the motor (with a double axis, 1 pointing to the right and another to the left), a cylindrical axle with an appropriate length and internal radius had to be built. Instead of having the hexagonal cavity that was present in the original design (Fig. 4, 2nd image), the shape of the hollow inner cylinder was changed to match the shape of the motor's axle, as we can see in Fig. 4, 1st image.
Special attention should be given to the fact the wheels were fixed to this double axle, consequently, these 2 move along at the motor speed. This is not the case for the 2 front wheels.
The same original design was used in the front wheels. However, the axles modelled were completely different, as these were meant to rotate around a vertical imaginary axle, synchronously with the servo's paddle. This movement was limited to 45º rotation to each side. Both wheels’ axles were designed in an L-shape, with a cylindrical and a rectangular end. The latter is always parallel to the servo’s paddle and has a cut where an elastic was to be wrapped around and connected to the paddle (Fig. 5).
Both ends of each axle were connected by a bar to guarantee the wheels move simultaneously to the sides. Furthermore, to assure the wheels rotate at the same angle as the servo’s paddle, the distance between the centre of the hinge of the axle and the centre of the cut was equal to the length of the paddle (Fig. 6).
To guarantee the rotation of the wheels, a revolved cut was added to the cylindrical end of the axle and a complementary boss was designed in the wheel (Fig. 5). In order the joint to be detachable, a difference of 0.3mm between the internal and external radius was guaranteed. The same principle was applied to the hinges in both axles. Thus, 2 cylindrical structures were built on the bottom surface of the chassis, each with a revolved cut at the end. A complementary structure was built in each axle corner, again with 0.3mm difference.
As for the chassis of the car, besides the structures already referred, there are 2 other features worth mentioning. First, a cut in the chassis was made in order to fit the servo, as the paddle must be at the same height as the axles. Second, it had to be cut at the front in order the wheels to turn (Fig. 7).
Finally, although this part was not printed due to its dimension and accessory nature, the body of the car was also designed. We made sure to include the cuts for the respective lighting system, place for (back and front) registration plates and 4 complementary supports to the ones present on the top surface of the chassis - tightly connecting both parts.
It is shown below the side, front and back views of the completely assembled model (Fig. 8).
The biggest challenge faced in this part of the project was the design of the front wheels' rotation system. This had to be redone several times in order to allow the proper movement imposed by the servo. However, this was never tested, as the axles were meant to be connected to the servo’s paddle by an elastic, and this could only be done after printing.
Furthermore, it is important to mention that in order to achieve the final design, all components had to be redone several times, particularly, the cuts and extrudes responsible for the connections between parts. This assured the pieces were aligned and had appropriate dimensions.
After modelling, the main goal, in terms of design, was to 3D print (using Ultimaker 2+ Extended printer - Fig. 9) the several parts and use them to build the model. Finally, all the electric components were displaced in the car.
It is important to mention there was a dimension limitation associated with the printer, which did not allow us to print the body of the car. The printing required the use of a 2.85mm PLA filament. Although some smaller details of the model were not perfectly reproduced, printing was well succeeded.
Regarding the 2 cylindrical structures designed on the bottom of the chassis (to fit the L-shape axles), they ended up slightly prone to break. This was fixed by wrapping some resistant tap glue. Moreover, still to secure the axles to the chassis, 2 elastics were wrapped around on each side, which helped keeping the car stable and all parts in place. In other words, they pushed both parts against each other. 1 way to avoid these issues, would have been to increase the size of these structures.
The revolved structure inside the front wheels, which was designed to fit with the axle, was filled with support material (printed along with the car). This required a precision handwork to avoid loosening these joints while removing it. Although, later, we realized that due to dilation of PLA, these 2 parts did not fit. This was solved by shaving them. 1 problem encountered next was the wheels were not very secure, which resulted in them becoming crooked with the movement of the car. The solution was gluing an aluminium ring to each front wheel (after inserting the complementary part of the corresponding axle inside it) and wrapping some wire around each joint.
Both axles were connected, as it was originally designed, by a bar (using 2 screws and corresponding nuts, as the joints) and an elastic. Originally, this elastic was supposed to connect to servo's paddle. After testing car's side movement and confirming the bar could flip the axles better if directly connected to the paddle, we decided to join both, using a thin wire of metal. Consequently, the elastic (parallel to the bar) was discarded. The servo was kept in place by gluing its sides to the hole in the chassis.
For both the front and back wheels, hot glue was distributed along their perimeter to increase ground traction. Due to the added diameter the glue streaks added to the front wheels, part of the chassis had to be shaved off in order to avoid bumping in the side movement of the car.
Finally, the front, back and turn signal lights were glued in their usual positions to the car. The breadboard and the GPS were attached on the back. And the DC 3V Motor in the bottom of the chassis. All the other components were kept in place with several elastics to guarantee they would not affect the car movement or disconnect its circuitry.
All in all, even though the design required some adaptations after being printed, the result was a success. The car was able to move stably, with enough traction and perfectly supported the weight of all components. Moreover, the cost of printing was negligible (< $1).
---------------------------------------Future Improvements---------------------------------------
- An optimized Bluetooth module would improve the range of operability and to reduce the lag between commands (given with the app) and the effective performed actions;
- There are plenty of different batteries available in the market. Lighter and lasting batteries would positively influence car's autonomy;
- Instead of a breadboard, a PCB (Printed Circuit Board) would turn the car circuitry more durable and less prone to short-circuits or other electric fails;
- A system of suspension is another structure that can be added to the project in the future. This feature takes a greater importance if the prototype is intended to be used in an off-road track;
- The modelled body could have been more aerodynamic. However, since this part was not printed along with the rest of the car (due to size and time constraints), this was not prioritized in the design;
- Adding a camera to the car would allow us to control it out of sight;
- Several parts were all meant to be printed in plastic. The usage of other low-cost materials, like rubber for the wheels and some metal alloy for the axles/chassis, would allow us to create an enhanced and still cheap model.
Check out RCar app in Play Store or in MIT App Inventor Gallery.
----------------------------------------------Android App----------------------------------------------
Using MIT App Inventor 2 (Fig. 12), we developed an Android app that is able to control many features of a RC car, using a Bluetooth connection. Specifically, the angular velocity of the back wheels, the rotation angle of a front servo, a horn, music, light and GPS components.
Once the application has many controls (1 joystick and several buttons), we needed to clearly define the source of data received by the Arduino. This is particularly important because we were only able to send 1 type of values (either strings, bytes or integers) to the BT module. Communication between the app and the Arduino was done using 1 byte numbers. Thus, each command was associated to a specific integer ranging from 0 to 255.
The inclusion of a GPS module ended up increasing the complexity of the app. The reason is that, at certain moments, the app is sending values and, in others, receiving longitude and latitude coordinates. It was not particularly easy to transmit these numbers due to their big number of decimal digits (requisite to achieve an acceptable location accuracy). The root of the problem was to transmit both values in real time and without overlapping the previously received.
Similarly to what happened with the GPS module, the joystick action was not easy to coordinate. Again, the transmission of horizontal and vertical coordinates was done by including a small delay between their transmission. This was carefully adjusted, so that the Arduino did not understand x as y or y as x. And, at the same time, to prevent overlapped signal transmission. Moreover, a range of numbers common to the command buttons of the app, was also avoided.
As said above, the presence of a single communication channel prevents us from transmitting multiple values at once. For this reason, one should carefully disable all the previously activated timer commands while trying to send new instructions.
Another issue out of our control was the number of bugs still present in MIT App Inventor 2. Along the project development, we faced a great number of unexpected issues while programming a more recent version of the Bluetooth module (HM-10). BLE (Bluetooth Low-Energy) library present in MIT App Inventor 2 is still very limited in terms of its functional tools. We ended up using HC-05. If our goal was to transmit sporadic on/off values, such as in the case of a button or a set of them, it would be fine. But, for now, to send many values and in a very reduced time interval (as requested by the joystick to obtain real-time responsive commands) will crash the application still in AI2 Companion Mode or, later, after building the app.
----------------------------------------------User Guide----------------------------------------------
In order to use the app, the first step is to go to the smartphone’s definitions and pair up with the car’s Bluetooth receptor, which goes by the name HC-05. The (default) password is 1234. After this step is concluded, open the app, click on the Bluetooth icon on the bottom end of the screen and establish a connection with the module. All the features the app controls - the front lights, the turn signal lights, the horn, the music player and the joystick - are now ready to be used. The GPS, whose icon is next to the Bluetooth one, can also be accessed (note it does not work indoors). In Fig. 13, some features of the app were depicted.
---------------------------------------Future Improvements---------------------------------------
- Development of an improved app in terms of stability and memory requirements;
- Expand compatibility across mobile devices: create iOS version;
- Introduction of a real time FPV (First Person View) feature would allow us to control the car without keeping it in our range of view. Thus, allowing a set of brand-new applications.
A remote-controlled car and the respective app were developed under the supervision of Prof. Luís Sousa, from Instituto Superior Técnico (University of Lisbon).
Every app, CAD file and assembling plan related to this project is free. And will always be...
Luís Rita & Sara Freitas
Comments