



Hardware components | ||||||
| × | 1 | ||||
| × | 1 | ||||
| × | 1 | ||||
 |
| × | 1 | |||
| × | 1 | ||||
| × | 1 | ||||
Hand tools and fabrication machines | ||||||
 |
| |||||
Inkora is a battery-powered DIY family calendar built around an ESP32-S3 controller and a 7.5-inch e-paper display.
It connects directly to Google Calendar, Apple/iCloud Calendar, or both at the same time. You choose the calendars you want to include, and Inkora combines their events into one chronological family overview.
Alongside upcoming events, it can display a monthly calendar, a four-day weather forecast, regional public holidays and name days, waste collection reminders, battery status, Wi-Fi status, and synchronization information.
The project is designed so that building it feels closer to assembling LEGO bricks or IKEA furniture than constructing a traditional electronics project:
- no soldering;
- no custom PCB;
- no glue or screws;
- no Arduino IDE or PlatformIO;
- no source code to compile;
- no programming experience required.
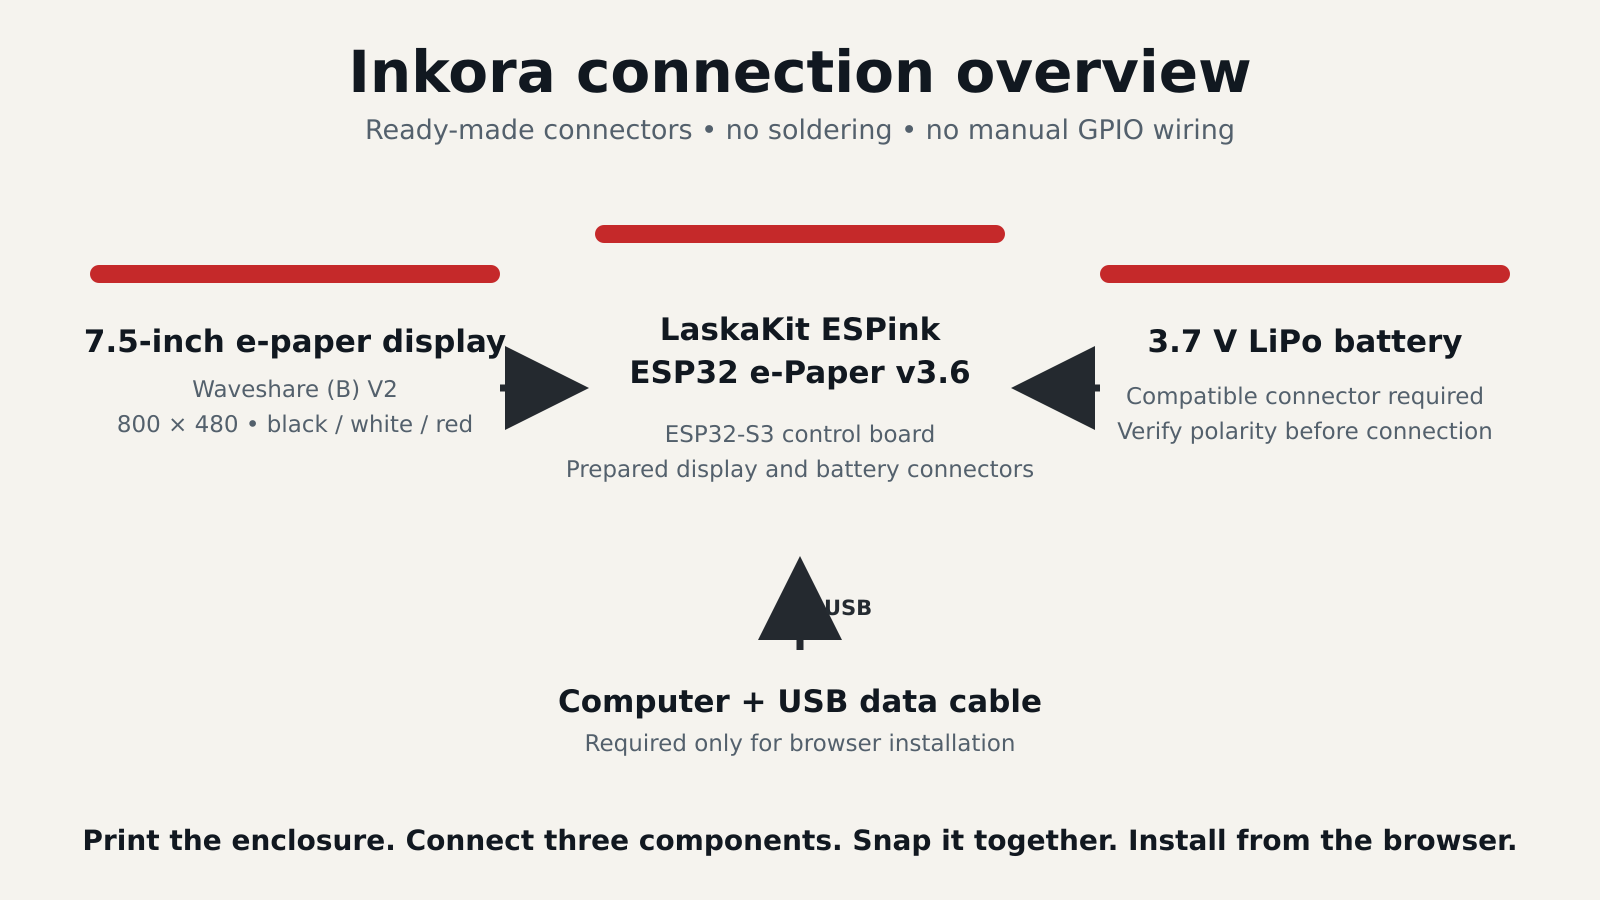
Print the correct enclosure, connect ready-made components, close the snap-fit case, connect USB, and install Inkora directly from a web browser.
Inkora is an independent project and is not affiliated with or endorsed by the LEGO Group or IKEA.
Why I built InkoraInkora started as a solution for my own family.
We already used a shared digital calendar, but not every person at home always has a phone nearby—and young children do not have their own smart devices. I wanted a calendar that anyone could simply look at and immediately see what is happening today and during the next few days.
A paper calendar has the calm appearance I wanted, but every change must be copied manually. A tablet updates automatically, but introduces another glowing screen, a permanent power cable, and more opportunities for distraction.
E-paper offered a useful middle ground. It looks like paper, remains readable without a backlight, and uses most of its energy only when the image changes. Inkora can therefore stay visible throughout the day without feeling like another television or phone in the room.
My family uses Inkora every day. It is not a prototype built only for photographs, which also gives me a practical reason to keep maintaining it.
What Inkora displaysThe current public firmware provides:
- a monthly calendar;
- up to eight upcoming events;
- Google Calendar through a read-only OAuth authorization flow;
- Apple/iCloud calendars through CalDAV and an app-specific password;
- Google only, Apple only, or both providers together;
- selection of up to eight Google and eight Apple calendars;
- chronological merging of events from all enabled calendars;
- a four-day weather forecast;
- regional public holidays and name days where available;
- up to six independently named waste collection schedules;
- configurable Monday or Sunday week start;
- 12-hour or 24-hour time;
- European and US-style short-date formats;
- configurable header date format;
- Celsius or Fahrenheit;
- automatic time-zone suggestion and manual IANA time-zone selection;
- optional quiet hours;
- battery, Wi-Fi, and synchronization status;
- cached calendar and weather data during temporary network outages;
- browser-based installation;
- signed firmware and content-package updates;
- no mandatory subscription.
Because e-paper retains its image without continuous power, Inkora sleeps between updates while the last rendered information remains visible.
Supported hardwareInkora currently supports two ESP32-S3 controller boards:
Supported 7.5-inch displays:
- Waveshare 7.5-inch e-Paper (B), V2 — 800 × 480 pixels, black/white/red
- Good Display GDEM075F52 — 800 × 480 pixels, black/white/red/yellow
Generic ESP32 or ESP32-S3 development boards are not supported substitutes. Similar-looking e-paper panels may use a different controller, connector, resolution, or colour technology, so use one of the exact supported models.
Bill of materials- Controller board: LaskaKit ESPink 3.6 or Seeed Studio EE05
- Display: Waveshare 7.5-inch e-Paper (B), V2 or Good Display GDEM075F52
- Battery: LiPo 6060100, 5000 mAh, 3.7 V, JST-PH 2.0
- Enclosure: the 3D-printed variant for the selected board and display
- Other: PLA or PETG filament and a USB-C data cable
An optional LaskaKit 24-pin FFC/FPC adapter and matching 0.5 mm-pitch cable can be used when additional display-cable length is required.
Current enclosure files, component links, print profiles, manuals, and assembly documentation are available on Printables.
Tools requiredYou need:
- access to a 3D printer;
- a computer running a current desktop version of Chrome or Edge;
- a USB-C data cable;
- a 2.4 GHz Wi-Fi network.
You do not need:
- a soldering iron;
- screws or threaded inserts;
- glue;
- electronics schematics;
- an Arduino IDE or PlatformIO installation;
- programming experience.
The enclosure files are provided in variants for the supported controller-board and display combinations. Choose the folder matching both your controller and your display. Before using prepared G-code, confirm that it matches your printer, nozzle, and material.
The parts fit on a Prusa MINI-class print bed or larger. Recommended starting settings are a 0.20 mm layer height, 0.40 mm nozzle, PLA or PETG, no supports, and no brim.
The front enclosure part must be printed with its visible front surface lying flat on the print bed. Check its orientation before slicing. After printing, gently press and move the integrated buttons several times until they move freely.
Step 2: Connect the displayOpen the locking tab of the e-paper connector on the controller board. Insert the display flex cable straight and fully in the orientation shown in the assembly guide, then close the locking tab.
Do not force the cable, bend it sharply, or trap it under another component. Use the assembly photographs for your exact board and display combination as the source of truth.
Step 3: Connect the batteryConnect the supported 3.7 V LiPo battery to the board’s battery connector.
Before connecting any third-party battery, verify its connector type, wire polarity, voltage, and physical condition. Identical-looking connectors do not always use the same polarity. Never use a swollen, punctured, or otherwise damaged LiPo battery.
Step 4: Assemble the enclosurePlace the controller board, battery, display, and buttons into their prepared positions. Route the cables so they cannot be pinched or sharply bent.
Close the enclosure using its integrated snap-fit clips. No screws or glue are required.
Assembly videoWatch the complete Inkora assembly guide.
The video shows the display cable, battery, buttons, component placement, and snap-fit enclosure assembly.
Step 5: Install Inkora from the browserConnect the assembled device to your computer with a USB data cable and open the official Inkora installer.
- Install the Inkora Setup firmware.
- Wait for browser flashing to finish.
- Press the lower button on Inkora.
- Allow the installer to identify the supported controller board.
- Allow it to detect the connected display, or select the verified display model manually if detection fails.
- Connect to the temporary
INKORA-XXXXXXWi-Fi network shown on the display or in Logs & Console. - Open the displayed address and complete the installation wizard.
Pressing the lower button after flashing is required. Until it is pressed, Inkora waits without starting its setup Wi-Fi or WebUI.
The installer prepares the hardware profile, stores the selected settings locally, obtains the current production firmware over HTTPS, verifies it, and starts the main Inkora firmware. No compiler, development environment, or manual BIN-file selection is required.
Step 6: Complete first-time setupThe WebUI guides you through:
- home Wi-Fi configuration;
- interface language and regional data;
- time zone and display preferences;
- Google Calendar and/or Apple/iCloud connection;
- selection of individual calendars;
- optional weather configuration;
- optional waste collection schedules;
- optional quiet hours;
- final review and initial synchronization.
At least one Google or Apple calendar must be connected before the initial setup can be completed. If continuation through the home network is unavailable, Inkora can provide a fallback setup network and local WebUI.
Google CalendarGoogle Calendar is connected through an OAuth device flow. You do not need to create a Google API project or manually enter API keys.
Inkora requests read-only calendar access. It can read selected calendars but cannot create, modify, or delete Google Calendar events.
Apple/iCloud CalendarApple calendars are connected through CalDAV using your Apple ID email address and an app-specific password created in your Apple account. Do not enter your normal Apple account password as the application password.
Google and Apple connections are independent. You may use only Google, only Apple, or both providers simultaneously.
First-time setup videoWatch the browser installation and first-time setup guide.
The video covers installation, Wi-Fi setup, and Google and Apple calendar configuration.
Languages, regions, and time zonesInkora separates interface language, regional data, and time zone. This means, for example, that the German interface can be combined with Austrian regional data and the Europe/Vienna time zone.
Current interface languages:
- Czech;
- Slovak;
- English;
- English—United States;
- German;
- Spanish;
- French;
- Dutch;
- Polish.
Regional packs are available for Czechia, Slovakia, Germany, Austria, England and Wales, the United States, Spain, metropolitan France, the Netherlands, and Poland. Inkora can also be used without regional data.
The browser suggests a time zone during setup, and any of the 598 supported IANA time zones can be selected manually.
How synchronization worksAt configured intervals, Inkora wakes from deep sleep, connects to Wi-Fi, loads events from the selected calendar providers, obtains optional weather data, calculates regional and waste-collection information, renders the new screen, and returns to sleep.
Events from enabled Google and Apple calendars are merged and sorted chronologically. Days containing events and regional holidays are also marked in the monthly calendar.
If Wi-Fi or an external service is temporarily unavailable, Inkora can render the last cached calendar and weather data. The e-paper display remains readable even while the ESP32-S3 is asleep or disconnected from power.
In everyday use, Inkora has achieved more than three months on one battery charge. Actual battery life depends on battery capacity and condition, Wi-Fi signal quality, synchronization interval, display type, refresh frequency, and configuration.
Privacy by designInkora does not use a central Inkora calendar server to collect users’ calendar contents.
The device communicates directly with Google, Apple/iCloud, and the weather service. Google access is read-only, so Inkora cannot create, modify, or delete calendar events.
Calendar credentials and configuration are stored locally on the device. The Inkora server supplies installation files, firmware updates, and signed language, region, font, and display packages; it is not a central storage service for calendar events.
Apple/iCloud credentials and calendar data communicate directly with Apple’s CalDAV service and do not pass through the Inkora server.
Read the complete Inkora Privacy Policy.
Firmware installation and updatesThe initial setup firmware is installed through the browser. It then downloads the current production firmware from the official Inkora distribution.
Inkora supports automatic and manual update checks. Firmware and downloadable content packages are signed and verified before activation. If verification fails, the new firmware is not activated.
The firmware uses an A/B update layout. A new image is written to the inactive application partition and is activated only after verification. This provides a safer recovery path if an update cannot start correctly.
Devices running firmware older than 1.1.0 should be installed once through the current web installer so the correct board and display profile can be detected and saved.
Project availability and licenceInkora is a public DIY project, but its firmware is not open source.
Publicly available:
- printable enclosure files;
- component information;
- assembly and setup documentation;
- English and Czech user manuals;
- browser-based installation;
- compiled firmware for private, non-commercial use.
Firmware source code is not publicly distributed.
Commercial use, sale, commercial redistribution, inclusion with commercially offered devices, firmware re-hosting, or redistribution of firmware files requires prior written permission from the author.
Inkora does not require a subscription, and its normal features are not locked behind payment.
Current public firmwareThe current public release is firmware 1.1.7, published on 9 October 2026.
Compared with the version originally described on this page, the current firmware adds:
- support for both LaskaKit ESPink 3.6 and Seeed Studio EE05;
- support for Waveshare 7.5-inch B V2 and Good Display GDEM075F52 panels;
- nine interface languages;
- additional regional packs, including Austria, Spain, France, and the United States;
- independent language, region, and time-zone settings;
- automatic time-zone suggestion;
- 12/24-hour time, selectable date formats, week start, and temperature units;
- up to six custom waste collection schedules;
- optional quiet hours;
- improved onboarding and installer handoff;
- lower memory usage and improved stability;
- improved update routing for individual boards and channels.
See the current release notes.
About the authorMy name is Vojtěch Sejkora. I am a musician, teacher, and self-taught maker; software development is not my profession.
Inkora grew from a practical need in our home and from the idea that useful electronics should not require every user to become an electronics engineer.
I develop the project in my free time, usually in the evenings when family life allows it. That is also why one of the central design rules is simplicity: a useful feature should not introduce another server, subscription, or technical obstacle unless it is genuinely necessary.
Project links- Project website: https://vsejkora.cz/en
- Browser installer: https://inkora.vsejkora.cz/install/en
- 3D files and assembly documentation: Printables
- Firmware releases: https://vsejkora.cz/en/releases
- Feature ideas and voting: https://vsejkora.cz/en/ideas
- Bug reports: https://vsejkora.cz/en/bugs
- Optional support: Ko-fi
Future work focuses on stability, simple setup, broader hardware availability, additional useful regional data, lower memory use, and further power optimization.
New features are prioritized through public suggestions and voting instead of being added only to make the feature list longer.
Inkora connection overview
Do not present the ESP32 GPIO table as something the builder must wire manually. The display connects through the board's prepared connector.


Comments