vpapoglou
Published © GPL3+

Monitoring System for Cold-Chain Operations

Handling the environmental conditions using sensors, air-conditioner IR signals and remote monitoring by sending data to the cloud.

BeginnerProtip648
Monitoring System for Cold-Chain Operations

Things used in this project

Hardware components

Arduino UNO
Arduino UNO
×1
IR receiver (generic)
×1
IR receiver (generic)
×1
DHT11 Temperature & Humidity Sensor (3 pins)
×1
Arduino NodeMcu
×1
Breadboard (generic)
×1
Jumper wires (generic)
×1
USB-A to B Cable
USB-A to B Cable
×1
USB-A to Mini-USB Cable
×1
GPS Module (Generic)
×1

Software apps and online services

Arduino IDE
Arduino IDE
ThingSpeak API
ThingSpeak API

Story

Read more

Schematics

Circuit Diagram

Some hardware is shown different in the image from what I used. For example my DHT11 Sensor has three nodes instead of four like in the image and the NodeMCU I used is different than the "Photon" board in the image. But the connections are the same, just in a different position. You can easily just connect the wires in your corresponding Vcc or GND. What's more, you don't need to make all the connections of the NodeMCU like I did because the DHT11 sensor already is connected to GND and Vcc. I did all the three connections needed though, in case someone wanted to use the DHT11 sensor without sending the values to the Arduino board. I provide more explanations in the code section.

A closer look to the connections.

A closer look to the connections.

A closer look to the connections.

Code

Printing Temperature and Humidity

Arduino
Printing the room Temperature and Humidity values from DHT11 sensor in the Arduino IDE serial monitor.
//Printing Temperature and Humidity
//Printing the room Temperature and Humidity values from DHT11 sensor in the Arduino IDE serial monitor.

// The library we need for sensor DHT11
#include <dht.h>

#define dht_apin A0 // The Arduino analog pin in which the DHT11 Sensor is connected to
 
dht DHT; //The object that will handle the values of temperature and humidity
 
void setup(){
 
  Serial.begin(9600);
  delay(500); //Delay 0.5 sec to let system boot
  Serial.println("DHT11 Humidity & temperature Sensor\n\n");
  delay(1000);//Wait 1 sec before accessing Sensor
 
}
 
void loop(){
    //Start of Program 
 
    DHT.read11(dht_apin); //read from the A0 analog pin of Arduino
    
    Serial.print("Current humidity = ");
    Serial.print(DHT.humidity);
    Serial.print("%  ");
    Serial.print("temperature = ");
    Serial.print(DHT.temperature); 
    Serial.print("C and ");
    //We convert the temperature to fahrenheit
    Serial.print(DHT.temperature*1.8 + 32);
    Serial.println("F");
      
    delay(2000);//Wait 2 seconds before accessing the sensor again.
}

Decoding the IR signal for air-conditioner

Arduino
We decode the IR signal sent by the remote controller of air-conditioner. We press the buttons ON and OFF and the IR Receiver will receive this signal which after that is decoded in order to send it back again afterwards.
//Decoding the IR signal for air-conditioner
//We decode the IR signal sent by the remote controller of air-conditioner. We press the buttons ON and OFF and the IR Receiver will receive this signal which after that is //decoded in order to send it back again afterwards.

#define IRpin_PIN PIND
#define IRpin 6
#define MAXPULSE 65000
#define RESOLUTION 20

//the array where the IR signal will be saved
uint16_t pulses[100][2];
uint8_t currentpulse = 0;

void setup(void) {
  Serial.begin(9600);
  Serial.println("Ready to decode IR!");
}

void loop(void) {
    uint16_t highpulse, lowpulse;
    highpulse = lowpulse = 0;
  
    //reading the signal
    while (IRpin_PIN & (1 << IRpin)) {
      
      highpulse++;
      delayMicroseconds(RESOLUTION);

      if ((highpulse >= MAXPULSE) && (currentpulse != 0)) {
        printpulses(); //method for printing results
        currentpulse=0;
        return;
      }
    }

    pulses[currentpulse][0] = highpulse;
    //reading of signal
    while (! (IRpin_PIN & _BV(IRpin))) {

      lowpulse++;
      delayMicroseconds(RESOLUTION);
      if ((lowpulse >= MAXPULSE) && (currentpulse != 0)) {
        printpulses(); //method for printing results
        currentpulse=0;
        return;
      }
    }
    pulses[currentpulse][1] = lowpulse;

    currentpulse++;
}
//method for printing the decoding of IR signal
void printpulses(void) {
 
  Serial.println("int IRsignal[] = {");
  for (uint8_t i = 0; i < currentpulse-1; i++) {
    Serial.print("\t");
    Serial.print(pulses[i][1] * RESOLUTION / 10, DEC);
    Serial.print(", ");
    Serial.print(pulses[i+1][0] * RESOLUTION / 10, DEC);
    Serial.println(",");
  }
  Serial.print("\t");
  Serial.print(pulses[currentpulse-1][1] * RESOLUTION / 10, DEC);
  Serial.print(", 0};");
}

Handling the room temperature by sending IR signal to turn on/off the air-conditioner

Arduino
We set specific temperature values and check the ambient conditions through the DHT temperature and humidity sensor. We have set as desired room temperature the 20 ° C and the signal is sent per minute. If the conditions are not what we need, the Arduino board via IR Transmitter sends the appropriate signal either to turn on or off the air conditioning.
//Handling the room temperature by sending IR signal to turn on/off the air-conditioner

//We set specific temperature values and check the ambient conditions through the DHT temperature and humidity sensor. We have set as desired room temperature the 20 ° C and the //signal is sent per minute. If the conditions are not what we need, the Arduino board via IR Transmitter sends the appropriate signal either to turn on or off the air //conditioning.

//The libraries we need for handling IR singals and DHT11 sensor
#include <IRremote.hpp>
#include <dht.h>

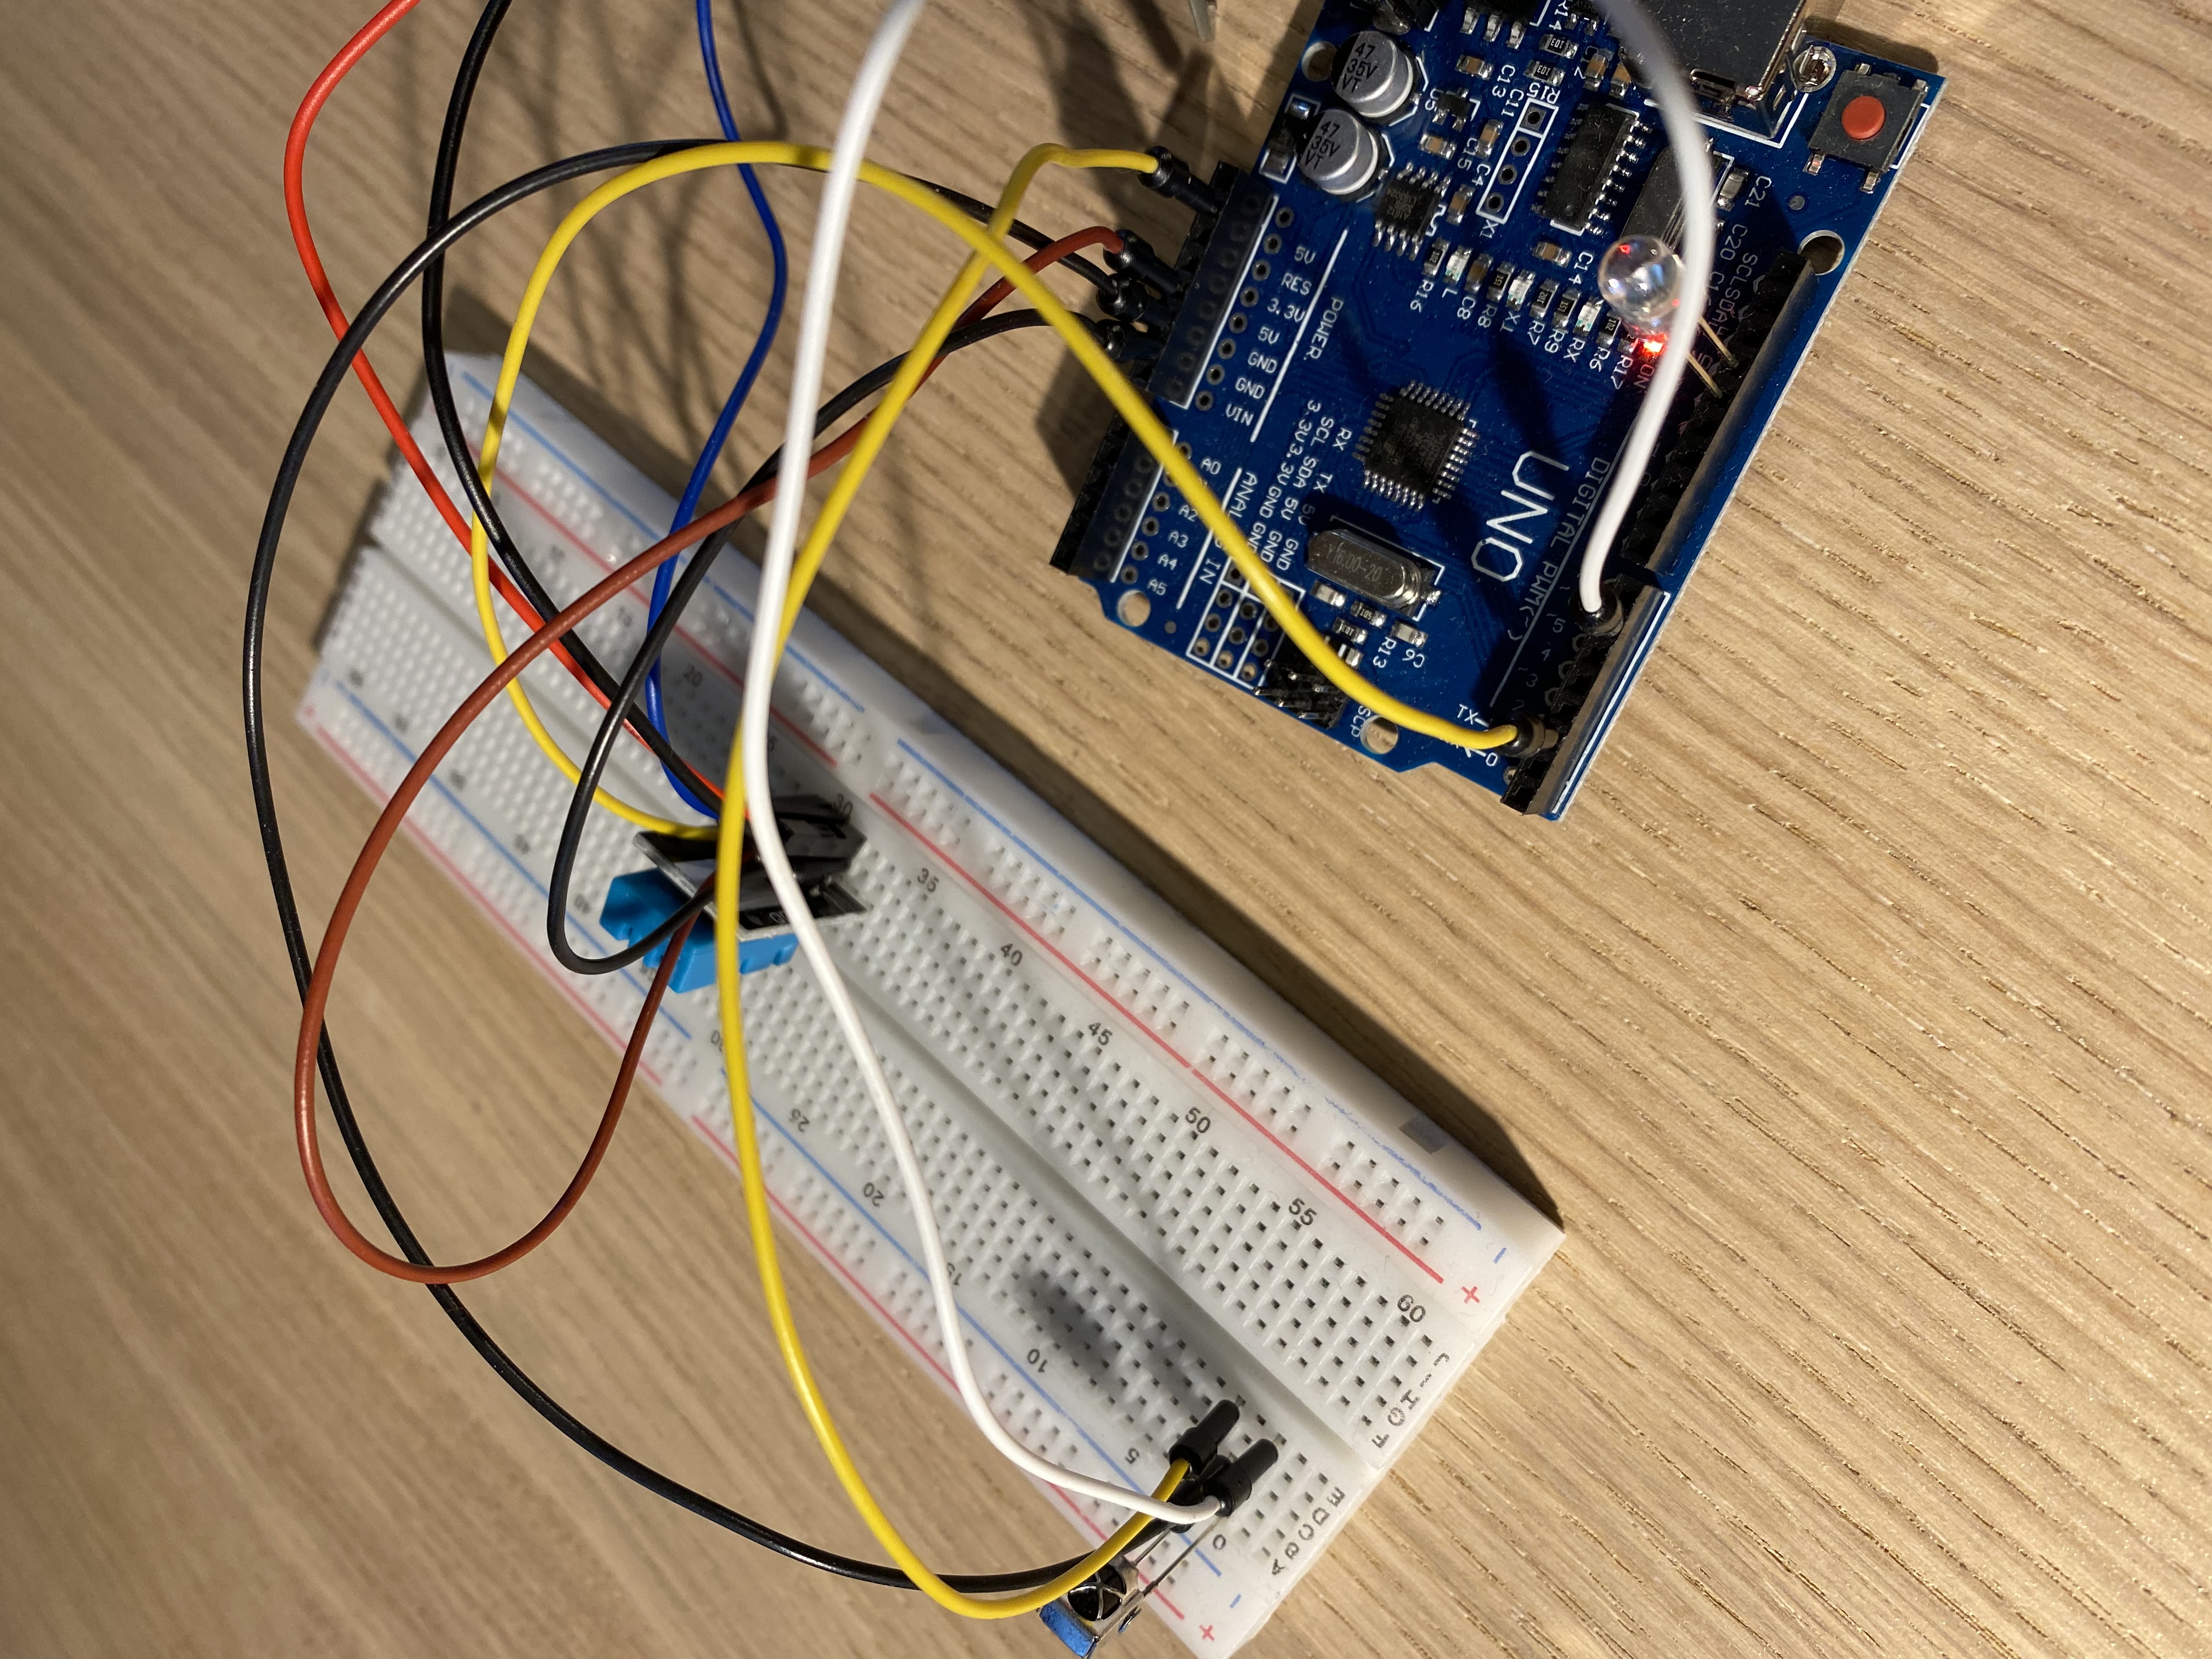
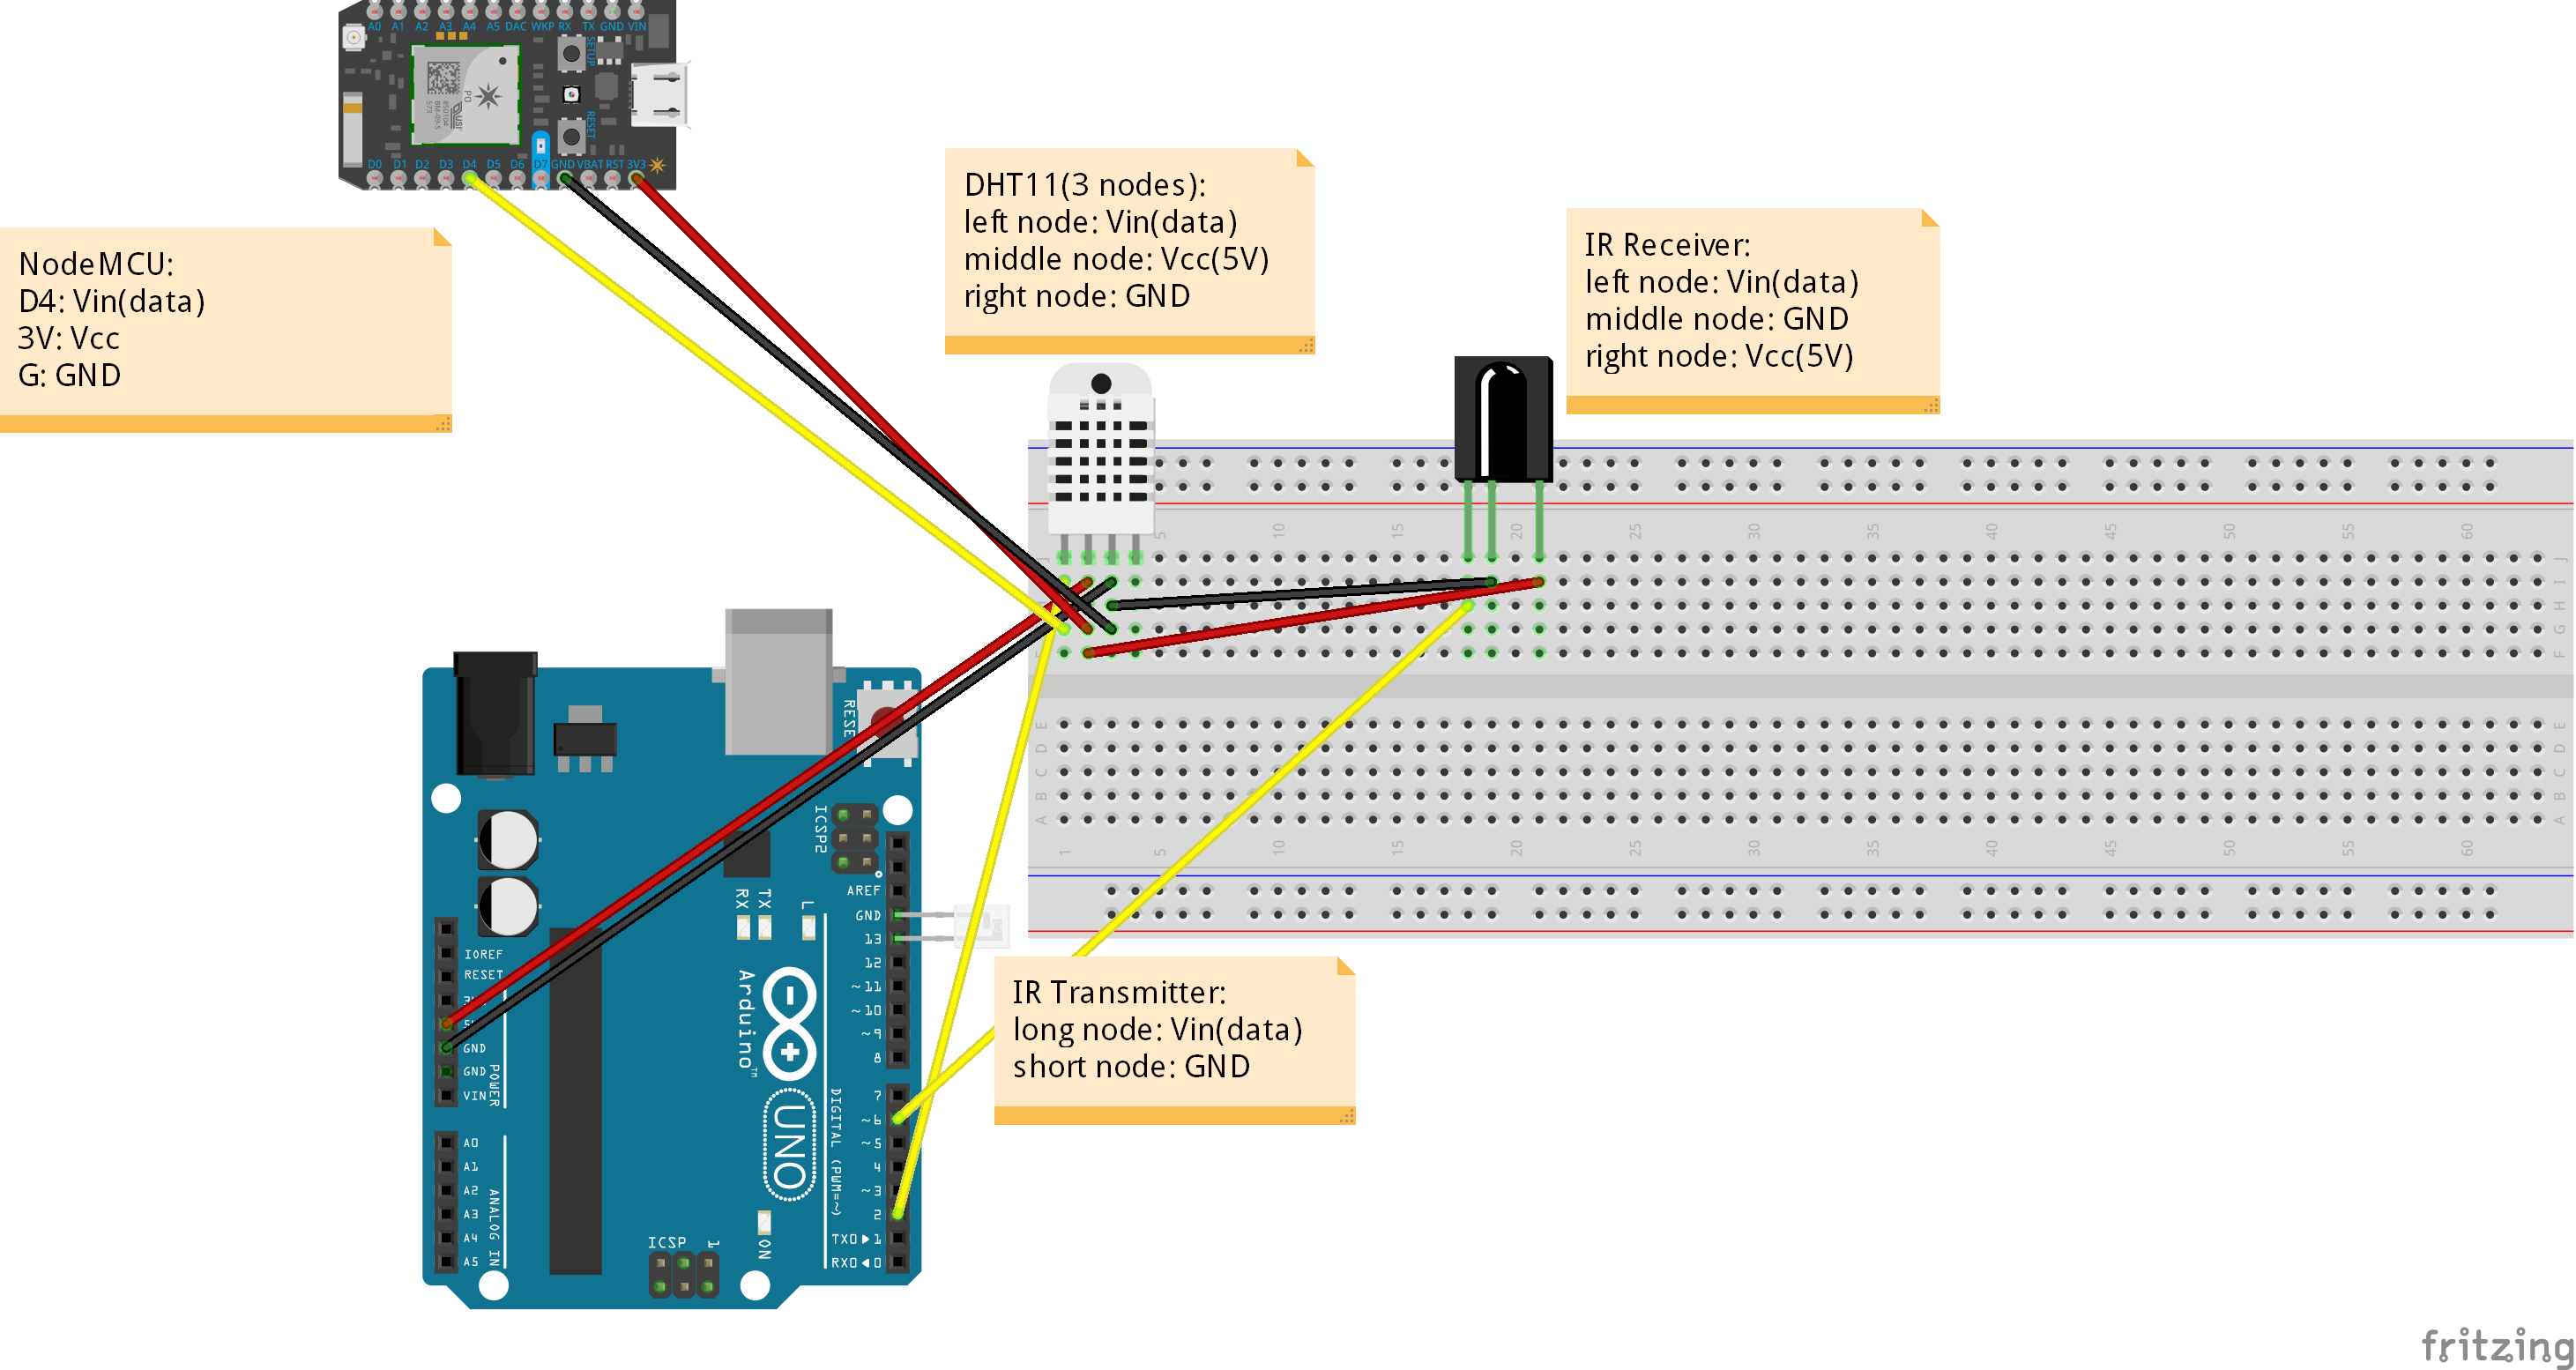
//defining the Arduino pin where we connect DHT11 sensor
#define dht_apin A0
//defining the Arduino pin where we connect IR Transmitter
#define IRledPin 13
#define NumIRsignals 200

dht DHT;

int IRsignalON[] = {

//put your own signal here
/*
456, 454,
58, 164,
58, 52,
58, 166,
56, 164,
58, 54,
58, 52,
58, 164,
58, 54,
58, 52,
58, 164,
58, 54,
56, 54,
58, 164,
58, 164,
58, 54,
56, 166,
58, 164,
58, 52,
58, 164,
58, 164,
58, 164,
58, 164,
58, 164,
58, 164,
58, 54,
58, 164,
58, 52,
58, 54,
58, 52,
58, 54,
56, 54,
58, 52,
58, 166,
56, 54,
58, 164,
58, 164,
58, 164,
58, 164,
58, 54,
56, 54,
58, 54,
56, 164,
58, 54,
58, 52,
58, 54,
58, 52,
58, 164,
58, 164,
58, 536,
456, 456,
56, 166,
56, 54,
58, 164,
58, 164,
58, 52,
58, 54,
58, 164,
58, 52,
58, 54,
56, 166,
58, 52,
58, 54,
56, 166,
58, 164,
58, 52,
58, 164,
58, 164,
58, 54,
58, 164,
58, 164,
58, 164,
58, 164,
58, 164,
58, 164,
58, 54,
56, 164,
58, 54,
58, 52,
58, 54,
58, 52,
58, 54,
58, 52,
58, 164,
58, 54,
56, 166,
56, 166,
56, 166,
56, 166,
56, 54,
58, 52,
58, 54,
58, 164,
58, 52,
58, 54,
58, 52,
58, 54,
56, 166,
58, 164,
58, 0
*/
};

int IRsignalOFF[] = {

//put your own signal here
/*
458, 454,
58, 164,
58, 52,
58, 164,
58, 164,
58, 54,
58, 52,
58, 164,
58, 54,
56, 54,
58, 164,
58, 54,
56, 54,
58, 164,
58, 164,
58, 52,
58, 164,
58, 54,
58, 164,
58, 164,
58, 164,
58, 164,
58, 54,
56, 166,
56, 166,
58, 164,
58, 52,
58, 54,
58, 52,
58, 54,
56, 166,
58, 52,
58, 54,
56, 166,
56, 166,
56, 166,
56, 54,
58, 54,
56, 54,
58, 52,
58, 54,
58, 52,
58, 54,
58, 52,
58, 164,
58, 164,
58, 164,
58, 164,
58, 164,
58, 536,
456, 454,
58, 164,
58, 54,
58, 164,
58, 164,
58, 52,
58, 54,
58, 164,
58, 52,
58, 54,
58, 164,
58, 52,
58, 54,
58, 164,
58, 164,
58, 52,
58, 164,
58, 54,
58, 164,
56, 166,
56, 166,
58, 164,
58, 52,
58, 164,
58, 164,
58, 164,
58, 54,
58, 52,
58, 54,
58, 52,
58, 164,
58, 54,
56, 54,
58, 164,
58, 164,
58, 164,
58, 52,
58, 54,
58, 52,
58, 54,
58, 52,
58, 54,
58, 52,
58, 54,
58, 164,
56, 166,
58, 164,
58, 164,
58, 164,
58, 0
*/
};

void setup() {
  //Confirming that IR is off in the beginning
  digitalWrite(IRledPin, LOW); 
  pinMode(IRledPin, OUTPUT); 
  Serial.begin(9600);        
}

void loop() {
    //reading from sensor
    DHT.read11(dht_apin);
    //printing values from sensor
    Serial.print("Current humidity = ");
    Serial.print(DHT.humidity);
    Serial.print("%  ");
    Serial.print("temperature = ");
    Serial.print(DHT.temperature); 
    Serial.print("C ~ ");
    Serial.print(DHT.temperature*1.8 + 32);
    Serial.println("F");
    /*If temperature is less than 19°C --> send IR signal for turning on the air-conditioner*/
    if(DHT.temperature < 19)
    {
      Serial.println("Temperature low --> AC powered on");
      for (int i = 0; i < NumIRsignals; i+=2) 
      {
        //send IR signal of turning on the air-conditioner
        pulseIR(IRsignalON[i]*10);
        //turning off the IR Transmitter
        delayMicroseconds(IRsignalON[i+1]*10);  
      }
    }
    
    /*If temperature is more than 19°C --> send IR signal for turning off the air-conditioner*/
    if(DHT.temperature > 19)
    {
      Serial.println("Temperature high --> AC powered off");
      for (int i = 0; i < NumIRsignals; i+=2) 
      {
        //send IR signal of turning off the air-conditioner
        pulseIR(IRsignalOFF[i]*10);  
        //turning off the IR Transmitter
        delayMicroseconds(IRsignalOFF[i+1]*10); 
      }
    }
    //wait for 60 secs and repeat
    delay(60000);
}

//method for sending the IR signal
void pulseIR(long microsecs) {
  
  //turns off any background interrupts
  cli();  
 
  while (microsecs > 0) {
    
   digitalWrite(IRledPin, HIGH); 
   delayMicroseconds(10);         
   digitalWrite(IRledPin, LOW);   
   delayMicroseconds(10);         
 
   microsecs -= 26;
  }
  //turns on background interrupts
  sei();  
}

Connecting NodeMcu to WiFi and sending data to the Cloud.

Arduino
This code first connects NodeMcu to WiFi and then sends the data to the ThingSpeak page. At https://thingspeak.com/ we can create a Channel that will have its own fields, graphs and API keys so we can do our own updates. So in the code we need to add the WiFi name and code as well as the Channel ID and the Write API Key of ThingSpeak. Finally, we upload the code to NodeMcu by selecting "NodeMCU 1.0 (ESP-12E Module)" as a board tool.
//Connecting NodeMcu to WiFi and sending data to the Cloud
//This code first connects NodeMcu to WiFi and then sends the data to the ThingSpeak page. At https://thingspeak.com/ we can create a Channel that will have its own fields, graphs //and API keys so we can do our own updates. So, in the code we need to add the WiFi name and code as well as the Channel ID and the Write API Key of ThingSpeak. Finally, we upload //the code to NodeMcu by selecting "NodeMCU 1.0 (ESP-12E Module)" as a board tool.

#include <ESP8266WiFi.h>
#include <dht.h>
#include <ThingSpeak.h>

dht DHT;
#define DHT11_PIN D4
/* creating object for connecting on WiFi and variables for Channel ID and Write API Key in ThingSpeak */
WiFiClient client;

long myChannelNumber = yourChannelID;
const char myWriteAPIKey[] = "yourAPIKey";

void setup() {
  Serial.begin(9600);
  //connect on WiFi
  WiFi.begin("Your SSID", "Your Pass");
  while(WiFi.status() != WL_CONNECTED)
  {
    delay(200);
    Serial.print("..");
  }
  Serial.println();
  Serial.println("NodeMCU is connected!");
  Serial.println(WiFi.localIP());
  //Start ThingSpeak with WiFi credentials
  ThingSpeak.begin(client);
}

void loop() {
  int chk = DHT.read11(DHT11_PIN);
  float h = DHT.humidity;
  float t = DHT.temperature;
  Serial.println("Temperature: " + (String) t);
  Serial.println("Humidity: " + (String) h);
  /*sending temperature and humidity values to field1 and field2 of ThingSpeak*/
  ThingSpeak.setField(1, t);
  ThingSpeak.setField(2, h);
  int x = ThingSpeak.writeFields(myChannelNumber, myWriteAPIKey);
  if(x == 200){
    Serial.println("Channel update successful.");
  }
  else{
    Serial.println("Problem updating channel. HTTP error code " + String(x));
  }
  delay(20000);
}

Sending email alerts in case of wrong temperature.

Arduino
We will add the function of sending email in case the temperature is different than 20 ° C. To perform this function we will create a new gmail account which will be the sender. So, in case we have a different value than 20 ° C in the loop we have created, an email will be sent from the new email alert account through the NodeMCU.
//Sending email alerts in case of wrong temperature
//We will add the function of sending email in case the temperature is different than 20 ° C. To perform this function we will create a new gmail account which will be the sender. //So, in case we have a different value than 20 ° C in the loop we have created, an email will be sent from the new email alert account through the NodeMCU.

#include <ESP_Mail_Client.h>
#include <ESP_Mail_FS.h>
#include <SDK_Version_Common.h>

#include <ESP8266WiFi.h>
#include <dht.h>
#include <ThingSpeak.h>
//Defining the WiFi credentials
#define WIFI_SSID "Your SSID"
#define WIFI_PASSWORD "Your pass"
//Defining the host we will use for the emails, I use gmail
#define SMTP_HOST "smtp.gmail.com"
#define SMTP_PORT 465

/* The sign in credentials of the new created email */
#define AUTHOR_EMAIL "your new gmail account"
#define AUTHOR_PASSWORD "your new password"

/* Defining recipient's email*/
#define RECIPIENT_EMAIL "your preferred recipient"

/* The SMTP Session object used for Email sending */
SMTPSession smtp;

/* Declare the message class */
 SMTP_Message message;

/* Callback function to get the Email sending status */
void smtpCallback(SMTP_Status status);

dht DHT;
#define DHT11_PIN D4

WiFiClient client;

long myChannelNumber = yourChannelID;
const char myWriteAPIKey[] = "yourWriteAPIKey";

void setup() {
  
  Serial.begin(9600);
  // Connect to WiFi
  WiFi.begin(WIFI_SSID, WIFI_PASSWORD);
  while(WiFi.status() != WL_CONNECTED)
  {
    delay(200);
    Serial.print("..");
  }
  Serial.println();
  Serial.println("NodeMCU is connected!");
  Serial.println(WiFi.localIP());
  //DHT.begin();
  ThingSpeak.begin(client);

  /* Set the callback function to get the sending results */
  smtp.callback(smtpCallback);

  /* Declare the email session config data */
  ESP_Mail_Session session;

  /* Set the session config */
  session.server.host_name = SMTP_HOST;
  session.server.port = SMTP_PORT;
  session.login.email = AUTHOR_EMAIL;
  session.login.password = AUTHOR_PASSWORD;
  session.login.user_domain = "";

  /* Set the message headers */
  message.sender.name = "ESP";
  message.sender.email = AUTHOR_EMAIL;
  message.subject = "ESP Alert Email";
  message.addRecipient("Vasileios", RECIPIENT_EMAIL);

  /* Connect to server with the session config */
  if (!smtp.connect(&session))
    return;
}

void loop() {
  
  int chk = DHT.read11(DHT11_PIN);
  float h = DHT.humidity;
  float t = DHT.temperature;
    
  if(t!=20){
    /*Defining the HTML message of the email*/
    String htmlMsg = "<div style=\"color:#2f4468;\"><h1>Hello World!</h1><p>- Sent from ESP board: Temperature needs caution:!</p></div>" + (String)t + "° C";
    message.html.content = htmlMsg.c_str();
    message.html.content = htmlMsg.c_str();
    message.text.charSet = "us-ascii";
    message.html.transfer_encoding = Content_Transfer_Encoding::enc_7bit;

    /* Start sending Email and close the session */
    if (!MailClient.sendMail(&smtp, &message))
      Serial.println("Error sending Email, " + smtp.errorReason());
  }
  
  Serial.println("Temperature: " + (String) t);
  Serial.println("Humidity: " + (String) h);
  
  ThingSpeak.setField(1, t);
  ThingSpeak.setField(2, h);
  int x = ThingSpeak.writeFields(myChannelNumber, myWriteAPIKey);
  if(x == 200){
    Serial.println("Channel update successful.");
  }
  else{
    Serial.println("Problem updating channel. HTTP error code " + String(x));
  }
  delay(20000);
}

/* Callback function to get the Email sending status */
void smtpCallback(SMTP_Status status){
  /* Print the current status */
  Serial.println(status.info());

  /* Print the sending result */
  if (status.success()){
    Serial.println("----------------");
    ESP_MAIL_PRINTF("Message sent success: %d\n", status.completedCount());
    ESP_MAIL_PRINTF("Message sent failed: %d\n", status.failedCount());
    Serial.println("----------------\n");
    struct tm dt;

    for (size_t i = 0; i < smtp.sendingResult.size(); i++){
      /* Get the result item */
      SMTP_Result result = smtp.sendingResult.getItem(i);
      time_t ts = (time_t)result.timestamp;
      localtime_r(&ts, &dt);
      //printing info regarding the email sent
      ESP_MAIL_PRINTF("Message No: %d\n", i + 1);
      ESP_MAIL_PRINTF("Status: %s\n", result.completed ? "success" : "failed");
      ESP_MAIL_PRINTF("Date/Time: %d/%d/%d %d:%d:%d\n", dt.tm_year + 1900, dt.tm_mon + 1, dt.tm_mday, dt.tm_hour, dt.tm_min, dt.tm_sec);
      ESP_MAIL_PRINTF("Recipient: %s\n", result.recipients);
      ESP_MAIL_PRINTF("Subject: %s\n", result.subject);
    }
    Serial.println("----------------\n");
  }
}

GPS Tracking with NodeMCU and MATLAB Visualization

MATLAB
In ThingSpeak we can create Map Visualizations in order to track the location of a cargo at a specific time. We create MATLAB Visualization and through code we can choose which variables to show(e.g. Temperature), including the Latitude and Longitude variables for printing a mark on the map.
For easy testing we could send data manually to our ThingSpeak variables through the browser:
https://api.thingspeak.com/update?api_key=yourWriteAPIKey&field4=?&field3=?&field1=?
% GPS Tracking with NodeMCU and MATLAB Visualization
%In ThingSpeak we can create Map Visualizations in order to track the location of a cargo at a specific time. We create MATLAB Visualization and through code we can choose which variables to show(e.g. Temperature), including the Latitude and Longitude variables for printing a mark on the map.
%For easy testing we could send data manually to our ThingSpeak variables through the browser: (in my case field4 was the longitude, field3 the latitude and field1 the temperature)
%https://api.thingspeak.com/update?api_key=yourWriteAPIKey&field4=?&field3=?&field1=?

% the <'NumPoints',3> indicates that the last 3 values will be shown
lat = thingSpeakRead(yourChannelID,'Fields',3,'ReadKey','yourReadKey','NumPoints',3,'Timeout',50);
lon = thingSpeakRead(yourChannelID,'Fields',4,'ReadKey','yourReadKey','NumPoints',3,'Timeout',50);
temp = thingSpeakRead(yourChannelID,'Fields',1,'ReadKey','yourReadKey','NumPoints',3,'Timeout',50);
%red indicated the color of marks and filled indicates how the mark will look like 
geoscatter(lat,lon,temp,'red','filled');
geobasemap('streets');

MATLAB Visualization with scaling

MATLAB
This is a different version of the previous one. The marks on the map are as big as the value of a variable that we choose. In this case, the mark is as big as the value of temperature.
For easy testing we could send data manually to our ThingSpeak variables through the browser:
https://api.thingspeak.com/update?api_key=yourWriteAPIKey&field4=?&field3=?&field1=?
% MATLAB Visualization with scaling
%This is a different version of the previous one. The marks on the map are as big as the value of a variable that we choose. In this case the mark is as big as the value of temperature.
%For easy testing we could send data manually to our ThingSpeak variables through the browser: (in my case field4 was the longitude, field3 the latitude and field1 the temperature)
%https://api.thingspeak.com/update?api_key=yourWriteAPIKey&field4=?&field3=?&field1=? */

% the <'NumPoints',3> indicates that the last 3 values will be shown
lat = thingSpeakRead(yourChannelID,'Fields',3,'ReadKey','yourReadKey','NumPoints',3,'Timeout',50);
lon = thingSpeakRead(yourChannelID,'Fields',4,'ReadKey','yourReadKey','NumPoints',3,'Timeout',50);
temp = thingSpeakRead(yourChannelID,'Fields',1,'ReadKey','yourReadKey','NumPoints',3,'Timeout',50);
%indicate how map will look like
geobasemap('streets');
geobubble(lat,lon,temp,zoom=5);

Credits

vpapoglou
0 projects • 1 follower

Comments