
Hardware components | ||||||
 |
| × | 1 | |||
 |
| × | 1 | |||
| × | 1 | ||||
| × | 1 | ||||
 |
| × | 4 | |||
 |
| × | 1 | |||
 |
| × | 1 | |||
 |
| × | 1 | |||
 |
| × | 1 | |||
| × | 1 | ||||
| × | 1 | ||||
| × | 1 | ||||
 |
| × | 1 | |||
| × | 1 | ||||
| × | 1 | ||||
Software apps and online services | ||||||
 |
| |||||
_4YUDWziWQ8.png?auto=compress%2Cformat&w=48&h=48&fit=fill&bg=ffffff) |
| |||||
Hand tools and fabrication machines | ||||||
| ||||||
 |
| |||||
 |
| |||||
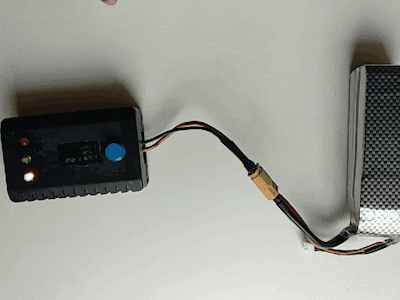
Currently, there are mechanical switches to turn on and off of devices involving high current and high voltage like drones, solar power grids, high power appliances etc. In custom-made drones, power is provided by plugging in the LiPo battery. These mechanical operations create sparks and hence cause wear and tear of connectors or even burning. Sparks are generated due to more presence of inductive or capacitive elements in load i.e BLDC motors and capacitors in ESCs. The battery voltage resists the connection of load and hence ionizes thin layer of air and causes sparks. Higher the voltage Higher the sparks. This burns the plastic part of the connector or destroys the gold plated connectors. There are examples where connectors gets destroyed in mere 10 to 15 operations of plugging in and out. This problem also persists in mechanical switches involving power hungry loads. Along with connectors some sensitive circuits in drones gets destroyed due to peak current surge in the circuit while connecting.
The smart soft switch will be using 600 V CoolMOS™ C7 Gold superjunction MOSFET for switching on and off. Single push button to turn ON and turn OFF. Hence there will be no or minimal loss in energy and no damage to switches or connector.
Currently, there is no soft switch available for custom drones or for high power appliances people use mechanical switches or battery connectors to power up these devices. This causes issues like sparks and burning of external plastic housings or even the switch itself.
Step One: What the end goal is....?A push button based ON/OFF switch using CoolMOS™ C7 Gold superjunction MOSFET also the smart soft switch will be very useful as it can switch between on-off without any significant loss energy also it is smart an hence it can measure the current flowing through it.
I have mentioned all the required components in things section
Step Three: SchematicsAs we can see the schematics involves many passive and active components for this circuit. This involves 2 sections switching section and data acquisition section. In data acquisition section micro-controller reads the current consumption and records data in SD cards and also displays it on OLED screen. Here I'm using 0.96" I2C OLED display and Arduino Pro Mini for micro-controller. CoolMOS™ C7 Gold superjunction MOSFET serves as a heart of the circuit by performing switching action. Here I will do the prototyping on the perf board as my PCB is not ready yet. You can find the schematics and PCB designs at www.github.com/vishwasnavada/SoftSwitch
Step Four: WorkingInitially the capacitor in the circuit is discharged and hence there is no signal at the base of the PNP transistor BC557, hence the output of the transistor will be low and hence CoolMOS™ C7 Gold superjunction MOSFET will be turned OFF.
The capacitor gets charged by the resistor R4 (330K) to the maximum input voltage. When the button is pressed this voltage goes to gate of the MOSFET turning the MOSFET on rapidly followed by transistor.
If the switch is held closed the gate voltage will be defined by the voltage divider formed by R1 and R4. Since Q1 is saturated the junction of R1 and R2 is pulled up to +Vs (Supply voltage). The junction of R3 and R4 is pulled down to zero volt by MOSFET drain. With the switch closed the the Vgs of MOSFET is given by
Vgs= Vs*R4/(R4+R1)
which is 12*330K/(340K) = 12*0.97
This will hold the gate of the MOSFET at a higher voltage making the Q2 ON.
In the same way if the push button is pressed when the device is ON the gate of Q2 is pulled low hence turning off the MOSFET allowing the junction of R3 and R4 raise to the +Vs through load impedance and R5. At the same time, Q1 also switches off, such that Q2's gate is pulled to 0V via the series combination of R1 & R2. If the switch is released immediately, C2 will simply charge up toward +Vs via R4. However, if the switch is kept closed, Q2's gate voltage will be defined by the potential divider formed mainly by R4 and R1+R2. If we assume that the OUT (-) terminal is roughly equal to +Vs when the circuit is unlatched, Q2's gate-source voltage is given by: Vgs= (+Vs) × (R1 + R2)/(R4 + R1 + R2) = 0.05*Vs
Even if Vs is as high as 20V, the resulting gate-source voltage of around 2V will be too low to switch the MOSFET on again. Consequently, both transistors remain off until the switch contacts open.
The debouncing time can be calculated by using time constant of R4 and C2 which is nearly 0.33s. Smaller time constants may lead to erratic behaviour, whereas a larger time constant increases the waiting time between switch closures necessary to ensure that C2 charges and discharges properly.
The micro-controller reads the current through hall effect based current sensor ACS 712 and Voltage through voltage divider network. The data is displayed on the OLED Screen. Voltage can be measured at input to find the energy consumption, but if you want to measure the complete energy consumption of DC unit including the SoftSwitch itself, you can measure both parameters in beginning only. SD card with SPI interface allows one to read the data for diagnosis purpose. (Not included in this version).
Step Five: Applications and future enhancementsThe applications are as follows:
1. Spark free switching in custom DIY drones and large scale industrial survey drones with mammoth battery (Like 6s)
2. Energy monitoring and switching of home appliances and electric grids like solar grids. Thanks to high voltage capacity of MOSFET.
3. Easy switching in Electric Bikes and vehicles.
4. Since it has data logging feature it can be used as a black box if something goes wrong.
Future enhancements: The data can be wirelessly monitored over wifi by adding a peripheral like bluetooth or wifi to the switch.
IP67 enclosure to survive rugged industrial and automotive environment.


_Ujn5WoVOOu.png?auto=compress%2Cformat&w=40&h=40&fit=fillmax&bg=fff&dpr=2)


_3u05Tpwasz.png?auto=compress%2Cformat&w=40&h=40&fit=fillmax&bg=fff&dpr=2)
Comments