
Hardware components | ||||||
_ztBMuBhMHo.jpg?auto=compress%2Cformat&w=48&h=48&fit=fill&bg=ffffff) |
| × | 1 | |||
 |
| × | 1 | |||
 |
| × | 1 | |||
| × | 1 | ||||
| × | 1 | ||||
| × | 1 | ||||
| × | 1 | ||||
 |
| × | 1 | |||
| × | 1 | ||||
 |
| × | 1 | |||
Software apps and online services | ||||||
 |
| |||||
Hand tools and fabrication machines | ||||||
| ||||||
 |
| |||||
| ||||||
the reason I chose this topic is cause nowadays we see a lot of RF(Radio frequency) remote control toys but the main problem for those toys is listed below
1) no secure connection which means a car can be controlled by any RF remote
2)signal attenuation occurs when car is controlled by two RF remotes which means in simple terms the car gets confused and doesn't respond
3) RF receivers come in fixed frequencies and cannot be tuned and hence we cant avoid the above problem
Solution:This where the Ir receiver comes to play so for this project I am using an Ir receiver TSOP1738 you guys can also use the 1838 version, it"s all the same in functionality, also the pin diagram for this component is shown below so that u guys dont accidentally shot the sensor also if sensor is shot guys then its is of NO USE
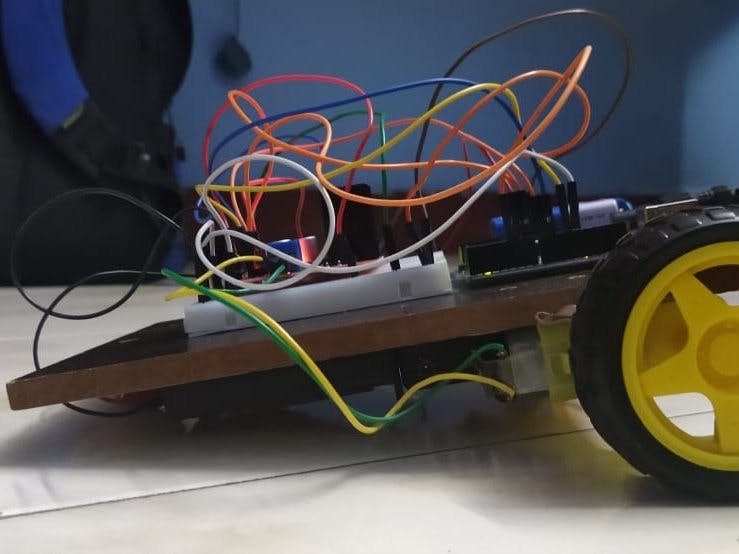
Also guys I am using a bread board in my project for better connectivity between the arduino and the sensor.I suggest u guys to do the same, if there is any loose contact sensor might not actually work as expected, I am using a motor shield for equally distributing power between the two DC motors also I suggest you guys use the motor shield as it comes with an inbuilt hit sink on top of the L2939D ic chip as we all know that ic chips are very sensitive to high voltages, temperature also if this ic chip gets cooked up then the motors wont function properly, by the way we get these L2939D ic chips separately.And at last but not the least I am using a 12 volt AA battery holder, a 9 volt battery holder and its connector. the reason I am using a 12 volt AA battery holder is cause to power the motors in any project we need a lot of power to power them up.One more thing guys after completing the connection and powering up the setup using the 12 volt AA battery holder you guys might think that it will be enough to power up the setup but the truth is that I would be enough but the batteries will drain at a faster rate I would say it would last for an half an hour or so and thats the reason why I am using a 9 volt battery and by connecting it to the arduino dc jack using the connector so that batteries drain at a rate slower than the one before and hence the setup might last for 2 hours or so.
Procedure:first we download the or remote library file from the URL below and then we install the library file in arduino IDE
https://www.arduinolibraries.info/libraries/i-rremote - library file
installing library file in arduino IDE
Sketch>include library>Add.ZIP library>select file location >Open
and then we copy the below code and paste it in arduino IDE software and then we connect the Ir receiver to the 6th pin of arduino and then we upload this code and run it, then open serial monitor in the arduino IDE software and for each button you press on the remote we can see its equivalent hexadecimal code and we have repeat the same for 5 different buttons(forward, backward, left, right, stop) and then copy those different hexadecimal codes and paste it the main code for its equivalent function
NOTE:if an hexadecimal value for a particular function repeats itself again please do ignore that
setup:after following the above steps of finding out the equivalent hexadecimal values for 5 different buttons in remote and then we copy those different values and paste it in this code below for its equivalent function and then finish the connections as mentioned in the document and at last upload the main code with the hexadecimal values into the arduino and then power up your project, and thats it you have made your very own IR remote control car
NOTE: do not try to power your setup only with a 9 volt battery cause the lights in the Arduino and motor shield will lit up but the motors wont work as incoming voltage is too low to power them
screenshots:1) cheap
2) simple circuit
3) secure connection
4) no signal attenuation even when using multiple remotes
conclusion:Thus together we have created a cheap and advanced remote control car which we can control with only the remote it is bound to and also at the same time it eliminates all the disadvantages of RF remote control cars
FOR FURTHER QUERIES OR PROBLEMS FACED BY YOU GUYS, DO SEND A MESSAGE IN THE COMMENT SECTION BELOW AND I WILL RESPOND BACK TO YOU GUYS
MY OTHER PROJECTS:
https://www.hackster.io/vishalsivaraman5/trash-talker-0d87de - TRASH TALKER
www.hackster.io/vishalsivaraman5/smart-dustbin-using-iot-and-arduino-mega2560-1-0-c05e95 - SMART DUSTBIN USING IOT AND ARDUINO MEGA 256


_3u05Tpwasz.png?auto=compress%2Cformat&w=40&h=40&fit=fillmax&bg=fff&dpr=2)
Comments