

Hardware components | ||||||
 |
| × | 1 | |||
 |
| × | 1 | |||
| × | 1 | ||||
Software apps and online services | ||||||
 |
| |||||
 |
| |||||
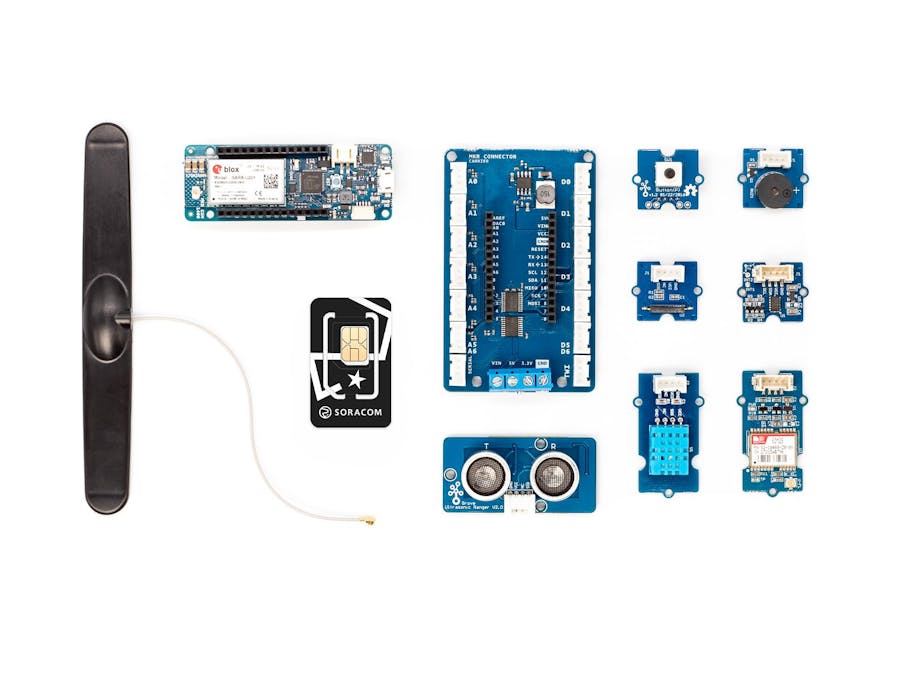
This guide uses the Soracom IoT Starter Kit – a beginner-friendly kit for anyone wanting to launch an IoT project quickly and easily.
Powered by the popular Arduino MKR GSM 1400 and MKR NB 1500 development boards, the kit includes everything you need to build a connected device.
This project walks through connecting your device to the Soracom network, how to publish and store data to Soracom Harvest, and then creating a dashboard using Soracom Lagoon.
Activate SIMSoracom Air provides worldwide, commitment-free mobile data service designed for IoT and M2M with coverage in 130 countries. The IoT and M2M SIM card provides an easy-to-use, secure connectivity platform to 2G/3G/LTE/Cat-M1 data with flexible pay-as-you-go rates.
Your device authenticates and connects to the Soracom network using the Soracom Air SIM card. Instead of having to use certificates or API tokens - the SIM card acts as the key. This gives you a secure connection on 2G/3G/LTE/Cat-M1 data.
Before inserting it into your device, the SIM card needs to be registered to an account and activated. It also needs to be attached to a Group in order to configure services like Soracom Harvest.
- Navigate to https://console.soracom.io/ to sign in or register a Soracom account.
- Choose Register SIM.
- Enter the ICCID and PUK (written on the back of the SIM card) and name your SIM - ideally something that signifies the device associated with it.
- Choose Create from the Group drop-down and name it something like "Arduino".
- Click Register.
The Arduino IDE is an open-source development environment for programming microcontrollers. It supports a wide variety of chipsets and there are libraries available for a vast majority of sensors and peripherals.
Download and install the Arduino IDE for your operating system.
https://www.arduino.cc/en/Main/Software
Install Board dependanciesTo program the Arduino MKR GSM 1400 or MKR NB 1500 you'll need to install support for Arduino SAMD Boards.
- Open the Arduino IDE
- Go to Tools > Board > Boards Manager.
- Search "Arduino SAMD Boards" and choose Install.
To install libraries:
- Open the Arduino IDE
- Go to Sketch > Manage Libraries.
- Use the search bar to find and install the libraries listed below.
- MKRGSM(Arduino MKR GSM 1400)
- MKRNB(Arduino MKR NB 1500)
- ArduinoHttpClient
- ArduinoJSON
In order to publish data to Soracom Harvest, it must be enabled. Soracom Harvest is an API for collecting, storing, and querying data - such as sensor values.
- Navigate to the Soracom Console.
- Choose Groups from the menu.
- Select the group from the list that your device is associated with.
- Select Soracom Harvest Data and set it to On and click Save.
Now that the Arduino IDE is installed and Soracom Harvest is enabled, it's time to program the device.
Open the Arduino IDE and create a new sketch. Copy and paste the contents of the example that corresponds to the board in your kit.
Program Sketch- Open the Arduino IDE
- Create a new sketch. File > New
- Copy the contents of the example sketch corresponding to your Arduino MKR device.
- Plugin the Arduino MKR device to your computer using a USB cable. Select the corresponding port in the Arduino IDE. Tools > Port
- Press upload, this compiles, verifies, and flashes the device with the new firmware. Sketch > Upload
- Open the Serial Monitor by clicking the magnifying lens icon. This will allow you to see what the device logs, such as errors, connection status, and any messages it publishes.
Once connected, the device will periodically publish the value read from Analog Pin 0 as a JSON message to the Soracom Unified Endpoint. This gets forwarded to Soracom Harvest to be stored.
{ "time": 12345678, "sensor_a0": 255 }
If you have issues connecting, try bringing your device somewhere unobstructed in order to get a better signal.
View Data in Soracom Harvest- Navigate to https://console.soracom.io/#/harvest_data
- Select SIM for resource type and then select your device from the drop down.
- Set a date range in the fields at the top right that correspond to when you would like to see data from.
- Click Search.
- Navigate to https://console.soracom.io/#/lagoon
- Follow the instructions to Configure Soracom Lagoon.
- Open the Soracom Lagoon console and create a new dashboard.
- Select Graph from the list of items.
- Click on Panel Title and select Edit.
- Under Metrics, add a Query and select your device and the JSON value you wish to query.
- Set a date range for the values collected in the top right and the panel will update.
- You can click back and Save your dashboard.
Congrats! Now you have a realtime dashboard that displays data collected from a remote cellular IoT device!
What next?!Lets recap everything we just did:
- Activated a Soracom IoT SIM card.
- Created a SIM Group.
- Enabled the Soracom Unified Endpoint.
- Enabled Soracom Harvest.
- Programmed the Arduino device with an example sketch that periodically publishes a sensor value as a JSON object to the Soracom Unified Endpoint.
- Viewed stored sensor values in Soracom Harvest Data.
- Created a custom realtime dashboard of sensor values using Soracom Lagoon.
You now have a device that can remotely publish data using a cellular connection. The data you send can be arbitrary. The example can be used as a starting point to build out custom IoT projects using the Arduino IDE.
The Soracom IoT Starter Kit GitHub repository contains examples for using all the various Grove sensors included in the kit with the Arduino IDE. Combine these with the example from this guide and make something new!
What will you build? Share with us by tweet at @SoracomIoT and #SoracomMakes
Hack the planet!


Comments