

Hardware components | ||||||
| × | 1 | ||||
 |
| × | 1 | |||
 |
| × | 3 | |||
 |
| × | 3 | |||
 |
| × | 1 | |||
 |
| × | 1 | |||
My son's high school takes part in a "Génies en Herbe" league and annual tournament. This is a popular quiz game in French-speaking provinces of Canada.
It used to be on TV:
Now it is played in school classes, typically with parents acting as referees:
There is an english version of the game known as "Reach for the top".
https://www.reachforthetop.com/
To play this game, you need a machine that determines which team and which player hits his buzzer first (a pushbutton). There are machines for sale, but they cost hundreds of dollars.
Here is one example of a machine for sale:
http://www.paleogenies.com/eng/zgbox.htm
With the help of my son, I have decided to build one using an Arduino board. For now, I only have a working prototype, but the source code is in very good shape.
The quiz machine helps determine which player and which team answers the fastest to a question by pushing a buzzer (a pushbutton). Each player has his own buzzer, to which a LED is associated. The purpose of the machine is to determine which player answers first, by turning on the LED associated with the buzzer being pushed first, and by making a sound. When a buzzer is pushed, the other buzzers are deactivated. The buzzers can be re-activated by a reset button operated by the referee. When the buzzers are activated, a green light is turned on. There is a timer after which the buzzers are re-activated if the referee does not push the reset button. The duration of the timer is determined by a potentiometer. If the potentiometer is set to its maximum value, then the buzzer must be re-activated by the referee (there is then no time limit).
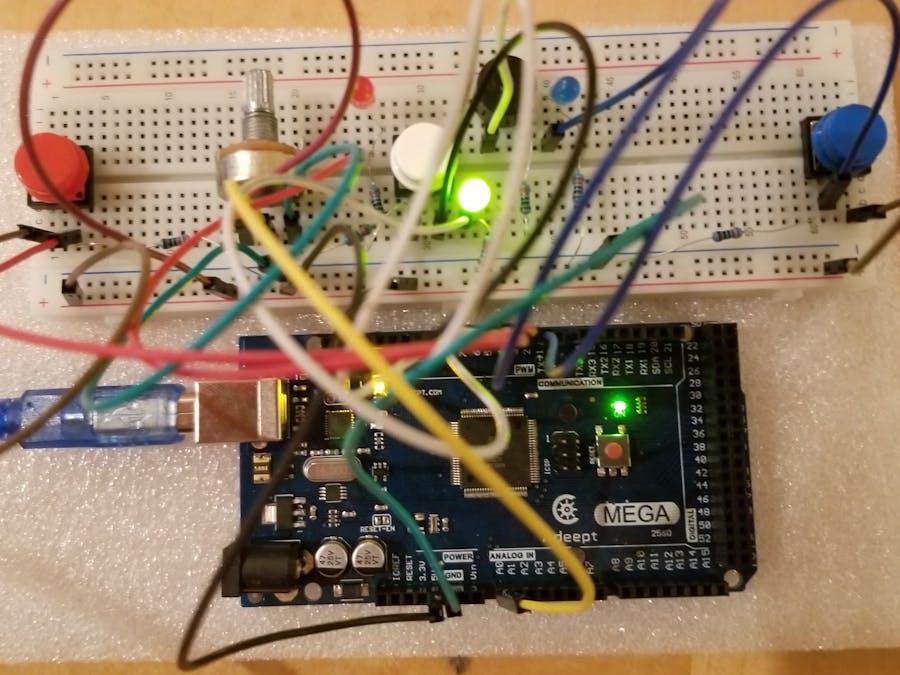
Here is what the prototype looks like. It currently only handles two players (one per team), but the source code already handles multiple players (this has not been tested yet!):
Not easy to see what's happening with all these wires...
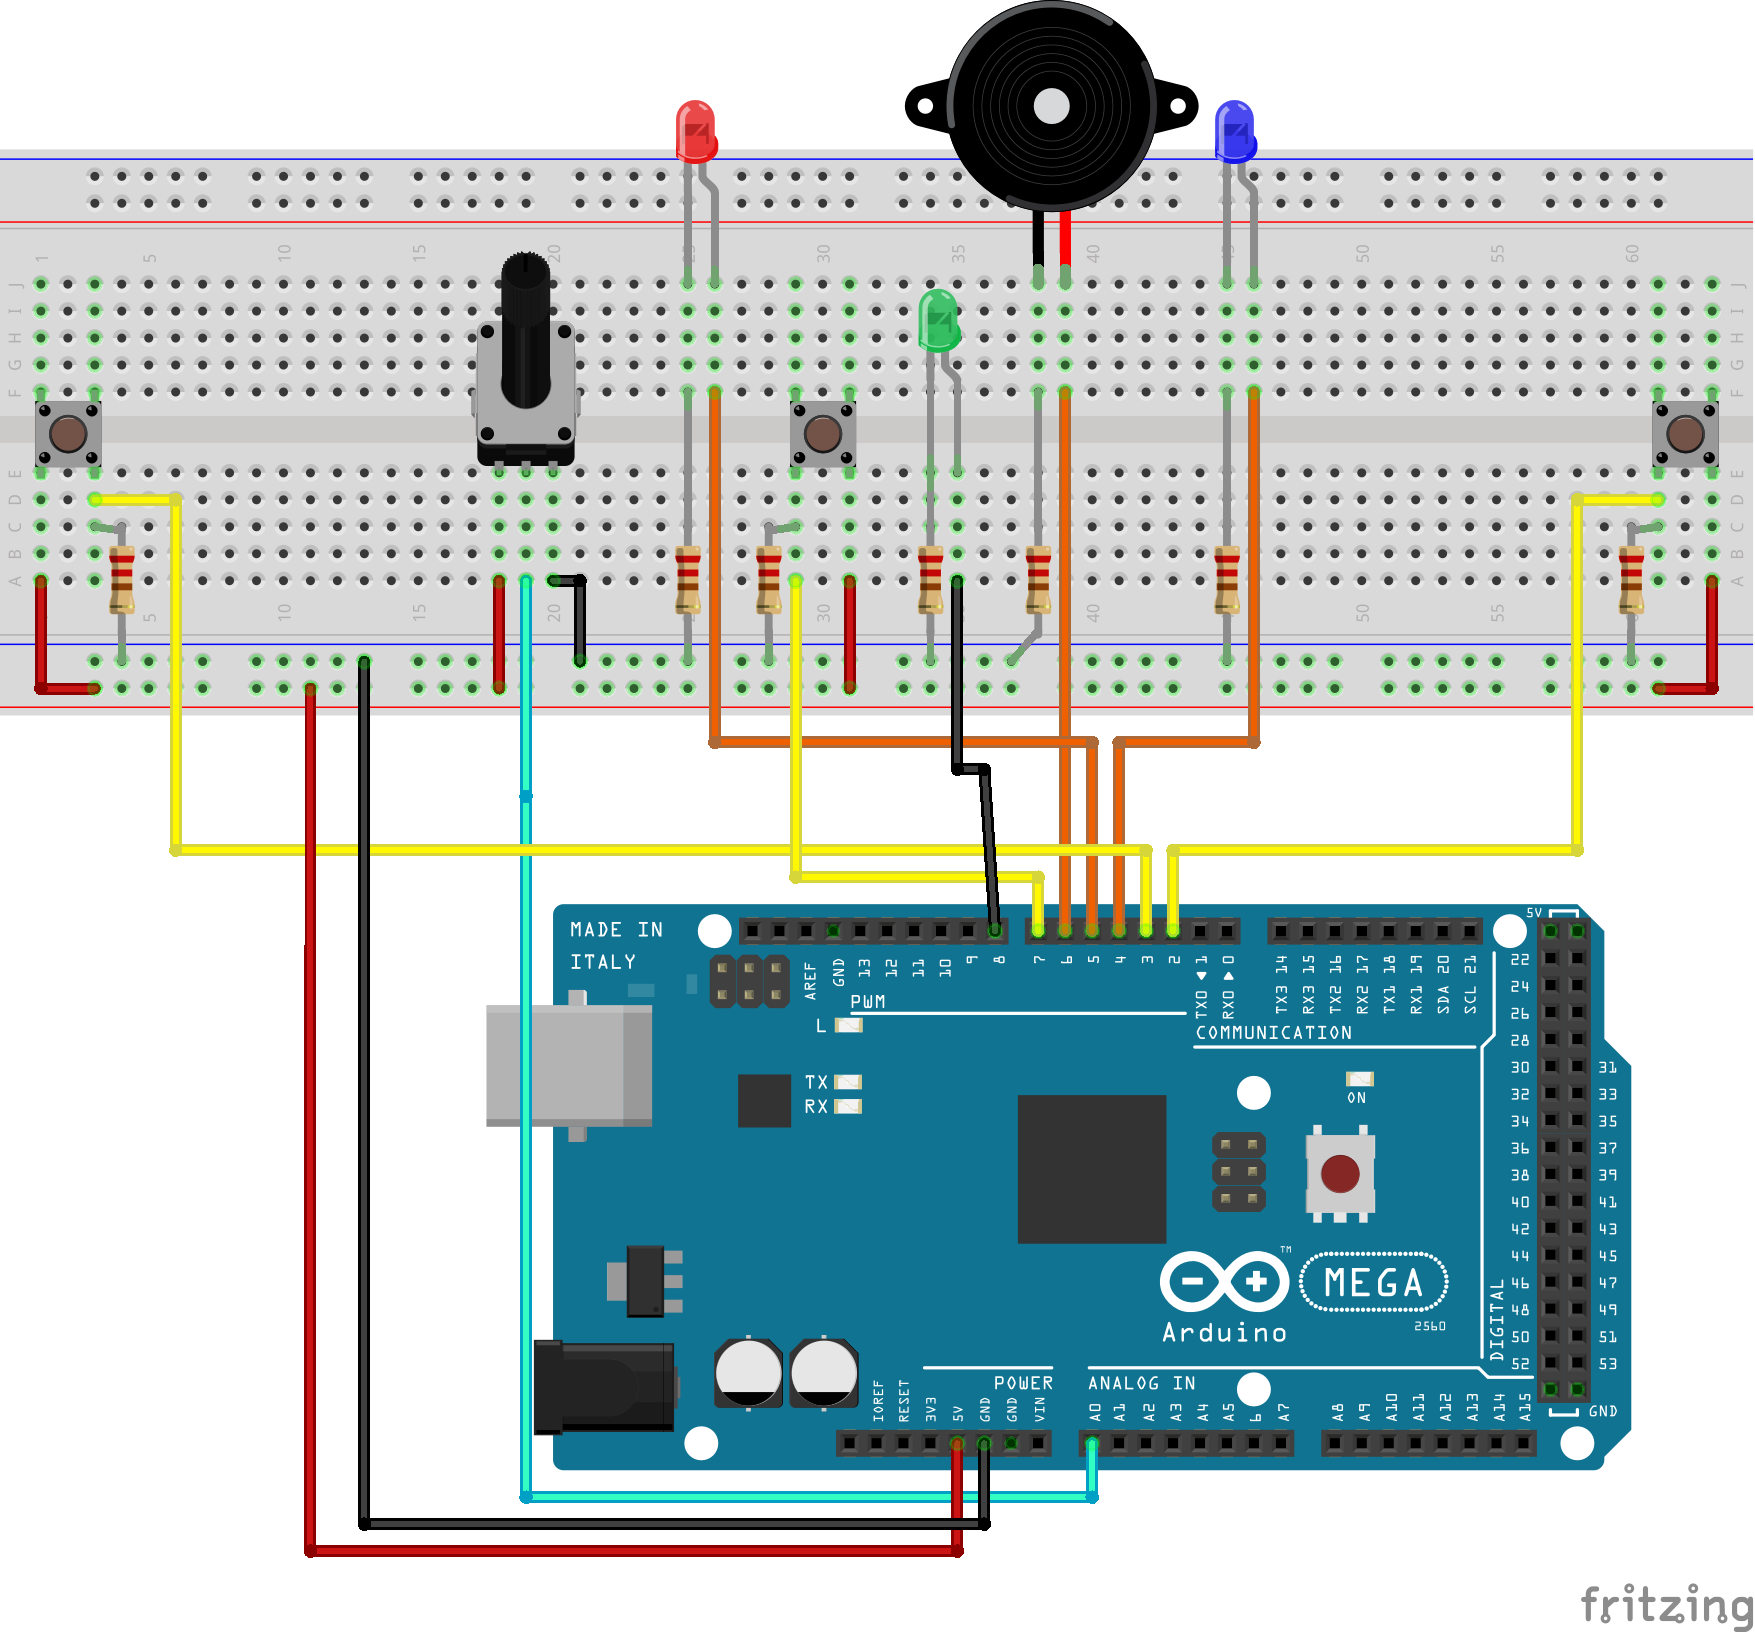
Here is a schematic diagram (breadboard view) which I did using Fritzing:
The design is fairly simple:
- Each LED is connected to a digital pin set to OUTPUT mode, and protected by a 220 Ohm resistor.
- Each pushbutton / buzzer is connected to the 5V input, grounded using a 220 Ohm resistor, and can be queried using a digital pin set to INPUT_PULLUP mode.
- The speaker is connected to a digital pin set to OUTPUT mode, and protected by a 220 Ohm resistor. I found out that if I do not use a resistor, I cannot change the tone of the speaker. However, the speaker is then not as loud. I should check what happens with a lower resistance value (100 Ohm?)
- The potentiometer is connected to the 5V input and its value can be queried using an analog pin.
- All the resistors are placed between the component that they are protecting and the ground.
The code is a bit more complex...
Let's analyze it in detail. It starts with a configuration section. The first few lines are used to define the number of teams and the number of players per team. The prototype that I built allows only two players (one per team) to compete:
// Configure the number of teams and number of players per team
// Normally there are two teams and four players per team
const int numTeams = 2;
const int numPlayers = 1; // 1 player per team for the prototype
Then we define the pin number associated to the speaker, as well as the frequency and duration of the sound that is made when a player pushes on his buzzer:
// Assign a pin number to the speaker and configure the sound
const int pinSpeaker = 6;
const int frequencySpeaker = 440; // Hz
const int durationSpeaker = 500; // milliseconds
The potentiometer is configured next. Recall that the potentiometer is used to configure the delay before the buzzers are reset. To configure the potentiometer, we specify its pin number as well as the maximum time before a reset:
// Assign a pin number to the potentiometer used to determine the delay after a buzz before reset
// and define maximum delay
const int pinDelay = 0;
const unsigned long delayResetMax = 5000; // maximum delay in milliseconds (scaled by potentiometer read)
Next comes something that should not be necessary... For some reason, the buttons don't work immediately when the Arduino board is plugged in. The LEDs do work almost immediately. I don't know why.
// Startup delay to let the buttons warm up (I don't understand why this is needed!!!)
const unsigned long startupDelay = 35000; // milliseconds
This value is passed to the delay() function during the setup phase, after which the green LED is turned on to let players know that the machine is ready.
Next comes the debounce delay. This is used when reading the state of a button. Low-cost push-buttons flicker on and off for some time when they are pushed. I would have thought that 50 milliseconds would be enough to debounce the buttons but I found out through trial-and-error that 500 milliseconds is safer:
// Debounce delay to filter out flickers of button states
const unsigned long debounceDelay = 500;    // the debounce time for buttons in milliseconds
I next define a structure which keeps track of the configuration of each button. This is useful as the final machine will have typically 9 buttons to handle two teams of four people plus one referee.
// Define structure for standard button
struct Button {
 int pinButton;        // pin number of the pushbutton
 int pinLED;           // pin number of the associated LED
 int buttonState;      // last stable state of the button (after filtering)
 int lastButtonState;  // last known state of the button (including flickers)
 int lastDebounceTime; // last time the button flickered (for debounce purposes)
};
For each button, we keep track of the pin number to which it is connected, the pin number of the corresponding LED, the last stable state of the button (once it has remained constant for the duration of the debounce delay), the state of the button when it was last queried, and the last time the state changed (used to determine if the button state is stable). In practice, the last three attributes are managed internally by the function readButtonState().
The next step is to create and initialize and array of button for the buzzers, an additional button for the referee, plus an additional variable that will be later set to the pin number of the Green LED, based on the LED associated with the button of the referee (pin 8):
// Define each button by their pin numbers (for the button and the LED) and initial state
struct Button buzzers[numTeams][numPlayers] = {{{2,4,LOW,LOW,0}},{{3,5,LOW,LOW,0}}};
struct Button whiteButton = {7,8,LOW,LOW,0};
static int pinGreenLED; // will be set to the pinLED attribute of the white button
That's it for the configuration!
The setup() function is fairly simple. We first loop through the buzzers to initialize them:
 int team,player;
 for (team=0; team<numTeams; team++) {
   for (player=0; player<numPlayers; player++) {
     pinMode(buzzers[team][player].pinLED, OUTPUT);
     pinMode(buzzers[team][player].pinButton, INPUT_PULLUP);
     digitalWrite(buzzers[team][player].pinLED, LOW);
   }
 }
We then set the pin mode for the speaker, for the referee's button and the associated green LED:
 // Set the pin mode to OUTPUT for the speaker
 pinMode(pinSpeaker, OUTPUT);
 // Set the pin mode to OUTPUT for the green LED
 pinGreenLED = whiteButton.pinLED;
 pinMode(pinGreenLED, OUTPUT);
 // Set the pin mode to INPUT for the white button
 pinMode(whiteButton.pinButton, INPUT_PULLUP);
Finally, we wait a bit before turning on the green LED to ensure that the buttons will work (this needs to be fixed):
 // Wait for the buttons to warm up! (don't know why they need time before they start working...)
 delay(startupDelay);
 // Light up the green LED to tell players that the quiz machine is working
 digitalWrite(pinGreenLED, HIGH);
We are ready to start the infinite loop.
We first define a few local variables:
 /*
  * Local variables
  */
 // Iterators
 int team, player;
 // Identification of the winning team and player
 int teamBuzz, playerBuzz;
 // Variables used to determine the delay before the reset of the buzzers
 int valPot;     // value of the potentiometer, between 0 and 1023
 int delayReset; // delay obtained by rescaling the value of the potentiometer
 // Boolean indicating if a buzzer was activated
 bool someoneBuzzed;
 // Timestamp used to determine how much time has passed since a buzzer was activated
 unsigned long timestamp;
We then iterate through the buzzers to check if any player pushed on his button:
 // Determine if somebody has buzzed by scanning all the buzzers
 someoneBuzzed = false;
 for (team=0; team<numTeams; team++) {
   for (player=0; player<numPlayers; player++) {
     if (readButtonState(buzzers[team][player]) == HIGH) {
       // A buzzer is activated: set the flag, keep track of which buzzer is activated and exit inner loop
       someoneBuzzed = true;
       teamBuzz = team;
       playerBuzz = player;
       break;
     }
   }
   // A buzzer is activated: exit outer loop
   if (someoneBuzzed) {
     break;
   }
 }
At the end of this loop, the boolean variable "someoneBuzzed" is true if a buzzer was activated, and in this case the variables "teamBuzz" and "playerBuzz" keep track of which team and player pushed on his button. The rest of the code is skipped if nobody buzzed.
If a buzzer was activated, we first turn off the green LED, turn on the LED associated with the buzzer which was activated, and we play a sound:
 if (someoneBuzzed) {
   // turn off the green LED
   digitalWrite(pinGreenLED, LOW);
   // turn on the LED associated with the buzzer which was activated
   digitalWrite(buzzers[teamBuzz][playerBuzz].pinLED, HIGH);
   // play a sound
   tone(pinSpeaker, frequencySpeaker, durationSpeaker);
The next step is to determine how long to wait before resetting the machine. During this time, the buzzers won't work. To determine the delay, we first read the value of the potentiometer (which comes back as an int between 0 and 1023). If the value read is higher than 1000, we set it to -1 which is used as a flag to indicate that the wait time should be infinite - only ending by the referee pushing his button. The final delay is obtained by multiplying the value by the maximum delay and dividing by 1000.
   // read the value of the potentiometer to determine the duration of the delay before the reset
   // a value between 0 and 1023 is obtained
   valPot = analogRead(pinDelay);
   // If the value read is higher than 1000, set it to minus one.
   // This value will be used as a flag meaning that the white button must be pushed to reset the quiz machine.
   if (valPot > 1000) {
     valPot = -1; // quiz machine must be reset manually by the referee
   }
   // Obtain the delay by scaling the value read from the potentiometer by the maximum delay
   // Negative delays mean that the reset must be done manually
   delayReset = valPot*delayResetMax/1000;
We then wait for until this delay is over - or for ever if the duration of the delay is negative. During this wait time, we continuously check if the referee's button is pressed. If it is, we exit the loop before the end of the wait period.
   // Wait for the end of the delay before doing a reset
   timestamp = millis();
   while ((delayReset < 0) || millis() - timestamp < delayReset) {
     // The delay has not ended: check if white button is pushed by the referee
     if (readButtonState(whiteButton) == HIGH) {
       // White button is pushed: reset the quiz machine before the end of the delay
       break;
     }
   }
Now we re-activate the buzzers by turning on the green LED, turning off the LED associated with the buzzer which was activated, and going back to the start of the loop:
   // End of the delay or white button pushed: reset the quiz machine
   // Turn on the green LED
   digitalWrite(pinGreenLED, HIGH);
   // Turn off the LED of the buzzer which was activated
   digitalWrite(buzzers[teamBuzz][playerBuzz].pinLED, LOW);
 }
 // end of the loop: go back to the beginning!
That's it!
Now, here are the known issues with this prototype:
- The buttons take time to "warm up" (up to 35 seconds). A delay has been added during startup to deal with this issue.
- Software button debouncing takes a long time (500 milliseconds)
- Buttons are polled in the same order each time, which will favor a player over another if two players hit their buzzer at the same time. Hopefully, the Arduino Mega board is fast enough so that the effect is negligible.
- The code has only been tester for two teams and one player per team so far
If you can help me with the first two issues, let me know!
I will start working on the quiz machine itself, now that the prototype works...


Comments