


Hardware components | ||||||
_wzec989qrF.jpg?auto=compress%2Cformat&w=48&h=48&fit=fill&bg=ffffff) |
| × | 1 | |||
| × | 1 | ||||
I started this project because I was building a robot with an Arduino processor and I wanted to send telemetry from the robot to a server on my wireless network. I thought this would be a really common problem to solve in the Arduino community, so naturally I looked for a shield that would have the wireless radio on it. What I found was an ESP-13 shield from DOIT. I bought it without reading much about it, just assuming that it would work like any other Arduino shield, simple and seamless. Boy, was I wrong.
I mounted the ESP-13 to a Mega2560 R3 board and proceeded to configure it per the sparse instructions available on the DOIT website. The default configuration for the shield creates a TCP server that is supposed to take data seamlessly from the 2560 serial bus and send it out wirelessly, and conversely take incoming data from the wireless interface and publish it on the 2560 serial bus.
Here I encountered my first problem. I didn't want the ESP-13 to be a server. It is more common and useful for a robot to act as a client and send telemetry to a server. That way, many robots can use the same server as their homebase. Fortunately, the ESP-13 also supports a client mode, which they describe in the documentation as "Station" mode or STA.
The DOIT ESP-13 automatically publishes a configuration website when it is plugged in. To use it, you simply plug the ESP-13 into power and connect a computer to the DoitWiFi_Config hotspot that the shield is advertising. Then open a browser on that computer to 192.168.4.1 and you should see a configuration page for the shield. Below is the configuration I entered into my ESP-13 to make it a wireless client.
The important things to do in the top section are:
1) Under Station, Enable = Yes
2) Select your local wireless router from the AP List and enter the password for your router.
3) Turn on DHCP
The important things to do in the bottom section are:
1) Under Network Setting, Socket Type = Client
2) Remote IP = The IP address of the server where you are going to send the data from the client. To get the IP address for a Windows computer, open a command prompt on the computer and type "ipconfig" and press Enter. You should see something like this:
3) Set the port to 9000 or something else you like.
Now hit submit. The ESP-13 will recycle and you are done configuring it. It should now be able to act as a wireless client to the computer you specified just above.
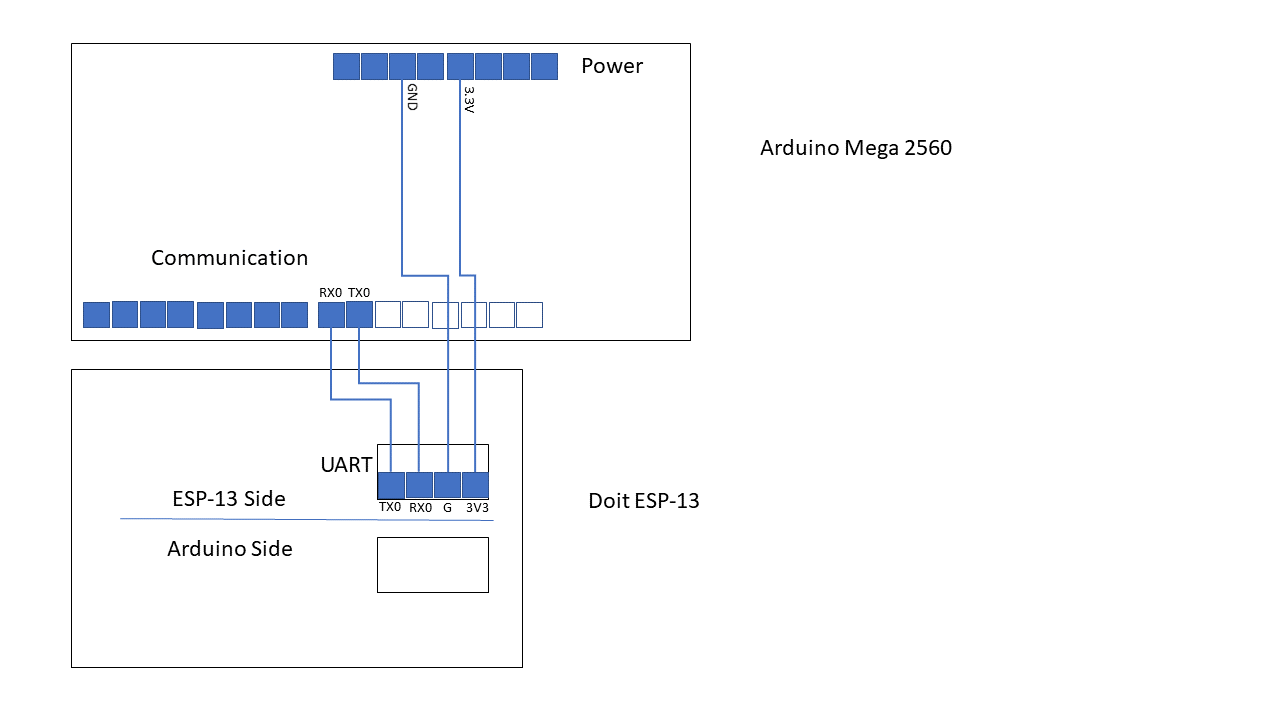
As I said earlier, the ESP-13 shield does not function properly when plugged into an Arduino 2560 or into an Arduino UNO. According to other sources on the internet, this is because the Serial TX and RX pins on the ESP-13 are hooked up backwards to the Arduino TX and RX pins. By that I mean when the ESP-13 is publishing to the Arduino serial bus, it should be hooked up TX to Arduino RX, and RX to Arduino TX. But it appears to be wired TX-TX and RX-RX. I tried for days to make it worked while plugged onto the board, but to no avail. So, I unplugged the ESP-13 from the 2560, set it down beside it, and wired it like this:
Arduino TX0->1 to ESP-13 UART RX0
Arduino RX0<-0 to ESP-13 UART TX0
Arduino Power 3.3V to ESP-13 UART 3V3
Arduino Power Gnd to ESP-13 UART G
With this wiring done, when you plug your 2560 into power (real power, not the USB power), you should see the lights on the ESP-13 light up.
Now for the software. You will need client software on the Arduino to send and receive data to the server, and you will need a TCP socket server on the computer that you designated in the configuration of the ESP-13 above. Here is a stub of Arduino code that works as a simple client:
void setup() { // put your setup code here, to run once: Serial.begin(9600); } void loop() { if(Serial.available()) { String a = Serial.readStringUntil("\n"); Serial.flush(); Serial.println("client1 heard the server say - " + a); } else { delay(1000); Serial.println("client1 is waiting for a data transmission from the server"); } } For the server side, I installed a python compiler https://www.python.org onto my computer and created this simple python script to act as a socket server. Here is that code:
'''
    Simple socket server using threads
'''

import socket
import sys
from _thread import *

HOST = '' # Symbolic name, meaning all available interfaces
PORT = 9000 # Arbitrary non-privileged port

s = socket.socket(socket.AF_INET, socket.SOCK_STREAM)
print ('Socket created')

#Bind socket to local host and port
try:
    s.bind((HOST, PORT))
except socket.error as msg:
 print ('Bind failed. Error Code : ' + str(msg[0]) + ' Message ' + msg[1])
    sys.exit()

print ('Socket bind complete')

#Start listening on socket
s.listen(10)
print ('Socket now listening')

#Function for handling connections. This will be used to create threads
def clientthread(conn):
 #Sending message to connected client
    sendstr = 'Welcome to the server. Ready to receive your data.'

    conn.send(sendstr.encode('utf-8')) #send only takes string

 try:

 #infinite loop so that function do not terminate and thread do not end.
 while True:

 #Receiving from client
        data = conn.recv(1024)
 print(str(data.decode()))
 #print(str(data))
 #conn.send(data)
 if not data:
 break

 #conn.sendall(reply.encode('utf-8'))

 except KeyboardInterrupt:
 pass

 #came out of loop
    conn.close()
 print ('Socket closed by server')

#now keep talking with the client
while 1:
 #wait to accept a connection - blocking call
    conn, addr = s.accept()
 print ('Connected with ' + addr[0] + ':' + str(addr[1]))

 #start new thread takes 1st argument as a function name to be run, second is the tuple of arguments to the function.
    start_new_thread(clientthread ,(conn,))

s.close()
Tostart the server, just double click the script in a file explorer, or go to a command prompt, navigate to the file you saved the script in, and type py <filename.py> and it should start running and look like this:
Now download the Arduino code to the Arduino board as you normally would, just make sure to unplug the Serial TX and RX pins from the wireless card during the download, otherwise it won't work. Then plug the pins back in, put power to the board and voila, you should see the lights blinking on the wireless shield, and you should see this on your server:
That's all there is to it. From here you should be able to expand the client to send telemetry data or anything else you want to the server, and expand the server to send other stuff back to the client. Good luck and let me know if you have any questions or comments!

Comments