

Hardware components | ||||||
 |
| × | 6 | |||
_ztBMuBhMHo.jpg?auto=compress%2Cformat&w=48&h=48&fit=fill&bg=ffffff) |
| × | 1 | |||
| × | 1 | ||||
 |
| × | 1 | |||
 |
| × | 1 | |||
| × | 100 | ||||
Software apps and online services | ||||||
 |
| |||||
Hand tools and fabrication machines | ||||||
 |
| |||||
I hope you never have to go through a long-term flow-through column experiment without automation. Once the experiment begins, it cannot stop. Often, the critical sampling times fall in the middle of the night, early mornings, or weekends. Your life effectively becomes a waiting game in the lab.
The first time we ran this experiment, I had a visiting student, Paul, who shared the burden of collecting samples at these weird off-hours. But eventually, Paul's internship ended, and he was gone. When we found a flaw in the initial data and had to restart the experiment, I was left alone to sample water vials at midnight on Saturdays.
The InspirationI needed a better solution. A former colleague, Cora, had built a basic system to collect water samples, but her design used a weak stepper motor and a center-mounted plate. It lacked the torque and stability needed for a long-lasting, critical experiment.
I decided to take the core idea but engineer a robust, "Frugal Science" solution custom-made for high-throughput sampling. I needed a system capable of managing 4 independent columns simultaneously with precise timing.
In homage to the student who used to help me carry this burden, I named the machine "Auto-Sampler Paul."
How It Works The design revolves around a 3D-printed rotating plate that holds standard 15ml centrifuge tubes.
Stability: Unlike previous designs, "Paul" uses a NEMA 17 motor for high torque and precision, ensuring the plate never stalls even when fully loaded.
- Stability: Unlike previous designs, "Paul" uses a NEMA 17 motor for high torque and precision, ensuring the plate never stalls even when fully loaded.
Support: I added a custom base and outlet tubing support to ensure the liquid flows directly into the vials without splashing.
- Support: I added a custom base and outlet tubing support to ensure the liquid flows directly into the vials without splashing.
Electronics: It runs on an Arduino Uno R3 equipped with a CNC Shield V3.
- Electronics: It runs on an Arduino Uno R3 equipped with a CNC Shield V3.
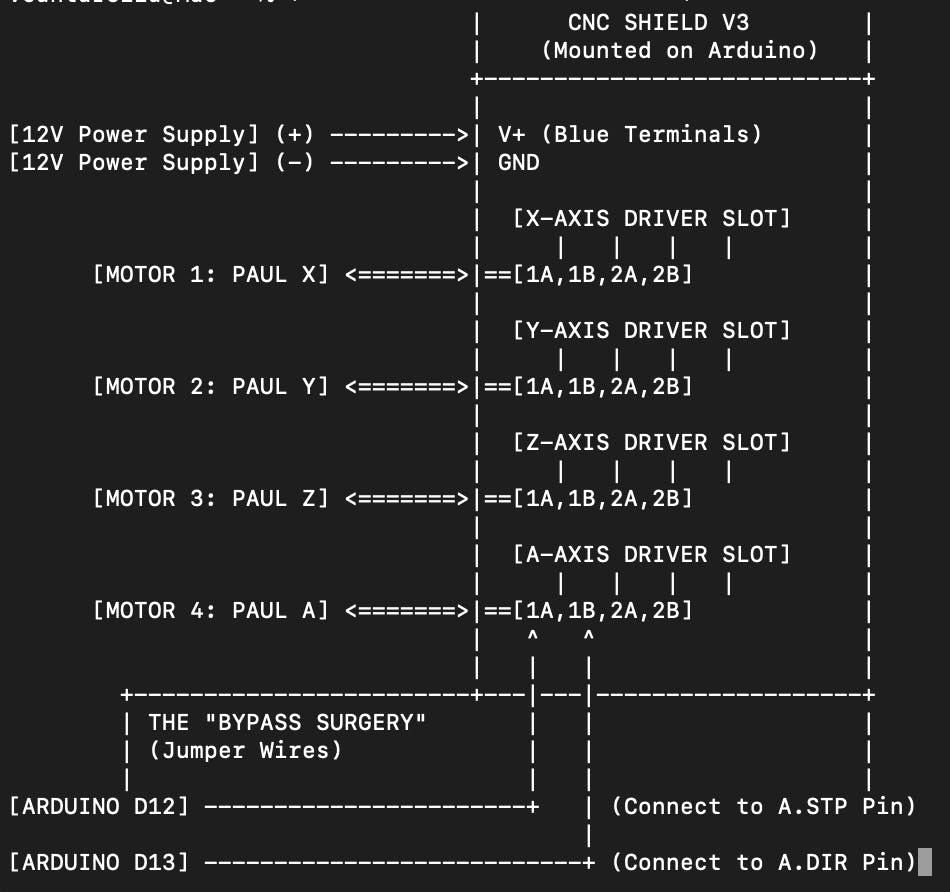
Specific Project Design: Standard CNC shields are designed for 3-axis machines (X, Y, Z). To get the 4th motor ("Paul 4") running independently on the Uno, you have to bypass the CNC with jumper wires (redirecting signals to Analog pins). I also do not use the standard instruction language, but directly control the motors through a specialized arduino firmware that allows all four motors to run on different schedules without blocking each other.
The first time we did this, I had a visiting student, Paul, that shared with me the burden of collecting samples on weird off hour times. Of course, at that time the experiment had a few problems and we decided to run it again. However, Paul, was long gone, and I was left alone to sample water vials at midnight and weekends.Well, I did the sampling, but when we saw an experiment design flaw later looking at the data and I had to redo it again, I decided I needed a better solution for that. Our colleague, Cora, that had already graduated had a system to collect water samples. But the design used a weak motor with a wide plate and I never trusted it for a long lasting experiment. So I decided to take on the idea and build a solution custom made for my sampling needs. which includes sampling 4 columns at the same time. In homenage to Paul, I have named it Auto-Sampler Paul.The desing is very simple and uses the same idea from Cora, it is a rotating plate with holes around it for holding 15 ml centrifuge tubes. A small factor Nema17 motor spin the plate at regular steps and designed time intervals. THe design also includes a base and a support for the column's outlet tubing.
Since, the experiment has started I have updated the design a bit, I have made more holes on the sides, to make visualization easier, and updated the support of the plate to be on the sides of the base, instead of the center, for more stability:
Up to four devices can be connected to A CNC-shield assembled on top of an arduino UNO.
Hardware Setup & Assembly1. Print the Parts
The link to STL files and print instructions are attached. I recommend printing with at least 20% infill for the base to ensure stability. The rotating plate should be printed with high resolution to ensure the gear teeth mesh perfectly with the motor shaft. The desing of the rotating device is mine, but the CNC shield case is from the web (see link for details)
2. The Electronics Assembly
Mount the CNC Shield V3 onto the Arduino Uno.
- Mount the CNC Shield V3 onto the Arduino Uno.
Insert the A4988 (or DRV8825) drivers. Crucial Step: You must tune the Vref (Current Limit) on your drivers. My pancake NEMA 17 motors are rated for 0.7A, so I adjusted the Vref to approximately 0.35V - 0.4V. Warning: Skipping this step will cause your motors to overheat and vibrate!
- Insert the A4988 (or DRV8825) drivers. Crucial Step: You must tune the Vref (Current Limit) on your drivers. My pancake NEMA 17 motors are rated for 0.7A, so I adjusted the Vref to approximately 0.35V - 0.4V. Warning: Skipping this step will cause your motors to overheat and vibrate!
3. The "4th Axis" Hack
If you are using a standard CNC Shield with an Arduino Uno, the 'A' axis is usually just a clone of X, Y, or Z. To make it independent, I had to bypass the standard wiring. (See the schematic section for the jumper configuration to enable the 4th independent motor).
4. Uploading the Firmware Download the autosampler_paul.ino code from the repository.
The code is designed to be easily configurable.
Set your interval variable (e.g., 6 hours, 1 hour) directly in the code.
You can disable specific motors by commenting them out in the motors[] array if you are running fewer than 4 experiments.
Attach the rotating plates to the motor shafts. Ensure the grub screws are tightened against the flat side
of the shaft to prevent slippage (backlash). Connect your tubing, power up the 12V supply, and let Paul do the work while you sleep!
CNC Shield case
Credits: @Plexi


Comments