

Hardware components | ||||||
| × | 1 | ||||
| × | 1 | ||||
 |
| × | 1 | |||
| × | 1 | ||||
Software apps and online services | ||||||
 |
| |||||
 |
| |||||
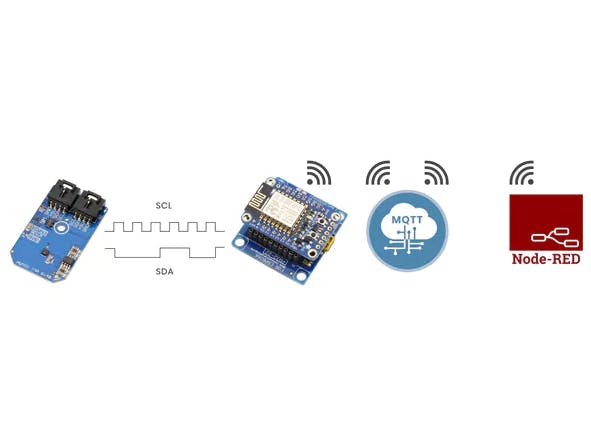
In this tutorial, we are going to display the readings of a temperature sensor (interface with ESP8266) in Node-RED Dashboard using MQTT node in Node-RED Flow.
Hardware UsedSHT25 - Temperature and Humidity Sensor
We are using Adafruit Huzzah Board to use with SHT25 I2C module(Temperature and Humidity Sensor). To avoid the manual PCB soldering and wiring connection, we are using the I2C electronic Shield to connect huzzah board and using the I2C cable to connect with Temperature and Humidity Sensor.
The Newbie can setup ESP8266 boards in Arduino IDE from here.
ESP8266 Wifi-client setup
For Wifi Client setup we will be using ESP8266WiFi library which helps us to connect easily with WIFI routers by just mentioning the SSID password using wifi example
#include <ESP8266WiFi.h>
const char *wifissid = "SSID";
const char *wifipass = "Password";
void setup()  {
// put your setup code here, to run once:
Serial.begin(115200);
}
void loop()
{
// put your main code here, to run repeatedly: delay(1000);
reconnectWiFi();
}
void reconnectWiFi()
{
WiFi.mode(WIFI_STA);
delay(200);
WiFi.begin(wifissid, wifipass);
while(WiFi.status()!= WL_CONNECTED)
{
Serial.print(".");
delay(500);
 }
Serial.println("Connected to: \t");
Serial.println(WiFi.localIP());
Thanks to the latest Azure IoT hub article we can connect the ESP devices to any wifi router any time by just entering the wifi credentials anywhere from PCs as well as from Smartphones by just opening the local server page in any web browser.
About SHT25 Temperature Sensor and I2C CodeThe SHT25 (humidity and temperature sensor) use the high precision, calibration, linearized sensor signals in digital, I2C format. The on-board power regulation and I2C level-shifting circuits adapts the I2C voltage standard with plug and play features.
To fetch the data from I2C devices and convert them and shift them in 8 bits data as per the requirements by:
- Initialize the I2C library
#include <Wire.h>
- Initialize the I2C registers of sensor module which is specified to work with 2 wire protocol.
#define Addr 0x40
- After Initialization, begin the I2C transmission and request for 2 bytes of data from where I2C bus will read the data from the I2C sensor module.
Wire.beginTransmission(Addr);
// Send humidity measurement command, NO HOLD master
Wire.write(0xF5);
// Stop I2C transmission
Wire.endTransmission();
delay(500);
// Request 2 bytes of data
Wire.requestFrom(Addr, 2);
// Read 2 bytes of data
// humidity msb, humidity lsb
if(Wire.available() == 2)
{
  data[0] = Wire.read();
  data[1] = Wire.read();
}
- If 2 bytes of data is available then use the mentioned below formula will help to convert the data bytes and display desired values
float humidity = (((data[0] * 256.0 + data[1]) * 125.0) / 65536.0) - 6;
float cTemp = (((data[0] * 256.0 + data[1]) * 175.72) / 65536.0) - 46.85;
float fTemp = (cTemp * 1.8) + 32;
- Using Serial.print you will be able to read the sensor data in the serial monitor screen.
The Publish-Subscribe based messaging using TCP/IP protocol called MQTT(Message Queuing Telemetry Transport).specially designed for remote location communications with different internet based online servers. These kinds of Publish-Subscribe messaging pattern requires a message broker.
MQTT ESP8266For Sending the temperature sensor data to Node-Red by using MQTT, we will be using PubSub Clientlibrary, available on Github. For other functions, use the API documentation for specified code manipulations.
Publish/Subscribe CodeFor Publish/Subscribe messaging with the server, we are going to use this library with I2C code for the sensor
- Define MQTT Server and the topics you want to publish using MQTT client.
#define mqtt_server "iot.eclipse.org”
#define humidity_topic "humid"
#define temperature_C "Ctemp"
#define temperature_F "Ftemp"
PubSubClient client;
Note: you can use any free server name to publish like mentioned above in code, you can also use “mqtt-broker.org” any kind of “default IPs” also to create the servers.
- Use the Reconnection loop function which helps you to reconnect to your MQTT server easily
void reconnect()
{
// Loop until we're reconnected
while (!client.connected()) {
Serial.print("Attempting MQTT connection...");
if (client.connect("ESP8266Client")) {
Serial.println("connected");
}
else {
    Serial.print("failed, rc=");
    Serial.print(client.state());
    Serial.println(" try again in 5 seconds");
    // Wait 5 seconds before retrying
    delay(5000);
  }
}
}
- After making the connection of MQTT client with the online server or a local server, The pubsub client will publish the message in below format,
void loop()
{
if (!client.connected())
{
  reconnect();
}
client.publish(Topic to publish, Payload(message to publish), Return value (true or false));
client.loop();
}
- The MQTT broker will finally send the payload to the server in a mentioned format which also directly execute the data in string format.
The visual tool for wiring the IOT hardware with APIs and different online Services requires Node.js which should be running in the Hardware platform using operating system Windows, Linux, Ubuntu by download the LTS(Long Term Support).
To install Node-RED in system path we can use the package manager commands in your windows command line interface
npm install -g --unsafe-perm node-red
Note: To install it in Linux or Ubuntu OS, we will use ‘sudo’before the mentioned abovecommand
After the installation run the let’s start the node red:
- Open the command prompt in the operating system
- Write node-red and enter it
- As in highlight area of the snapshot(below), the local server IP for hardware will be displayed e.g.127.x.x.1:1880
- Copy the mentioned above IP and paste it in the web browser, click enter.
The Node-RED does not include an MQTT broker which helps to create the connection with the TCP/IP protocols especially used in OS. We need to install the MQTT broker (such as mosquitto, Cloud MQTT, HiveMQTT, Paho etc) in Node-RED. As in this project we have used MOSCA MQTT broker and To install the MQTT broker use the follows:
- Click on the top right option corner.
- Select Manage Palette
- In User Settings page click Install
- Search node-red-contrib-mqtt-broker
- Click on Install Button
This Node-Red provides the different set of nodes for dashboard representation to their users. To install the dashboard:
- Use Node.JS command in command prompt or NodeJS command shell and then restart your node red
npm i node-red-dashboard
If you want to install the dashboard using Manage Pallete then:
- Click on the top right option corner.
- Select Manage Palette
- In User Settings page click Install
- Search node-red-dashboard
- Click on Install Button
After the Installation in the main screen of Node-Red on the left side option will be able to select the dashboard option. Using mentioned below image you can drag whatever node you want to use in the flow.
Note: The mentioned above Image is just the example of how to drag the nodes to flow. We will be discussing nodes in the next topics
Create Node-RED FlowThe Node-RED service is built on Node.JS and using version 0.14 MQTT nodes configured with TLS connections which we are using to send the Temperature sensor data to Node-RED platform.
Drag the following Nodes
- MQTT node from Output node options.
- We will drag or copy and paste 3 MQTT node and will give a different unique name to their topics.
- Double click on MQTT node
- In, Edit MQTT in node setting, Click on the editbutton mention on right side Server textbox.
- In Edit MQTT-Broker-Node, give a unique name to MQTT node.
- Write a server name which is earlier mentioned while coding the ESP8266 in Arduino IDE
#define mqtt_server "iot.eclipse.org”
.
- Set the time session after which the MQTT server will receive the message from the sensor hardware.
- Click Update button in Edit MQTT-Broker-Node
- Set the topic name which is earlier mentioned in Arduino IDE code
#define humidity_topic "humid"
#define temperature_C "Ctemp"
#define temperature_F "Ftemp"
- Click Done Button, Edit MQTT in node setting
Note:
- The server name must not be similar to the web browser Ip. Otherwise, you will not be able to create the MQTT connection with your device.
- The Topics must be written correctly which will also help to receive the data from Sensor and the similar topics we will be mentioning in ESP8266 code also.
- Both mentioned above points are most important to create the connection between the sensor device and Node-RED.
- Debug node from Output node options to test the payload.
- Similar to MQTT node here also, drag or copy and paste 3 Debug node and will set the default settings.
- Gauge node from Dashboard node option
- Like previous, For every MQTT node will use Gauge node.
- Double Click on gauge nodes.
- In Edit Gauge Node, Fill up your instruction which you want to display in the Dashboard with Every Gauge.
- Click Done.
Connect all the node as mentioned below in snapshot and then click on the Deploy button on the top right corner
The Final node red output will be as mentioned below
On the top right select the dashboard option.
Below the dashboard, you will select the dashboard screen button by clicking on which the screen will appear in which Dashboard gauge will be available.
We will be able to check the output display as mentioned in a snapshot below
In this application, the Node red service is responding only to a local server which is greatly running on the PC hardware for the secured local connection.
Future Enhancement
- The OS-based Application based system has 225, 000 repos with much different input and output node available.
- Using various Nodes we can also send the data to different IoT platforms or Online servers Like Firebase, Microsoft Azure, IBM Watson
- Using different API present with in the node red like JSON, HTTPS etc will help you to connect the service Directly with your mobile applications or online servers also.
- Not only Creating the local MQTT Server connection, but you can also create the connection with the online server by using various MQTT broker which is easy to install in node red like Mosquitto, HiveMQTT, CloudMQTT, Predix, and many others which uses the online storage database.


Comments