


Hardware components | ||||||
| × | 1 | ||||
| × | 1 | ||||
| × | 1 | ||||
| × | 1 | ||||
| × | 1 | ||||
| × | 1 | ||||
| × | 1 | ||||
| × | 1 | ||||
| × | 1 | ||||
| × | 1 | ||||
| × | 1 | ||||
| × | 1 | ||||
| × | 1 | ||||
| × | 1 | ||||
| × | 1 | ||||
| × | 1 | ||||
Software apps and online services | ||||||
| ||||||
| ||||||
Hand tools and fabrication machines | ||||||
 |
| |||||
| ||||||
 |
| |||||
 |
| |||||
| ||||||
A Low-Profile, Music-Reactive Subwoofer Enclosure with Edge-Lit Acrylic for Suzuki Ignis
OverviewIGNISYNC is a custom-built subwoofer enclosure developed for the Suzuki Ignis (2024). The project integrates a full-sized low-profile 12-inch subwoofer into a compact hatchback while preserving everyday trunk usability and improving ergonomics.
The system combines:
- A sealed acoustic enclosure for clean, controlled bass
- A compact, low-height form factor achieved through iterative design
- Laser-cut, edge-lit acrylic lighting with music-reactive and static modes
- Integrated electronics and active thermal management.
The final enclosure height achieved is 118 mm, reached through design iteration rather than a predefined dimensional target.
MotivationMusic plays a central role in my daily driving. Long commutes are far more engaging with a well-tuned audio system, and while the car already had a balanced speaker setup—component speakers in the front and coaxials in the rear—the absence of a subwoofer limited the overall listening experience.
Most aftermarket subwoofer solutions fall into two extremes:
- Large enclosures that consume valuable trunk space.
- Compact active subwoofers that compromise low-frequency performance.
The objective of this project was to integrate a proper 12-inch subwoofer without turning the trunk into an unusable or inconvenient space.
The Core ProblemThe Suzuki Ignis has a relatively deep trunk of boot capacity about 260 liters, but the floor sits low. In daily use, placing or retrieving items requires significant bending.
A conventional subwoofer enclosure would:
- Reduce usable trunk height
- Make ergonomics worse instead of better
The goal was not only to fit a subwoofer, but to do so in a way that:
- Preserves usable cargo space
- Improves trunk ergonomics
- Feels structurally and visually integrated into the vehicle
- Vehicle: Suzuki Ignis (2024)
- Subwoofer: JBL cLUB ws1200 Low-profile 12-inch driver
- Enclosure type: Sealed
- Amplifier placement: Inside the same enclosure but separate compartment.
- Lighting requirement: Controlled, precise, and non-distracting during driving.
The boot mat proved to be very helpful in understanding the surface geometry as well as dimenions for the boot space. I made the design strictly following boot mat's curves. The enclosure geometry and height were refined through multiple design and fabrication iterations, resulting in a final height of 116 mm and an easy ingress and outgress of the final enclosure when required. (The spare wheel sits below the subwoofer enclosure)
Using a low-profile 12-inch subwoofer provided flexibility in enclosure geometry. Through iterative layout, CNC fabrication, and physical testing, the enclosure reached a compact final height of 120 mm.
This configuration:
- Preserves usable cargo space above the enclosure
- Raises the effective trunk floor, reducing bending during daily use
- Allows a full-sized subwoofer to coexist with practical usability
A sealed enclosure was selected after studying enclosure theory, simulations, and real-world car audio builds.
The sealed design was chosen for:
- Tight, accurate, and controlled bass response
- Absence of exaggerated or boomy output
- Predictable behavior in a compact volume
- Structural simplicity and long-term reliability
The focus was depth and clarity rather than loudness.
Laser-Cut, Edge-Lit Acrylic LightingExposed LED strips were intentionally avoided. Instead, all acrylic components were designed and fabricated using a laser cutter.
The acrylic layers were:
Digitally designed with engraved light paths
- Digitally designed with engraved light paths
Laser-cut and laser-engraved for precision
- Laser-cut and laser-engraved for precision
Edge-lit to reveal defined lines rather than raw light sources
- Edge-lit to reveal defined lines rather than raw light sources
Laser cutting enabled:
- Clean, repeatable engraving depth
- Sharp internal corners and consistent line widths
- Accurate alignment with the MDF enclosure geometry
This approach keeps the lighting architectural and controlled, highlighting geometry instead of brightness or glare.
The visual language is inspired by flush-mounted trunk designs where light traces the structure rather than overwhelming it.
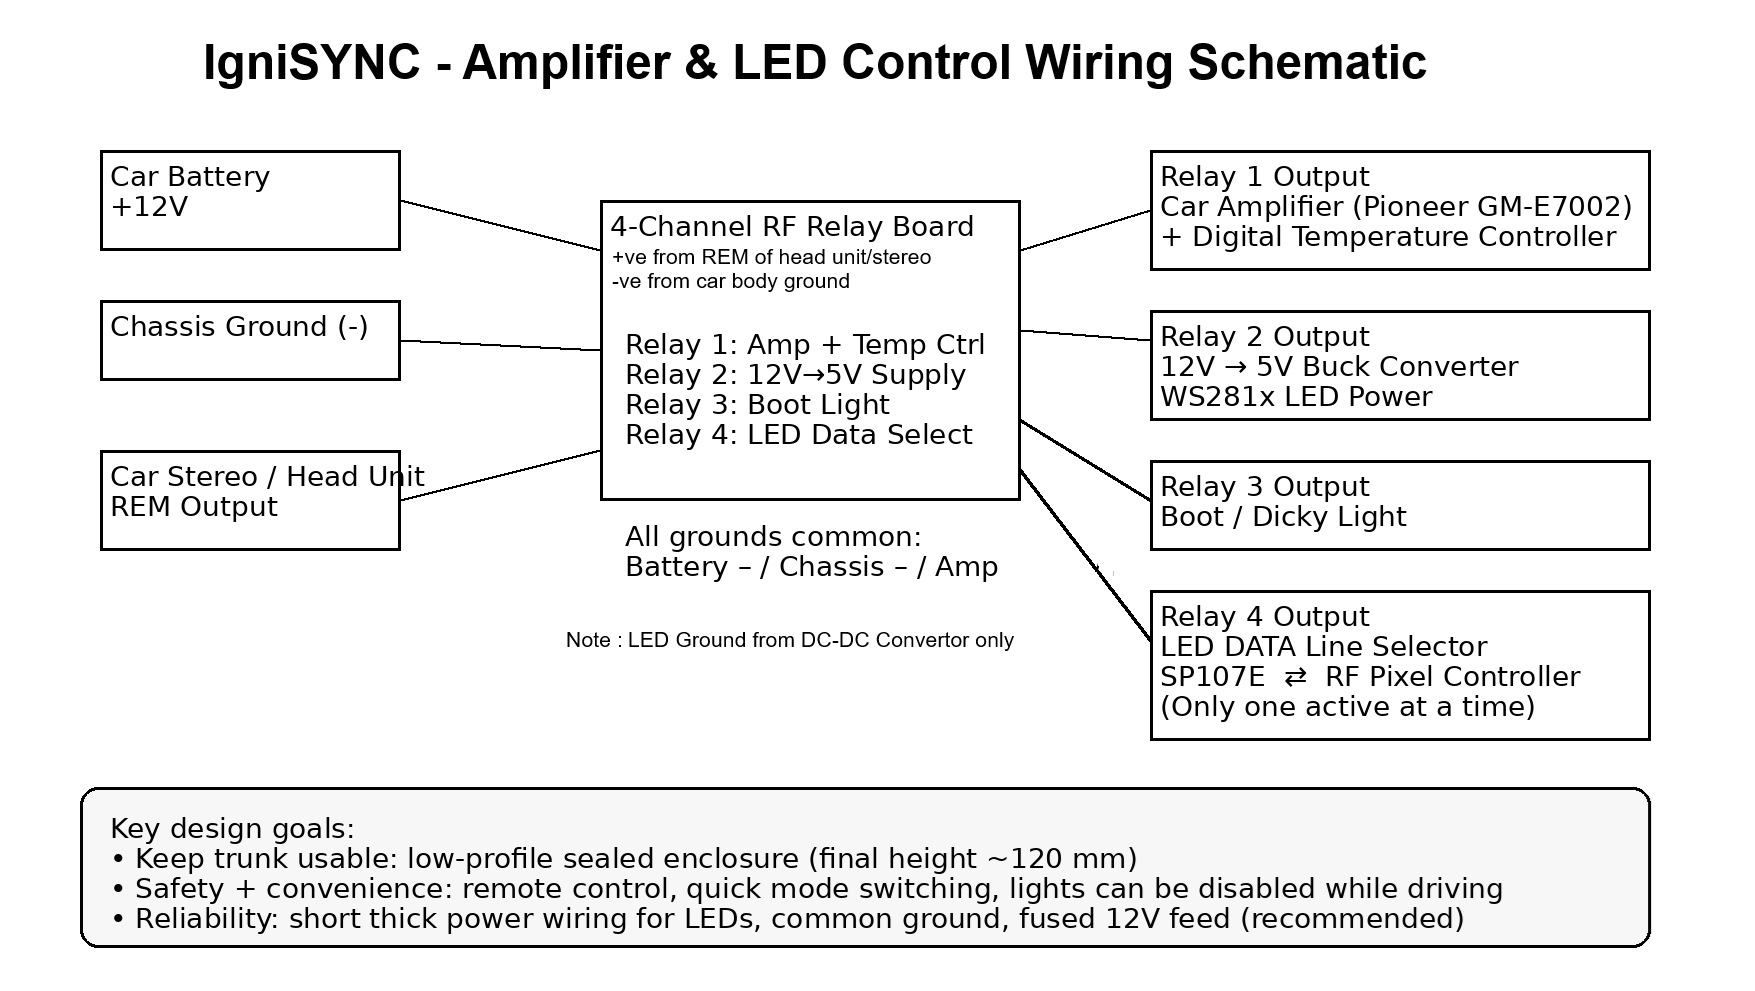
Dual LED Controller Architecture (Safety and Usability)Music-reactive lighting can be distracting during normal driving. To address this, a dual-controller lighting architecture was implemented:
SP107E pixel controller for music-synchronized lighting effects
- SP107E pixel controller for music-synchronized lighting effects
- RF pixel controller for static or slow-transition lighting modes
The RF controller also drives DIY under-dashboard light pods, ensuring predictable and non-distracting cabin illumination during daily driving. I will be writting a separate project for these LED Pods but heres howthey look.
Each contains 20 LEDs and are powered by same 5v powersupply which is supplied to LEDs in the Subwoofer Box.
The LED data line can be switched between controllers, allowing:
Complete disabling of flickering effects while driving
- Complete disabling of flickering effects while driving
Immediate physical control without relying on a mobile app
- Immediate physical control without relying on a mobile app
Independent control of trunk lighting and cabin lighting
- Independent control of trunk lighting and cabin lighting
CNC machining was used for all MDF components to achieve accurate and repeatable geometry while refining the enclosure toward a compact final form.
The enclosure perimeter, curved profiles, internal partitions, and mounting features were digitally designed and CNC-cut from MDF. This ensured:
- Precise driver fit
- Consistent layer alignment
- Structural rigidity in a low-height enclosure
Layered MDF construction was used to create a sealed enclosure with dedicated section for the subwoofer which is sealed, and an openable section for amplifier and controllers with an active airflow management.
An early CNC iteration failed due to a scaling mismatch, resulting in material loss. After correction, the final geometry achieved the intended proportions and fit.
LED Layout and Structural LayersTo maintain strength while keeping the enclosure compact:
- 10 mm MDF sheets were used for the top and bottom structural layers
- No structural cuts were made in these layers to preserve rigidity
- Laser-cut acrylic layers sit above the MDF and interact with the LEDs
To reduce weight, non-visible regions of the acrylic were selectively cut, while the top acrylic layer remains strong enough to support items placed in the trunk.
The lighting and control system was validated on the workbench before final installation. Testing confirmed.
- Stable power conversion
- Reliable switching between LED controllers
- Clean wiring logic without flicker or color instability
High-current operation was verified after installation under real vehicle conditions.
Thermal ManagementThermal management was added after observing amplifier heat buildup during testing. Since sufficient space was available inside the enclosure, an active cooling system with controlled airflow was integrated.
This improves long-term reliability without increasing enclosure size or compromising aesthetics. The temperature sensor was tighted on to the amplifier body so as when the temperature increases to a certain number the digital temperature controller turns on the fan automatically. I set the temperature to 40'C for now.
Iterations and Lessons Learned- A spare-wheel-mounted subwoofer concept was abandoned due to factory jack and wheel placement
- An early CNC cut failed due to scaling errors
- Adhesive fumes between acrylic layers caused localized frosting in some light channels, requiring design adjustments
Each iteration refined both structural integrity and optical clarity.
Final OutcomeThe completed system delivers-
- Clean, deep bass with no enclosure vibrations.
- Secure internal wiring that eliminates rattles.
- Music-reactive and static lighting modes with full manual control.
The enclosure integrates a full-sized subwoofer while improving trunk ergonomics, making the vehicle easier and more comfortable to use on a daily basis.
The final enclosure height of 120 mm represents the point where acoustics, structure, usability, and aesthetics converged.Infact there was enough space left to keep a bag and medium size trolley in the rear boot after installation.
In-Car Installation and IntegrationThe enclosure is installed flush in the Suzuki Ignis trunk without permanent vehicle modifications. Power and signal routing are integrated cleanly, and the system operates without introducing rattles, visual distraction, or loss of everyday trunk usability.
Lighting remains restrained during driving, with music-reactive effects reserved for stationary or demonstration use.


Comments