


Hardware components | ||||||
 |
| × | 1 | |||
| × | 1 | ||||
Software apps and online services | ||||||
 |
| |||||
Hand tools and fabrication machines | ||||||
 |
| |||||
 |
| |||||
I built a mini display using an ST7789 screen and an ESP8266 but it didn't do anything besides display an image.
https://www.hackster.io/148468/display-images-on-a-st7789-screen-fbb0d7
We will see how to use it as a mini connected display.
- This screen will display messages received from a MQTT server
- Messages can contains accuented characters
- Communications are encrypted
- In order to protect from MITM attack (man in the middle), we will check the identity of our MQTT server using a certificate
We can use IFTTT (or tasker) to transmit information from the web / a home automation system or our phone to our MQTT server.
In order to simplify the MQTT part, we will use Adafruit IO, which allows us to have a free MQTT server on the internet.
Of course, you can use your own mqtt server (however IFTTT won't works as easily)
Build the displayFollow my tutorial to learn how to build this display https://www.hackster.io/148468/display-images-on-a-st7789-screen-fbb0d7
Long story short:
- You need to Install tft_espi library
- Change User_Setup.h inside the library
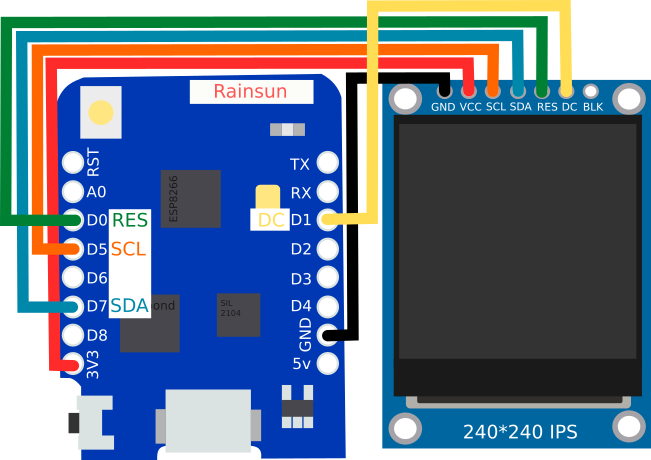
- Plug the screen to your ESP8266
- Create an account on Adafruit IO: https://io.adafruit.com/
- Click on Feeds
- Click on Actions / Create a New Feed
- In Name, put notifications
First you need to download my sketch
- Download it here : https://github.com/maditnerd/st7789_mqtt
- Install Adafruit_MQTT library
This library will allow us to communicate with our MQTT server
In the sketch there is a file named arduino_secrets.h, this is where we will store our Wi-Fi and MQTT login.
Click on View AIO Key to find your login on Adafruit IO.
- Replace HOME_SSID with the name of your Wi-Fi network
- Replace HOME_PASS with the password of your Wi-Fi network
- Replace ADAFRUIT_MQTT_USERNAME with your adafruit IO Username
- Replace ADAFRUIT_MQTT_PASS with your Adafruit IO Active Key
Upload your sketch and check that everything works correctly.
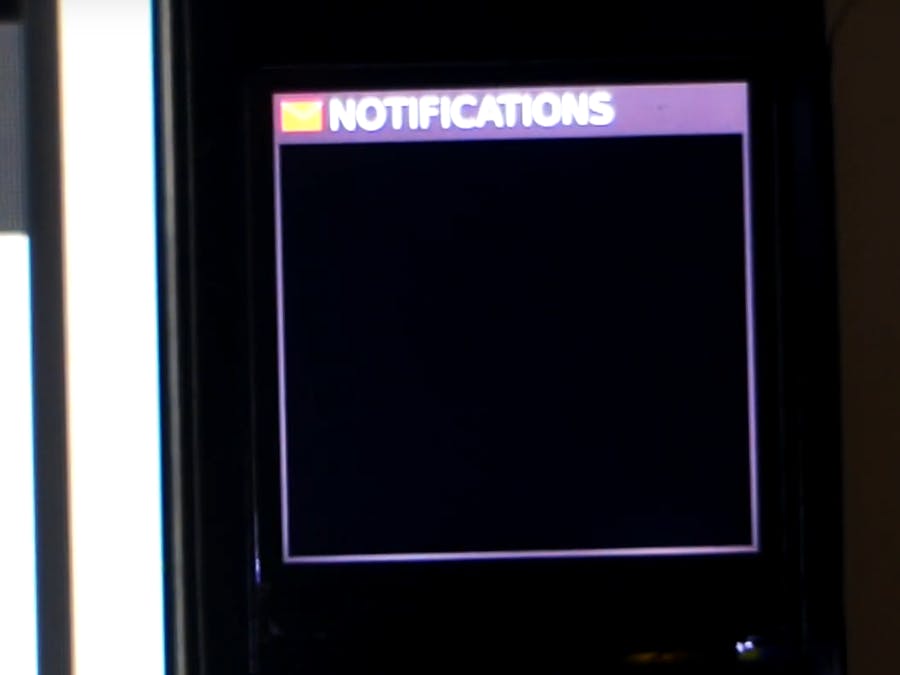
You should see a notification screen.
You can check in the serial monitor (Baudrate: 115200), if there is an issue.
Test your display in Adafruit IOYou can add data which will be display on your screen using Adafruit IO.
- Click on Feeds / Notifications
- Then click on Add Data
- Write your message
Note that, If your message was sent when your screen wasn't plugged, it will be ignore unless you use the retain function when you sent that message with MQTT.
IFTTT is a service that automate tasks, Adafruit IO can be used with it.
If you want to use IFTTT, with your own MQTT server, you can but you will need to use webhook.
Let's see how to display notifications from a smartphone and our screen.
While this is a useful and fun feature, keep in mind, you will give access to your notifications to two services on the internet. Even if the communication is theorically secure, it isn't great for your privacy.
- Create an account on IFTTT ( https://ifttt.com/ )
- Install the application on your phone
if
- On IFTTT web interface click on My Applets
- Click on New Applet
- Choose Android Device
- Choose Notification Received
then
- Choose Adafruit
- Choose Send data to Adafruit IO
- In Feed Name, put notifications
- In Data to save, choose AppName and NotificationTitle
ESP8266 will disconnect (and reconnect) to your MQTT server if you send too long messages.
Your applet should looks like this.
Don't forget to give access to your notifications to IFTT on your phone, or it won't works.
Hide your credentials on Arduino SoftwareWe used a file named arduino_secrets.h inside our sketch to save our logins.It isn't a good idea as you could give away your password accidently if you share your code!
You can avoid this by creating a library with your logins.Another benefit of doing this, is that your logins will be available in all your sketches.
- Create inside Documents/Arduino/libraries, a folder named arduino_secrets
- Copy arduino_secrets.h inside this folder
Inside your sketch, change this line at the beginning.
//#include "arduino_secrets.h"
include <arduino_secrets.h>
I learn this trick thanks to Andreas Spiesss in this video :
Change imagesIf you want to change the images I used, there are inside bitmaps.h
To convert your image into code, follow my tutorial:https://www.hackster.io/148468/display-images-on-a-st7789-screen-fbb0d7
All images are available in SVG/PNG in the images folder
To display an image, use this line:
tft.pushImage(0,0,240,240,adafruit_io);
To write text on multiples line, first set the position and print it
tft.setCursor(0,50);
tft.println(data); //Print text
If you want to write a single line, use this line
tft.drawString(HOME_SSID, 25, 20);
There is a font include inside the sketch named : arial12pt8b.h
I like to be able to write my name (which is Rémi), but I didn't find an easy way to add a font that display accented characters, so I had to generate it from a ttf font file.
Turn out, you can easily download a font and convert it into code (for ex here https://www.dafont.com/).
You will need a software named fontconvert, The source code is available in the Adafruit_GFX library but you can find a ready to use version (for Windows) in the description of this video https://www.youtube.com/watch?v=L8MmTISmwZ8
To create your font, type this command:
fontconvert arial.ttf 12 32 255 > arial12pt8b.h
If you want to change the size of the font, change the first number (here 12)
8b means that the font use 8 bytes which contains more characters than 7 bytes font.
Use your own MQTT serverThis sketch is setup to be used with an MQTT server using SSL.
So to use it with your own server, you will have to change the username / password / server / port in arduino_secrets.h, but also get the SSL certificate of your server.
You will need openssl to do this, you can download it here (Windows) : https://slproweb.com/products/Win32OpenSSL.html
Type this command (with the address of your mqtt server)
openssl s_client -showcerts -connect io.adafruit.com:8883
Get the last certificate and copy it inside connection.h
That's it for this tutorial, I hope it will helps you build your own applications.
Of course, it would be better if:
- We could setup our display from a web interface
- I avoid using images of the size of the screen when it wasn't necessary
Follow me on Twitter, if you want to know what will be my next tutorial :https://twitter.com/m4dnerd


Comments