

Hardware components | ||||||
 |
| × | 1 | |||
 |
| × | 1 | |||
| × | 1 | ||||
| × | 1 | ||||
 |
| × | 1 | |||
Software apps and online services | ||||||
 |
| |||||
 |
| |||||
Hand tools and fabrication machines | ||||||
 |
| |||||
Whenever I create a project for Pi, mostly remote controlled devices, I always find difficult to control it with the existing interfaces provided by Windows IoT. Since WIoT runs as headless application the only way to see the application running is by using WIoT client running in windows. This limits the access to the running application. While we can write UWP applications that can run on various devices, it is additional step and also not a trivial task. Earlier for my projects I used Azure cloud for sending messages using AMQP for controlling the device. Check this project Remote Internet Controlled 3 Speed Transmission for details.
To make application portable and also work on single interface, I needed to run the remote controller using simple web interface. This will make it compatible to run across all platforms
Purpose:This program forms the base for controlling pi. By running a simple webserver on Pi, we can send data to the web server from any device through HTML. The Web Server will listen to input on a particular port. The server will run as a service and provides a web page containing all the controls. The webpage is kept isolated from core programming. Thus it is possible to change the input controls by modifying the web page, without having to tinkle around with the core programming. The Web Server can also provide feedback from Navigator application to the Web client which is also incorporated with the HTML Text.
Salient features of Navigator:Navigator project utilises many features of Raspberry Pi and Windows IoT.
1. Webservice: using a unique listening port for this Service, it will pass the commands received from a Web client to Navigator. The Service will host the page for Web client and will also provide feedback (albeit delayed) to the Web client.
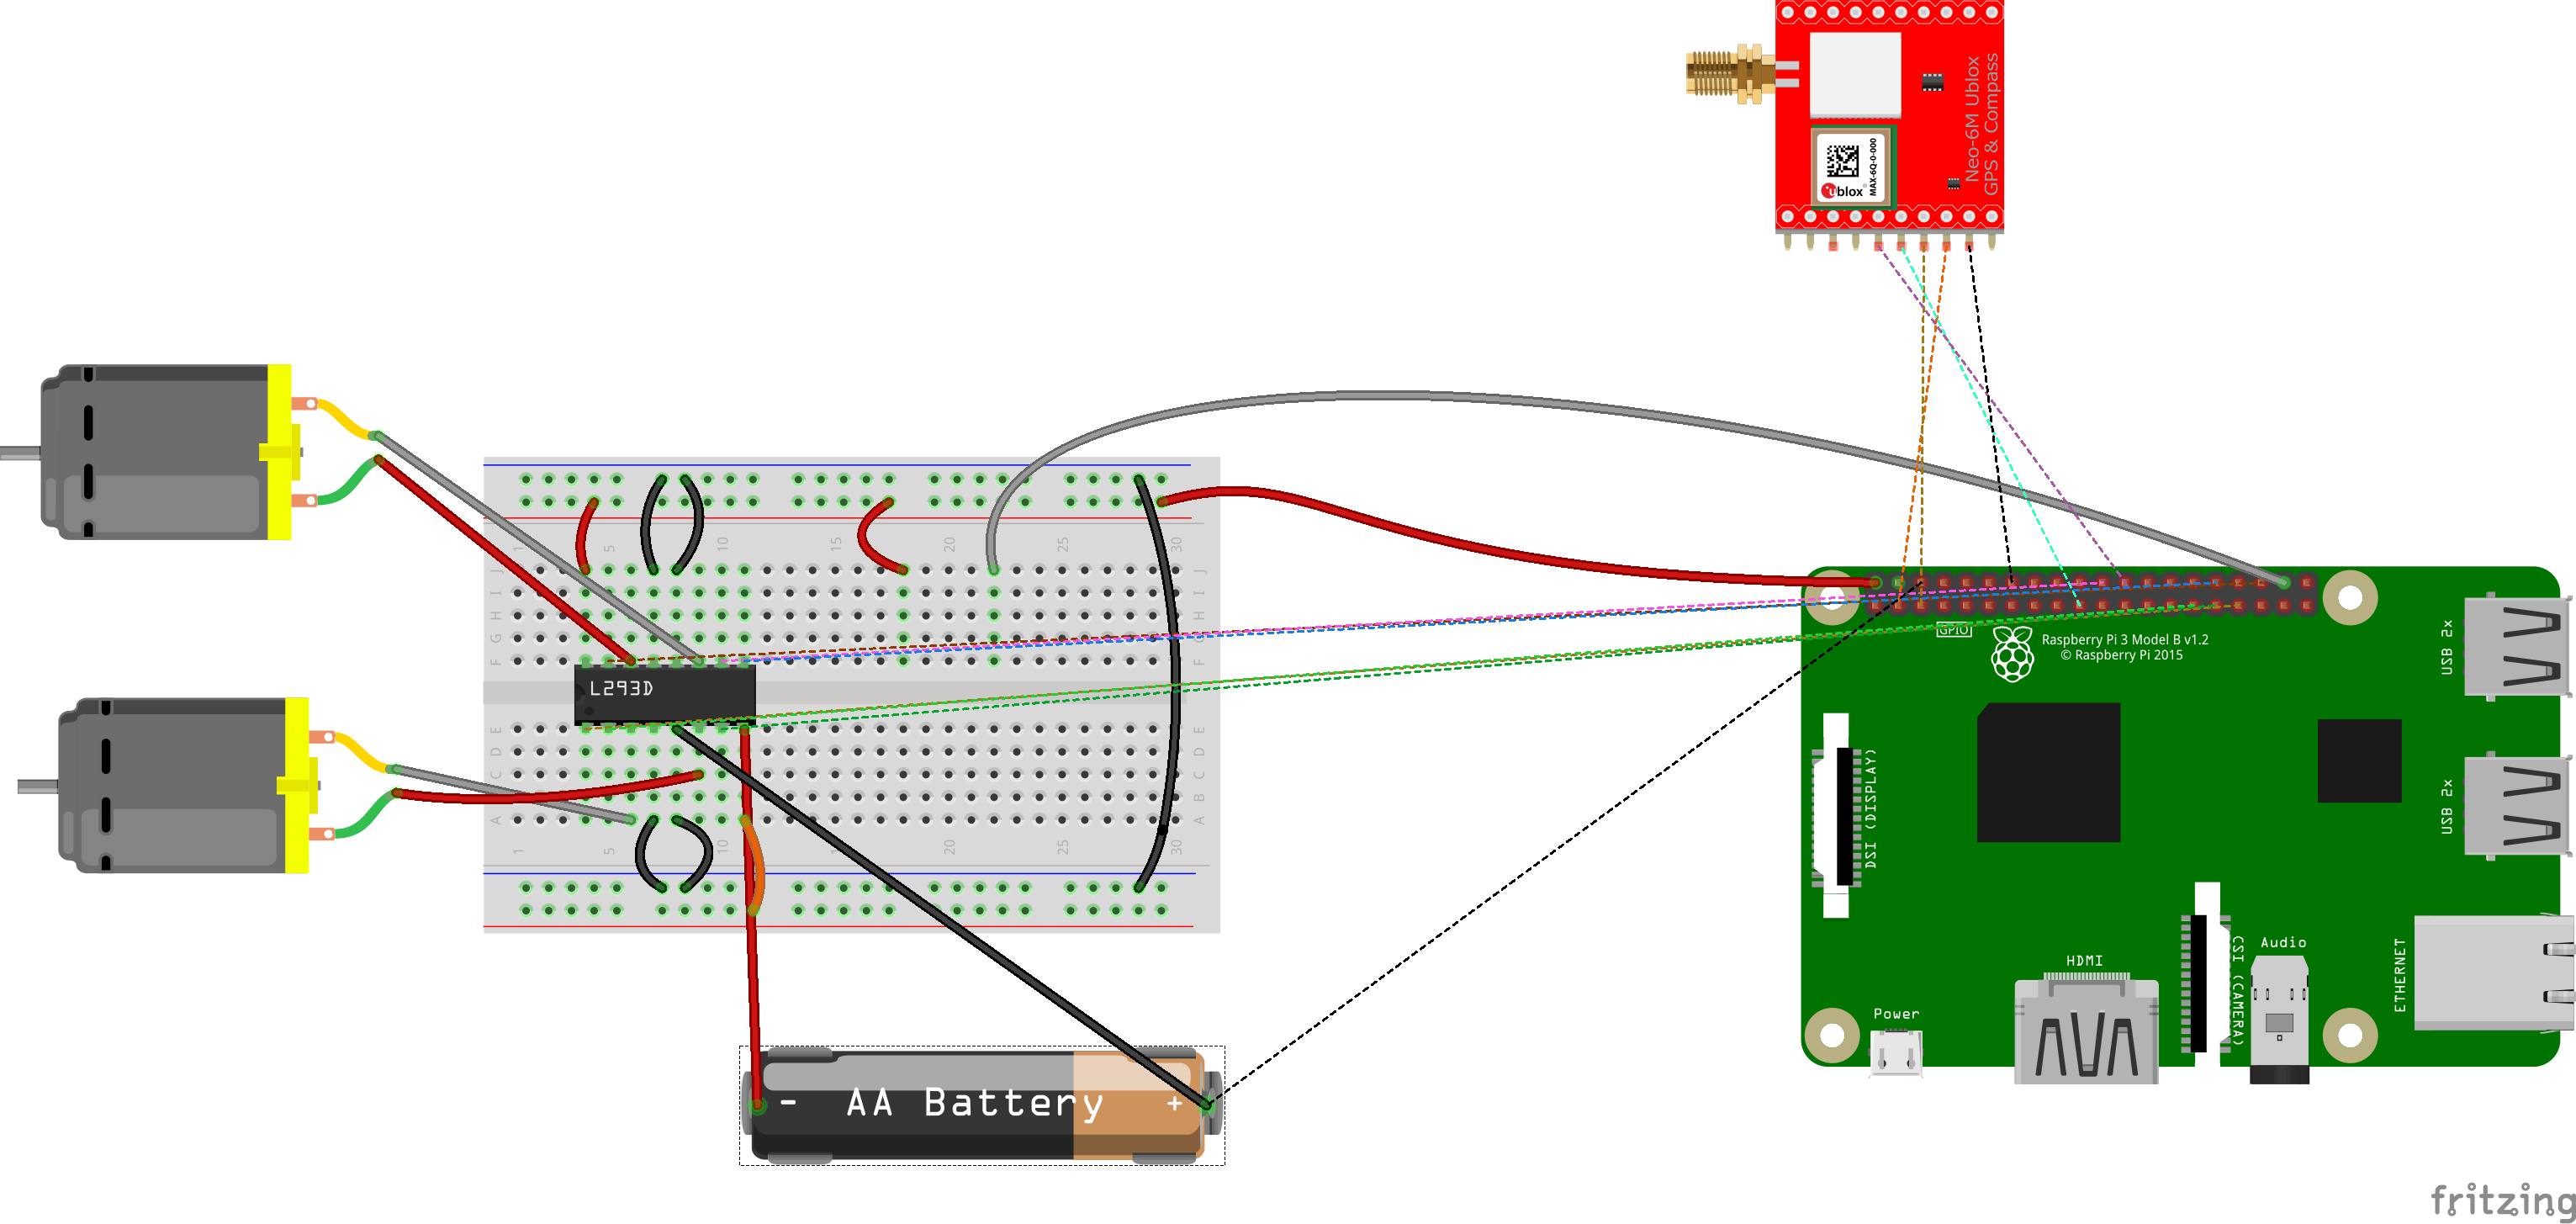
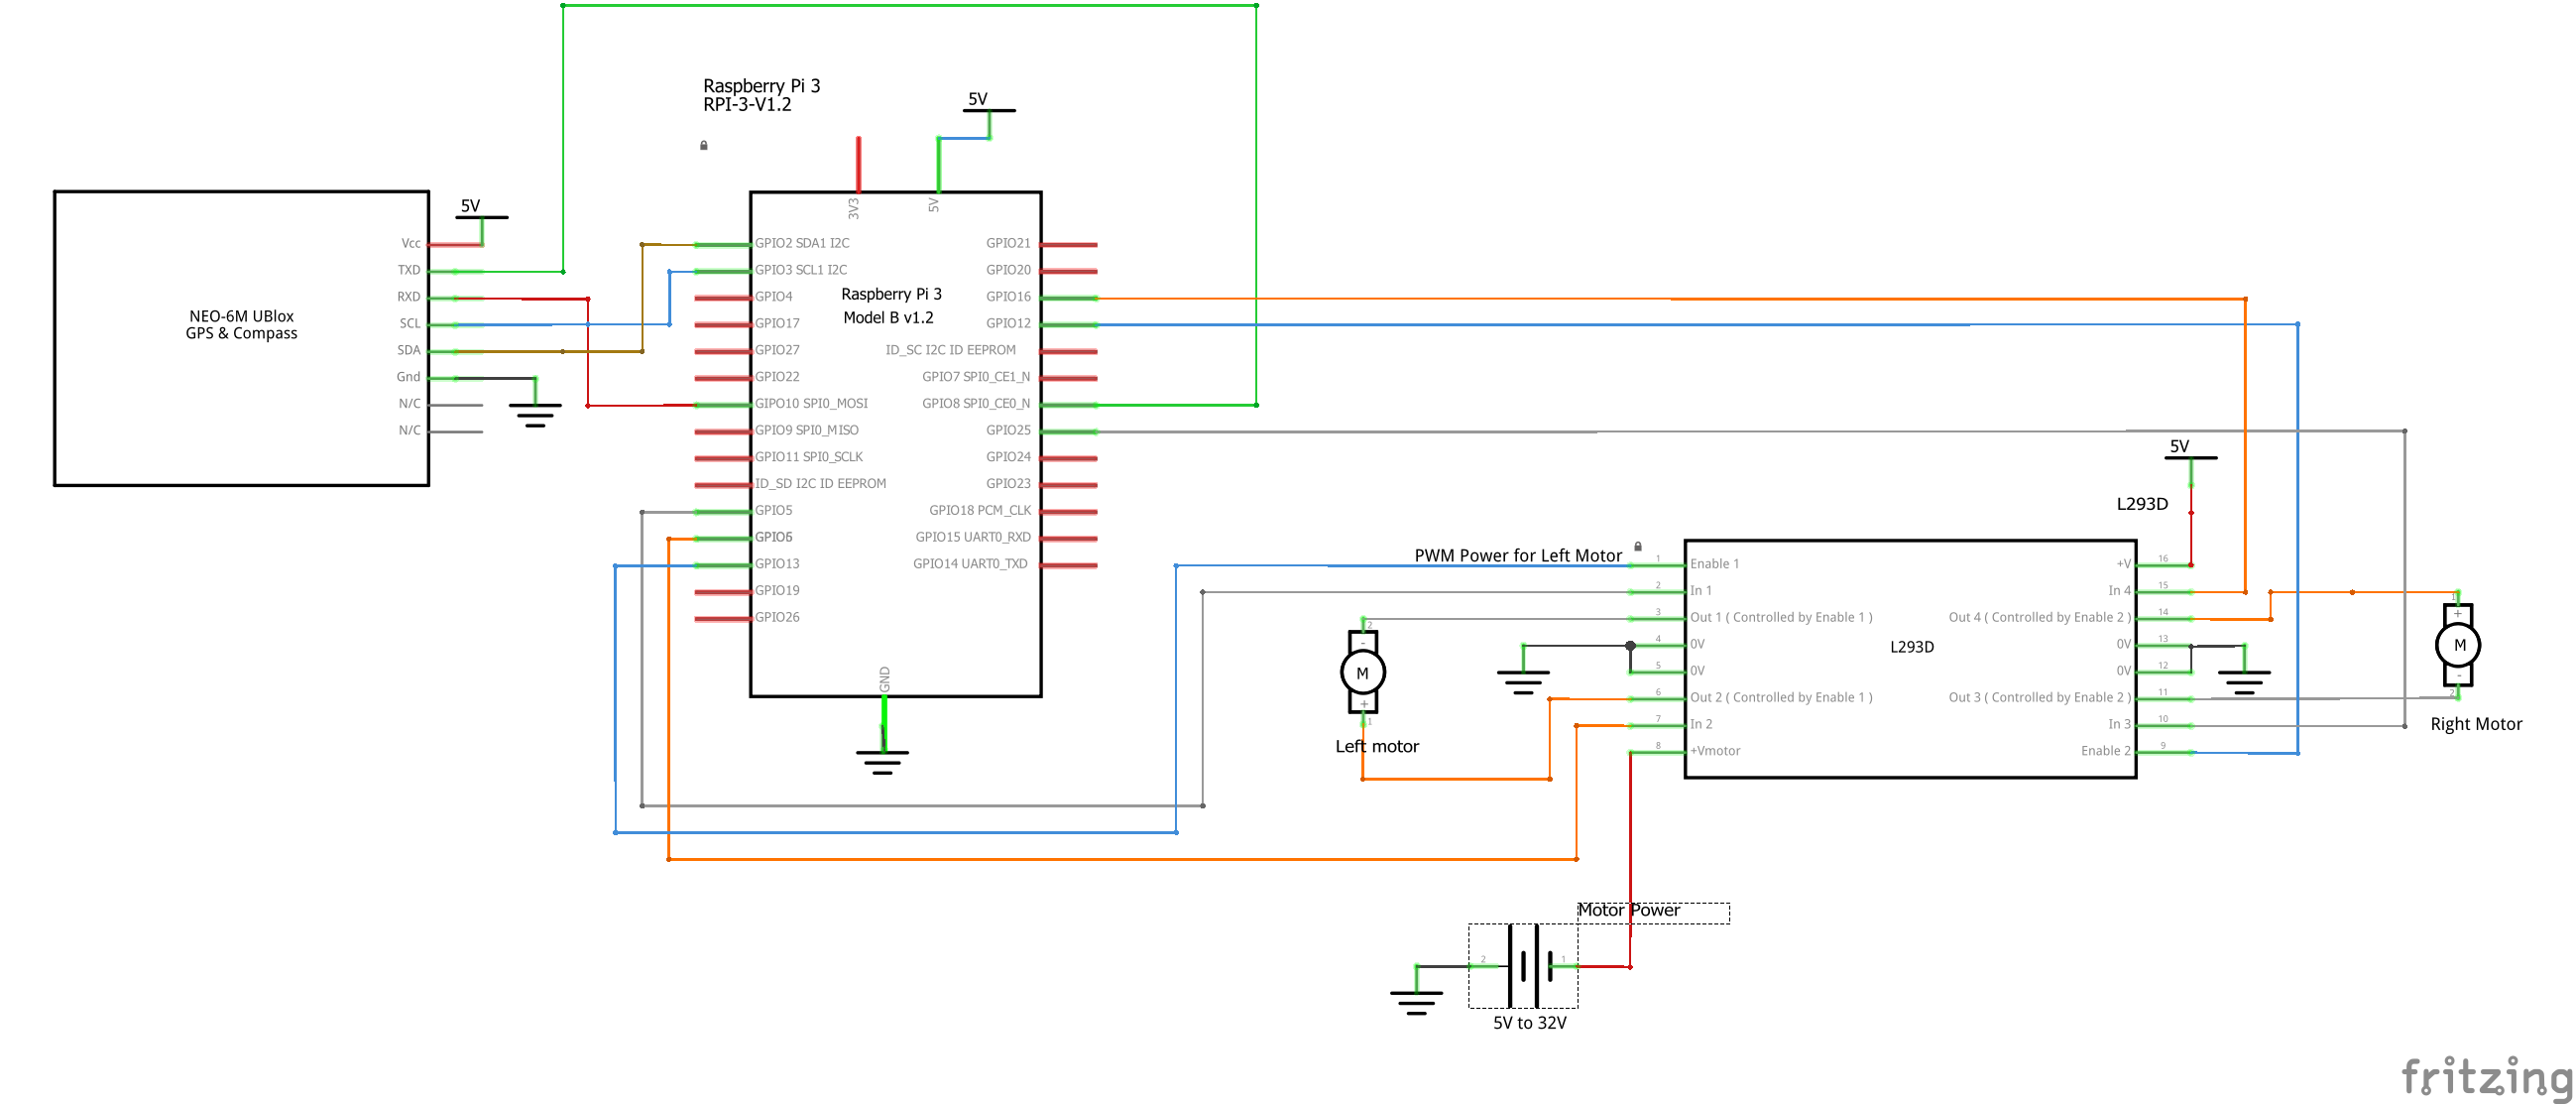
2. I2C Communication: Inter Integrated circuit (I2C) available in Raspberry pi is used to communicate with a Honewell 5883L digital compass providing the direction Navigator is heading.
3. Serial Port: Utilising the Serial Port of Pi to communicate with the UBlox Neo-6M GPS Module to provide GPS co-ordinates and speed
4. PWM Control: Pi has a built in circuits to provide Pulse Width Modulation (PWM). Navigator uses this feature to control the speed of Motor. TI’s L293D quadruple half bridge IC is used as Motor Driver.
5. GPIO Pins: Since we need the Navigator to move forward and reverse, GPIO pins are used to dictate the direction of Motor. The L293D half bridge is used in full bridge configuration to facilitate this, thus avoiding requirement for dual supplies to motor.
The simplicity of the program is the Remote Control Web Page is written with pure HTML5, CSS3 and Jquery. It also provides adequate controls that Pi device can use. The project exploits various resources available in Raspberry pi thus forming a good educational kit for learning.
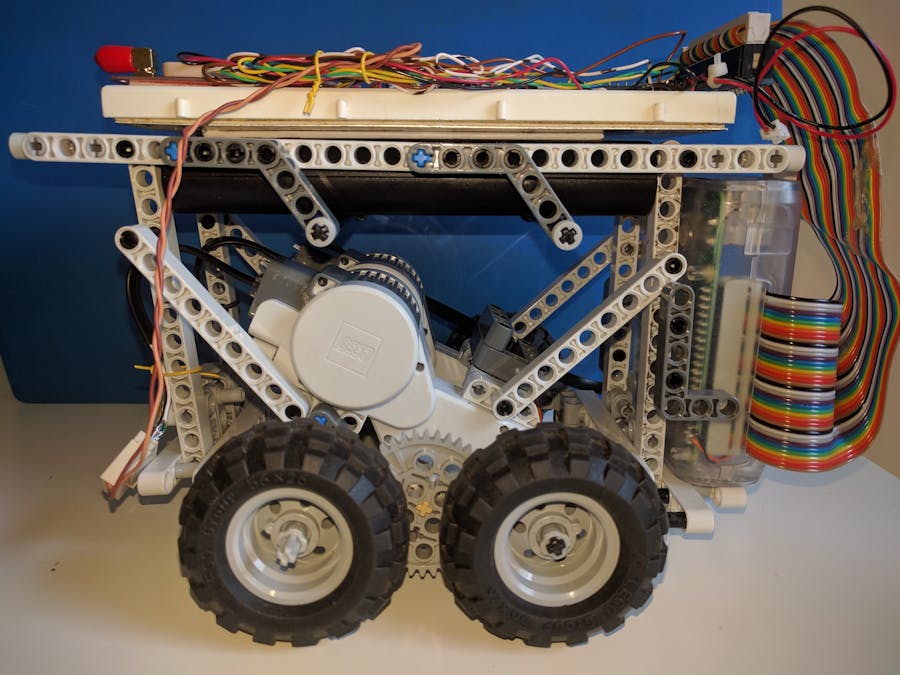
Building the project:The hardware used for this project is Raspberry Pi 3 (RPI3) with Windows 10 IoT running. The Navigator itself is constructed from parts of the Lego Mindstorm. The motors used is also from Lego and hence to drive the Motor L293 bridge is used. The integrated GPS & Compass Module can be obtained from web, available as HAT (Hardware Attached on Top) for RPI3
Developing and programming environment is Visual Studio 2015 Community edition using visual C#. There are two applications, WebService and Navigator. There are also two basic HTML files aptly named Header and Body. For Style sheet, there is also a CSS file.
Creating WebService (Part I):Because a webserver only needs to run in the background, without any display, we will create with a simple background application. In VS2005, we will first create a Blank solution and call it “RemoteNavi”.
Next in “Solution Explorer” right click on “RemoteNavi” solution and then select “Add / New Project”. Select “Windows IoT Core” under “Visual C# \Windows” Template. Then select Background Application (IoT). Name the application as WebService
Now we will add a class to the project. Right Click on the Project, Select Add \ New Item. Select Class and rename the Class as WebService. (File Name will be WebService.cs).
We need to modify the Package capability to run as both Server and as Service. Right click on Package.appxmanifest and select view code. Under <Extensions> remove the following lines
<Extension Category="windows.backgroundTasks" EntryPoint="WebService.StartupTask">
<BackgroundTasks>
<iot:Task Type="startup" />
</BackgroundTasks>
</Extension>
And replace that with the following code. This will take care of running as service. Take a note of the AppService Name. This is required by Navigator described in Part II
<uap:Extension Category="windows.appService" EntryPoint="WebService.StartupTask">
<uap:AppService Name="com.brahas.WebService" />
</uap:Extension>
Now to extend the capability to run as a service add the following line to <Capabilities>
<Capability Name="internetClientServer" />
With that addition, <Capabilities> will look like this.
<Capabilities>
<Capability Name="internetClient" />
<Capability Name="internetClientServer" />
</Capabilities>
In “Solution Explorer” right click on “References” select “Add References…” and then in Universal Windows \ Extensions ensure “Windows IoT Extensions for UWP” (Latest version) is selected.
For compiling Select "Release" and "ARM" processor. Select Target device to be "Remote Machine". Under Remote Machine, ensure your Windows IoT is selected. Finally from the source files copy the directory of “web” and drop that into your WebService Project.
That’s it. The preliminaries are over. Now to the code.
First add two private variables.
private BackgroundTaskDeferral deferral;
private AppServiceConnection asc;
Then Add the following code to Run method:
deferral = taskInstance.GetDeferral();
var ws = new WebService();
var td = taskInstance.TriggerDetails as AppServiceTriggerDetails;
asc = td.AppServiceConnection;
ws.SetConnection (asc);
await ThreadPool.RunAsync(wi =>
{
ws.Start();
});
Because we do not want to end the task immediately after WebService.Start() statement, we take a deferral. Note using async and await for asynchronous methods. The AppServiceConnection variable will store the connection established from Navigator Application. This connection is used to send commands received from Webpage to Navigator Application.
Now to the WebService Class. Copy and paste the code from WebService.cs file. The code is heavily commented which makes it self-explanatory.
Simply create a StreamSocketListener and bind it to a unique port. Because the IoT interface itself uses 8080, we have used 8090 here. Any port that does not conflict with existing services can be used. The Webserver will be listening on this port. Add a ConnectionReceived event. The web service will listen to this port and provides a web page to browser.
private async void Listener_ConnectionReceived(StreamSocketListener sender, StreamSocketListenerConnectionReceivedEventArgs args)
{
if (!bMsg)
{
bMsg = true;
StringBuilder request = new StringBuilder();
try
{
using (IInputStream input = args.Socket.InputStream)
{
byte[] data = new byte[BUFFERSIZE];
IBuffer buffer = data.AsBuffer();
uint dataRead = BUFFERSIZE;
while (dataRead == BUFFERSIZE)
{
await input.ReadAsync(buffer, BUFFERSIZE, InputStreamOptions.Partial);
request.Append(Encoding.UTF8.GetString(data, 0, data.Length));
dataRead = buffer.Length;
}
}
string inputString = GetQuery(request);
if (serviceConnection != null)
await serviceConnection.SendMessageAsync(new ValueSet { new KeyValuePair<string, object>("Query", inputString) });
OutputWebPage(args, inputString);
}
catch (Exception Ex)
{
Debug.WriteLine("Exception occurred: {0}", Ex);
bMsg = false;
}
bMsg = false;
}
Note the usage of flag bMsg. This is to avoid multiple messages being sent to the Navigator leading to queued up messages and may not provide requisite results. You may remove this, if you need to process queued messages. The GetQuery method strips the input from the browser for POST or GET methods and returns the query. The requests are broken down using spaces. See the difference in POST and GET
...
.
var requestLines = request.ToString().Split(' ');
if (requestLines[0] == "POST")
{
return requestLines[requestLines.Length - 1];
}
data = requestLines.Length > 1 ? requestLines[1] : "Unregistered".ToString();
.
...
The message thus retrieved is dispatched to the serviceConnection – your application that initiates this service.
if (serviceConnection != null)
await serviceConnection.SendMessageAsync(new ValueSet { new KeyValuePair<string, object>("Query", inputString) });
Note at the “Start” method we defined following variables
headerFile = File.ReadAllText("web\\header.html");
cssFile = File.ReadAllText("web\\theme.css");
bodyFile = File.ReadAllText("web\\body.html");
OutputWebPage will concatenate these headerFile, cssFile, bodyFile (denoting Header, Style sheet and Body of HTML) and output back appropriately.
...
.
byte[] bodyArray = Encoding.UTF8.GetBytes(
$"<!DOCTYPE html>\n<html>\n<head>{headerFile}<style>{cssFile}</style>\n</head>\n<body>{bodyFile}<p>Feedback Received: <span id=\"retVal\">{data}</span></p>\n</body>\n</html>");
var bodyStream = new MemoryStream(bodyArray);
var header = "HTTP/1.1 200 OK\r\n" +
$"Content-Length: {bodyStream.Length}\r\n" +
"Connection: close\r\n\r\n";
.
...
The tag span with id = “retVal” allows you to provide a feedback to the webpage. The data itself can be sent from your application. If you check the Jquery script in Header file you will see the following code:
$(".btnjs").click(function () {
var ran = Math.random();
var name = this.name;
$("#log").text(name + ": Clicked");
$.get("", { [name]: "Clicked_Action " + ran}, function (result) {
$("#retVal").text(result);
});
});
Using Math.random you can force the browser to send unique message and refresh when results are received. (For some reasons, the browser refreshes are always delayed and not immediate).
Before compiling, you will have to ensure “Compile with .Native Tool Chain is ticked in Build Configuration. Generally it is unticked.
Failing to do so will not work in “Release” mode, though it will work in “Debug” mode. Compile and Deploy and Run. That finishes our first part.
Creating Navigator UWP application – Part IIWhile on the same solution, right click on the “RemoteNavi” in solution explorer and add a new project as we did in Part I. This time select UWP blank application.
Next add three classes as we did earlier. Call them as I2CClass, PWMController and SerialInterface. We need to add a reference for Microsoft IoT Lightning Provider for using PWM controller. To do this, under Navigator in “Solution Explorer” right click on Reference and select “Manage NuGet Packages”. Click on Browse, and type “Microsoft.iot.lightning” in the search field. Check the item “Include prerelease”. Select the “Microsoft.iot.lightning” in the result and Install on the right side. Install the latest version.
Some changes are required in Package Manifest. Right click on Package.appxmanifest, under Navigator in “Solution Explorer”, select View code. Make these changes:
Change <Package to reflect this:
<Package
xmlns="http://schemas.microsoft.com/appx/manifest/foundation/windows10"
xmlns:mp="http://schemas.microsoft.com/appx/2014/phone/manifest"
xmlns:uap="http://schemas.microsoft.com/appx/manifest/uap/windows10"
xmlns:iot="http://schemas.microsoft.com/appx/manifest/iot/windows10"
IgnorableNamespaces="uap mp iot">
This will declare “iot” name space and ensure that the “iot” namespace declared should be ignored and not to be validated.
Modify the <Capability> section to reflect this:
<Capabilities>
<Capability Name="internetClient" />
<iot:Capability Name="lowLevelDevices" />
<DeviceCapability Name="109b86ad-f53d-4b76-aa5f-821e2ddf2141"/>
<DeviceCapability Name="serialcommunication">
<Device Id="any">
<Function Type="name:serialPort" />
</Device>
</DeviceCapability>
</Capabilities>
This will ensure that the application has following capabilities:
- Internet Client
- Iot using low level devices (more on that in a moment)
- The name “109b….” is for Microsoft iot Lightning provider
- Serial Communication.
Now in order to use the Lightning provider, we need to use DMA Map, hence the low level device. To do this, in your IoT device Console in browser, Click on Device Manager and select Directory Memory Mapped Driver.
Then click “Update Driver”. Reboot the Raspberry pi.
That completes initial changes for the Navigator Application. Copy all the code from each of the files into respective files. Duplicate the MainPage.xaml for UI. As usual the codes are already heavily commented to make it easier to understand. Some important points are given below:
Navigator:Navigator’s MainPage.cs declares and initiates each of the classes. Its main function is to start the web service and establish a communication with it. Following method does that:
private async void SetupAppServerService()
{
var listing = await AppServiceCatalog.FindAppServiceProvidersAsync("com.brahas.WebService");
var packageName = (listing.Count == 1) ? listing[0].PackageFamilyName : string.Empty;
asc = new AppServiceConnection();
asc.AppServiceName = "com.brahas.WebService";
asc.PackageFamilyName = packageName;
var status = await asc.OpenAsync(); //The service will be started and then open a connection to it
if (status != AppServiceConnectionStatus.Success)
{
tbStatus.Text = "Could not connect: " + status.ToString();
tbStatus.Foreground = new SolidColorBrush(Colors.DarkRed);
tbStatus.FontWeight = FontWeights.Bold;
}
else
{
asc.RequestReceived += Asc_RequestReceived;
}
}
Note the AppServiceName. This the same we declared earlier in Part I for WebService application. (If you are using a different name, make sure that is reflected here). On a successful connection, it will start receiving the messages from the WebService (which we know gets it from Web client) and process the same in the event handler “Asc_RequestReceived”. The messages are decoded, dispatched or processed appropriately. Note also the private declared variable AppServiceConnection asc. This will be used for sending messages back to WebService as seen in the method “SendMessageToService()”
ValueSet st = new ValueSet();
string str = "Heading: " + tbHeading.Text + "; GPS Co-ordinates: " + si.latLong;
st.Add(new KeyValuePair<string, object>("Value", str));
var x = await asc.SendMessageAsync(st);
To send the message frequently to the WebService we use a timer. Check the event handler “RefreshTimer_Tick”. This is self-explanatory. The frequency of sending this message is given by the variable “const double REFRESHCYCLE = 750;” which is 0.75 Seconds. You can change this to your preference, but keep in mind the latencies of other functions. You do not want multiple triggers, though the variable bRefresh will take care of it.
I2cClass:Honewell HMC 5883L is a 3 Axis digital Compass which communicates to I2C protocol. If you are using a different module, then the configuration and register details will change and this class must be modified appropriately. The Id for this IC is “H43”. The CheckId() will try to match this Id and returns true or false
WriteBuffer = new byte[] { (byte)CompassRegisters.IDENTIFICATIONA };
ReadBuffer = new byte[3];
//Read the device signatureA
compass.WriteRead(WriteBuffer, ReadBuffer);
string str = System.Text.Encoding.UTF8.GetString(ReadBuffer);
//Verify the device signature
if (str != CompassSign)
{
return false;
}
return true;
Note how the Registers are written and read. The no. of bytes in ReadBuffer will indicate the IC to obtain 3 bytes in return. This in most inherent to shift registers and the address are internally incremented after every read automatically.
As for compass data, it is provided in two bytes in big-endian format. (For those who are not conversant with big-endian and little-endian, in big-endian the most significant byte (MSB) is written / read first while Least Significant Byte (LSB) will be next – very similar to our reading or writing. The little-endian writes LSB first followed by MSB). Since Intel processors use little-endian, we need to convert that. The method “GetXYZ()” will shift the LSB value 8 times (So it becomes MSB) and then OR with MSB.
rawValue.XaxisRaw = (short)(read[0] << 8 | read[1]);
Also note the introduction of a small time delay of 70ms. This is required for the registers to fetch and fill the data and is documented in HMC 5883L IC specification. This latency is deliberately introduced to ensure webservice does not request to fetch the data in lesser time frame than this. (Current setting for refresh is 750ms and hence this delay is not applicable. This is only to safeguard against the refresh cycle being less than 70ms )
To obtain the Direction from XYZ axis data, check the method GetDirection() which converts x & y axis values, adds declination angle correction factor for the Geographic location (Mine: Sydney, Australia) and then converts the radian to degrees.
double direction = 0;
direction = Math.Atan2(scaledValue.YaxisScaled, scaledValue.XaxisScaled);
double declinationAngle = 219.6f/1000; //declination angle is East
direction += declinationAngle; //direction -= if the declinationAngle is West
// Correct for when signs are reversed.
if (direction < 0)
direction += 2* Math.PI;
if (direction > 2 * Math.PI)
direction -= 2 * Math.PI;
return direction * 180.0 /Math.PI; //radians to degrees
Neo-6M GPS HAT uses Serial communication to output the data. The data output is in a series of multiple lines of string starting with a header and the data separated by comma. All this is well documented. We use the $GPGGA header and then decode the values for GPS and for speed we use GPVTG. The “ReadAsync” splits the obtained data appropriately
var dataGPS = str.Substring(str.IndexOf("GGA")).Split('\n');
var dataSpeed = str.Substring(str.IndexOf("VTG")).Split('\n');
The SetData method declared in GPSData class and the SetData method declared in GPSSpeed class will further split the line based on “,” separation and sets the value. Here is the technique used for data extraction from the $GPGGA line
var val = data.Split(',');
if (val[6] != "0")
{
if (val[1].Length > 6)
gpsTime = string.Format("{0}:{1}:{2}", val[1].Substring(0, 2), val[1].Substring(2, 2), val[1].Substring(4,2));
else
gpsTime = "";
int dot = val[2].IndexOf('.');
latitude = string.Format("{0}° {1}' {2}.{3}\" ", val[2].Substring(0,dot-2),val[2].Substring(dot-2,2),val[2].Substring(dot+1,2),val[2].Substring(dot+3));
latitude += val[3] == "N" ? "North" : "South";
dot = val[4].IndexOf('.');
longitude = string.Format("{0}° {1}' {2}.{3}\" ", val[4].Substring(0, dot - 2), val[4].Substring(dot - 2, 2), val[4].Substring(dot + 1, 2),val[4].Substring(dot+3));
longitude += val[5] == "E" ? "East" : "West";
satellites = Convert.ToUInt16(val[7]);
dilution = Convert.ToDouble(val[8]);
elevation = Convert.ToDouble(val[9]);
PWM(Pulse Width Modulation) Controller and GPIO pins for I/O is defined in this class. This class controls the direction and speed of motor. The class itself has comments that explains the operation. The Texas Instrument L293D is a quad half bridge motor driver. In simpler terms it can drive 4 motors in one direction or Two motors in dual direction. Since we needed both forward and reverse motion, we use full bridge configuration of L293D. The IC has two inputs and corresponding two output to the motor. There is an enabler pin which enables these I/O. The specification for L293D states as follows:
- Motor In1 Motor In2 Motor Direction
- Low High Forward
- High Low Backward
- Low Low Stop
- High High Stop
The Motor In1 and Motor In2 for Left Motors are controlled by GPIO pins 5 & 6 respectively for motor direction while the enabler is connected to PWM on GPIO 13 for speed. The right motor uses GPIO pins 25 & 16 for controlling the motor direction while GPIO 12 is used for PWM which controls the speed.
The motor itself can run on separate voltage source without affecting any of the circuit.
A Working Demo in You Tube:Screen Shots:http://www.gpsinformation.org/dale/nmea.htm
https://developer.microsoft.com/en-us/windows/iot/samples/serialuart
https://www.hackster.io/windowsiot/hello-blinky-with-galileo-and-windows-6b89f0
http://www.raspberrypiwiki.com/index.php/Raspberry_Pi_Add-On_GPS_HAT_Module


Comments