

Hardware components | ||||||
 |
| × | 1 | |||
Software apps and online services | ||||||
| ||||||
Setting up your own IoT devices is totally cool, but what if you want to set something up for friends and family or even sell it? In this project I'll show you an architecture that will allow you to do just that. This project is complete with a working example that you can use to start out with.
We begin with the overall big picture:
1. We're going to create a product in the Particle Cloud console. See instructions here
2. We're going to create a product in Firebase/Google Cloud (By the way, Firebase and Google Cloud are essentially the same thing)
3. We're going to follow the Particle documentation for connecting Particle Cloud to Google Cloud
4. We're going to follow the Google documentation for setting up authentication in your app and setting up a Firestore database. I used google and email authentication in my example
5. We're going to follow Google documentation for setting up Firebase Functions and upload the example function
Next, up are some rough diagrams on how the architecture will be used during different phases of the product lifecycle.
The first diagram shows your "Production" setup
Production is when you would take the Boron and physically add it to your device to prepare it for shipment to customers.
1. Get the ICCID from the Boron using the Particle CLI and the command "particle identify" (You can also get the ICCID from the Particle console if the device is connected)
2. Add the device to your Particle Product using the Particle Console
3. Get the device id from the Boron using the "particle identify" command
4. Store the device id as the name of a document in a collection named "devices".
5. Run particle usb setup-done
Next up is the customer on boarding. This is what they would do after unboxing your device. But first, you'll have to have a compiling Android app. Either change the package name everywhere or create a new project from scratch and copy over all the code from the example.
1. You'd include a card or something instructing the user to install the smartphone app
2. The customer would then create an account on the app
3. To keep the example simple you'd include the device id on a printout and the customer would have to type it into the app. Not ideal but you could improve it by having the app read the device id over Bluetooth or scan it from a barcode you print out.
4. When they enter the device id and press "ONBOARD YOUR DEVICE" in the app, the app sends up the device id and Firebase Cloud Messenger token to the Firestore database (fcmToken above).
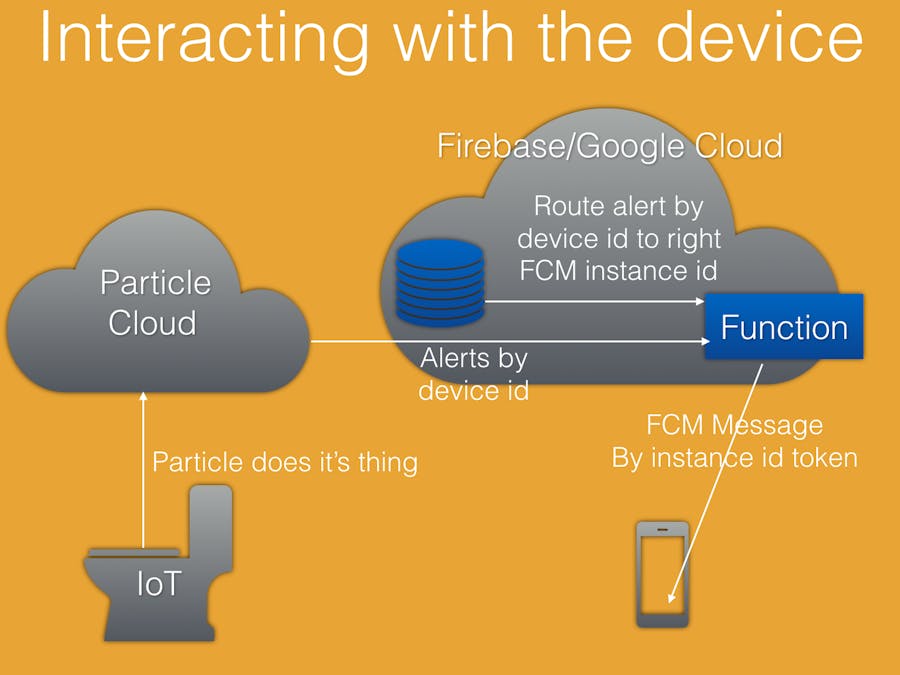
At this point the customer is all set to interact with the device. My example just sends a message once per minute. I get the device id from the Particle integration and route it to the right customer FCM token. The app shows the message in a text view when it's in the foreground. It creates a notification in a battery efficient way while in the background.
If you find this example useful give it a respect. I put it out here because I didn't find a complete example specifically for the Boron LTE scenario. At first I started going down the Particle Two-Legged Auth route but found that that didn't really make sense when you have a SIM card that you have to service. So this way you can handle the SIM card billing directly with your customer.
Finally, don't forget to add your own google-services.json in the Android project. Make sure you keep it in a safe place and don't commit it to a public git repo.


Comments