
Hardware components | ||||||
_ztBMuBhMHo.jpg?auto=compress%2Cformat&w=48&h=48&fit=fill&bg=ffffff) |
| × | 1 | |||
| × | 1 | ||||
| × | 2 | ||||
| × | 1 | ||||
 |
| × | 1 | |||
| × | 1 | ||||
| × | 1 | ||||
See our full tutorial here. Visit BreakoutBros.com for more.
In this tutorial we will be making a Joystick Laser Mini Turret. The joystick will control the laser on a turret and it will be able to move in 2 directions while turning on or off the laser. We are not using a burning or cutting laser for this tutorial but please be careful not to aim the laser at anyone's face.
We got the inspiration to create this Laser Turret when combining parts from the Elegoo Uno R3 Starter Kit* and the 37 in 1 Elegoo Sensor Kit. We wanted to create something with a joystick control and once we saw the laser, we couldn’t help ourselves.
*Check out our review of the Elegoo Uno R3 Complete Starter Kit
To start you will need:- Arduino(or equivalent)
- 2 x servos
- Wires
- Arduino Power Supply
- Electrical Tape
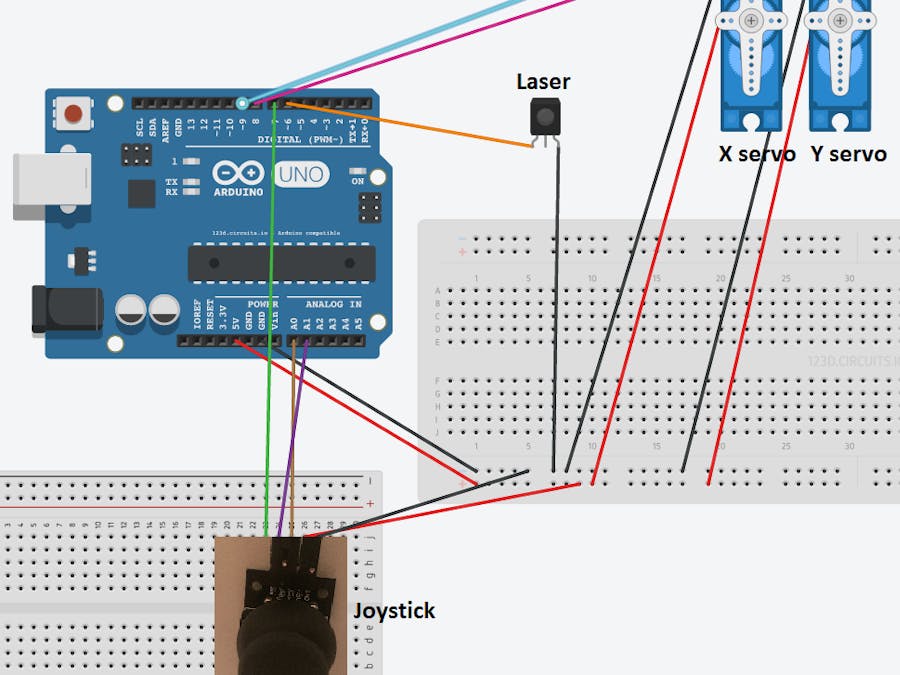
First things first, we must wire up all the components. Connect the servos correctly to 5V and GND. This was made extremely easy using our RoboRED. The X position servo control will be connected to Digital I/O pin 9 of the Arduino. The Y position servo control will be connected to Digital I/O pin 8 of the Arduino. The laser power(pin 3) will be connected to Digital I/O pin 6 of the Arduino, while pin 1 of the laser will be connected to GND of the Arduino. To wire up the Joystick, connect the 5V pin to 5V of the Arduino, GND to GND of the Arduino, Vrx to Analog pin 0 of the Arduino, Vry to Analog pin 1 of the Arduino and SW to Digital I/O Pin 7 of the Arduino.
See the Wiring Diagram Below:
- 5V – X Servo PWR, Y Servo PWR, Joystick 5v
- GND – X Servo GND, Y Servo GND, Laser Pin 1, Joystick GND
- Pin 6 – Laser Pin 3
- Pin 7 – Joystick SW
- Pin 8 – X Servo Control
- Pin 9 – Y Servo Control
- Pin A0 – Joystick Vrx
- Pin A1 – Joystick Vry
Now we need to assemble the laser turret. To do this take the X position servo and make it the base of the turret. Then lay the Y position servo on its side on top of the X position servo and tape it to the servo arm. Next mount the laser on the Y position servo so that it’s arm would move up and down with the laser. After uploading the program to the Arduino, come back to tweak the arm positions so that the laser is in the desired plane. Use a lot of electrical tape to mount the servo to a desk or you can use your wood working skills to screw the base servo in place.
Code Step 1The first step is to define all the libraries and variables used in this tutorial. The Servo.h library included in the Arduino IDE will be used for this tutorial. Then define two servo objects, one for the X rotation and one for the Y rotation. The remaining variables are the Pins definition, the Servo Position variables and a variable to store whether the push button is pressed or not.
#include <Servo.h> // Include the Servo Library to control the servos
Servo xservo; // create servo object to control the x direction servo
Servo yservo; // create servo object to control the y direction servo
//Servo Variables
int pos = 0;       // variable to store the servo position
int XServoPin = 9; // Servo pin that will control X motion
int YServoPin = 8; // Servo pin that will control Y motion
//Joystick variables
int xposPin = A0;    // select the input pin for the potentiometer
int yposPin = A1;    // select the input pin for the potentiometer
int Xpos = 0;
int Ypos = 0;
int buttonPin = 7;
int buttonPress = 0;
//Lazer Variables
int lazerPin = 6;
The next section of code is the setup. Define the laser pin as an OUTPUT and the push button as an input. Also enable the Arduino Pin pullup for the push button and enable the Servos.
void setup() {
  pinMode(lazerPin,OUTPUT);      //The lazer will be an output
  pinMode(buttonPin,INPUT);      //The buttonpress pin is an input
  digitalWrite(buttonPin,HIGH);  //This enables the Arduino pullup for this pin

  xservo.attach(XServoPin);  // attaches the servo on pin 9 to the servo object
  yservo.attach(YServoPin);  // attaches the servo on pin 8 to the servo object
}
The next section of code will be the Main void loop. This is where we will handle the button press. The button is active LOW. This means that when the button is not pressed the Arduino will read “HIGH” and when the button is pressed the Arduino will read “LOW”. The logic will turn on the Laser if the Button reads LOW and turn off the Laser if the Button reads HIGH.
buttonPress = digitalRead(buttonPin); //Read the sate of the button
  if(buttonPress == LOW) // The button press is active low , so if it is pressed we will turn the lazer on
  {
    digitalWrite(lazerPin, HIGH); //Turn Lazer on
  }
  else
  {
    digitalWrite(lazerPin, LOW); // If it is not pressed, keep lazer off
  }
The final section of code is to read the position of the joystick and map these to the degrees that the servo should turn to for both X and Y. The Servo only goes from 0 to 180 as it’s input, whereas the output of the joystick will be from 0 to 1023. the map() function will map these ranges correctly so that 1023 will equal 180. Once the positions are mapped, the servo is then instructed to go to this position. Add a short delay to help prevent jittering. There will still be some and that is due to filtering of the joystick. In the future we will add a tutorial to help combat this.
 Xpos = analogRead(xposPin);     // read and store the x position location of the joystick
  Xpos = map(Xpos,0,1023,0,180);  //map the analog read x values to the 0-180 servo values
  Ypos = analogRead(yposPin);     // read and store the y position of the joystick
  Ypos = map(Ypos,0,1023,0,180);  //map the analog read y values to the 0-180 servo values
  xservo.write(Xpos);             // move the X Location servo to the x position the joystick is at
  yservo.write(Ypos);             // move the Y Location servo to the y position the joystick is at
  delay(50);
Now that you have the pieces of the code, go ahead and put them all together. You can get the entire code here. Power up your Arduino and upload the code. Now you can start having fun with your laser turret!
If you liked this tutorial please subscribe to get more updates! Any questions on the Laser Turret tutorial feel free to comment below!


Comments