
Hardware components | ||||||
_ztBMuBhMHo.jpg?auto=compress%2Cformat&w=48&h=48&fit=fill&bg=ffffff) |
| × | 1 | |||
 |
| × | 1 | |||
This is a tutorial from BreakoutBros.com. See the full post here.
What is the BeatBot? The BeatBot is a BreakoutBros toy invented to entertain people who love tapping their fingers to a beat. It’s very simple, and after playing with it for a while I had to share this creation. Using a vibration switch and a buzzer the BeatBot will sense a predetermined number of beats and play them back to you. You can tap your fingers along and it will remember the beat Check it out below.
Be sure to turn on your volume otherwise you won’t catch the beat!
What you will need:- Arduino**
*The sensors used to create BeatBot we selected from the Elegoo 37 sensor kit. ** Be sure to check out our Best Arduino Starter kits if you are interested in getting started with the Arduino
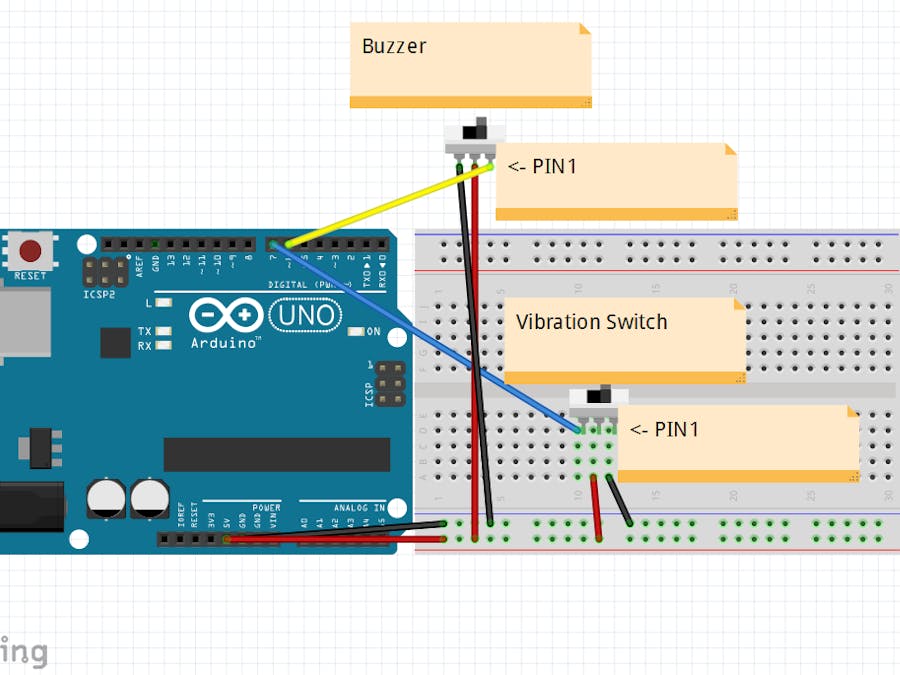
First we will connect the buzzer to the Arduino. Connect Pin6 of the Arduino to the Signal pin 1 of the Buzzer, connect 5V to pin 2 and connect, GND to pin 3 of the buzzer module. For the vibration switch Connect pin 1 of the module to GND, Pin2 to 5V and pin 3 to pin 7 of the Arduino. I found it a lot easier to put this on a breadboard to sense the vibrations as I could just thump the breadboard and it would pick up the vibration.
Buzzer CodeWe now will create a simple For loop program to make sure the buzzer is working and also create the tone desired.
int buzzerPin = 6;  //Pin used to Play the Buzzer
//Buzzer Information
int rateHIGH = 1; // Used for Buzzer Ton - 1 milisecond High - change to alter pitch of tone
int rateLOW = 3; //Used for Buzzer Tone - 3 miliseconds Low - change to alter pitch of tone
unsigned char d; //Used for the Loop for how long the tone is played

void setup()
{
pinMode(buzzerPin, OUTPUT); //Set the buzzer pin as an output to control the buzzer sound
}

void loop()
{

for(d = 0; d < 50; d++) // This deterimines the length of the sound - this seemed to be quick enough
{ // The buzzer works by imposing a frequency on to it by changing the 5V pin high and low
// Experiment around with this to get the tone you want
digitalWrite(buzzerPin,HIGH); // Set the buzzer High
delay(rateHIGH); //Delay by the High Tone setting
digitalWrite(buzzerPin,LOW); // Set the Buzzer Low
delay(rateLOW); //Delay by the Low Tone settnig
}
delay(1000); // set to buzz once every second
}
Now upload this onto your arduino and make sure you hear noise coming out of the buzzer about once every second.. How this work is “d” will control how long the buzzer goes, “rateHIGH” will control the amount of time the buzzer waveform is High and “rateLOW” will determine the amount of time the buzzer waveform is LOW. If you Adjust “rateHIGH” and “rateLOW” it will change the tone of the buzzer. I found that setting “rateHIGH” to 1 and “rateLOW” to 3 made a distinct loud sound that overcame the thumping of my thumb. Please note that “d” is not the only thing that controls the length of time the tone will play. If you change “rateHIGH” and “rateLOW”, “d” will need to be adjusted to keep the same length of the tone. Currently the total length is equal to (rateHIGH+rateLOW) *d = (3+1)*50 = 200ms.
Vibration Switch CodeNow that the buzzer is working, it’s time to get the vibration switch working. We will write a simple program that senses a vibration and outputs to the Serial Terminal that it sensed the vibration.
int vibrationPin=7; //Pin For Sensing Vibration Switch
int vibrationVal;  //variable to store Vibration State

void setup()
{
  pinMode(vibrationPin,INPUT); //Set the Vibration pin as an input to sense the switch
  Serial.begin(9600);          //Start serial Print to help with diagnostics
}
void loop()
{
 if(vibrationVal == LOW) // The switch is active low - meaning if a vibration is sensed we will enter this loop
  {
    Serial.println("Vibration Detected"); // Print to diagnostics that a "Vibration was detected
  }
}
Load this onto your Arduino and pull up the Serial Diagnostic reading. Now tap along on the breadboard and you should see “Vibration Detected” printed to the Serial port whenever you tap.
Play with it a bit to get familiar with the sensitivity of the vibration switch.
Integrate the Buzzer and Vibration SwitchTo integrate the buzzer and vibration switch we will need to turn the buzzer code into a subroutine. Do this by creating a void playBuzzer() subroutine at the bottom of the BeatBot code.
void playBuzzer() // Function to play the buzzer TOne
{

  for(d = 0; d < 50; d++) // This deterimines the length of the sound - this seemed to be quick enough
  {                       // The buzzer works by imposing a frequency on to it by changing the 5V pin high and low
                          // Experiment around with this to get the tone you want
    digitalWrite(buzzerPin,HIGH); // Set the buzzer High
    delay(rateHIGH);              //Delay by the High Tone setting
    digitalWrite(buzzerPin,LOW);  // Set the Buzzer Low
    delay(rateLOW);              //Delay by the Low Tone settnig
  }

}
This works exactly like in the above buzzer code example except the variables will be defined as global variables for the entire sketch. In order to play the buzzer, all you need to do is write playBuzzer().
Next we will look at the main loop code. We need a way to store each time stamp when a vibration is detected. Using the millis() command we can grab the Arduino’s counter and store this into an array for each beat.
 vibrationVal = digitalRead(vibrationPin); //Read the vibration switch and store into value
  if(vibrationVal == LOW) // The switch is active low - meaning if a vibration is sensed we will enter this loop
  {
    store[i] = millis(); //store the current time into our time store variable
    playBuzzer(); //Play the buzzer subroutine to indicate that it sensed the vibration
    Serial.println("Vibration Detected"); // Print to diagnostics that a "Vibration was detected
    i++; // incriment i since a time stamp was stored
  }
If the vibration switch detects a vibration, it will store that time into the store[] array. I also added playing the buzzer after the time is stored. That way you have an audible indication that the BeatBot captured the beat.
Now we need a trigger to start a “playback” of the beat. We will use the variable “i” which was used to index the store[] array above. Whenever this is equal to the number of beats we want to playback, it will execute our code. Once executing this if statement, we will create a For loop to run the playback.
if(i == notes)//If i is equal to the number of notes we wanted, this means its time to playback the notes
  {
    Serial.println("Starting Song"); // Indicated on the diagnostic that the "BeatBot" sound is starting
    delay(750); // Wait 3/4 a second to give an audible pause between the last beat indication and the start of the playback
    for(b = 0; b < (notes - 1); b++) // This will run the loop to play all the notes
    {
     playBuzzer(); //Play Buzzer function
     delay(store[b+1]- store[b]-(d*(rateHIGH+rateLOW))); // This will take the Array we stored minus the previous position to get the
     Serial.print(b);                                   //"Elapsed time" between the two. We also subtract the time it takes to play
     Serial.println(" = Playing");                      //the buzzer. This is the  time the buzzer is high(rateHIGH) + the time the buzzer is low(rateLOW)
    }                                                   // multiplied by the length of time (d)
    playBuzzer(); // Play the last beat since it will exit the for loop before the last beat is played
    i = 0;
    b = 0;
    Serial.println("Done");
   }
This will use another indexing variable “b”. Since it is starting at 0, the for loop will run from 0 to the number of notes minus 1. For each loop the first step is to play the buzzer sound and then delay it by the amount of time between the beats. Since the index stores the beats in incriminating order, this time is simply the difference between store[b+1] and store[b]. Now if you only include this for the delay, you will notice there is a 200ms shift in all the beats played. If you remember from above, this is because it takes 200ms to execute the playBuzzer() sound. So you will need to also subtract how long it takes to play the buzzer sound (d*(rateHIGH + rateLOW)). Once the For loop is done, we need the last beat to be included so we add a playBuzzer() out of the loop to capture this last beat. Then the variables are reset to 0 so that the program goes back to listening for beats.
In the global declaration at the top of the program you can change the store[] array size and notes variables to change how many notes it records.
int notes = 26;// Number of notes // Number of Notes used
double store[27]; //store 0-26 // Add 1 to the number of notes
                 //This variable will store the time data between notes
Check out the BeatBot playing along to the “Jingle Bells” beat:
Thanks for following along, I hope you have learned something about how to use a vibration switch! We plan on adding some LED lights to BeatBot’s future so please subscribe so you don’t miss it! You can grab the full BeatBot code here.


_3u05Tpwasz.png?auto=compress%2Cformat&w=40&h=40&fit=fillmax&bg=fff&dpr=2)
Comments