

Hardware components | ||||||
 |
| × | 1 | |||
| × | 1 | ||||
 |
| × | 1 | |||
Software apps and online services | ||||||
 |
| |||||
| ||||||
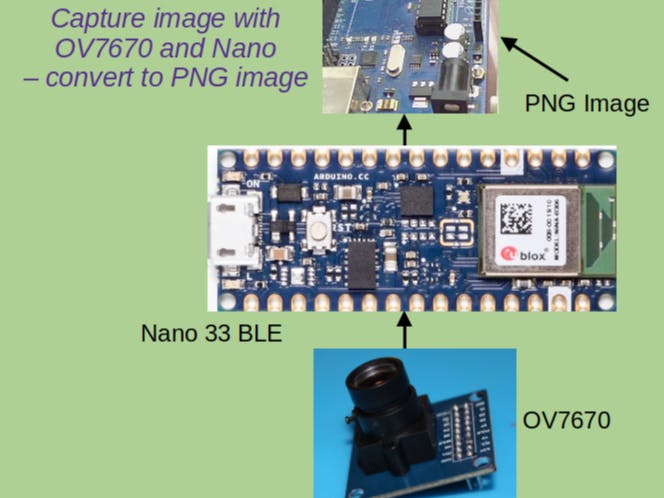
The OV7670 is an image sensor that can be used to capture pictures when controlled by a microprocessor such as the Nano 33 BLE. To quote the datasheet from OmniVision:
“The OV7670/OV7171 CAMERACHIP image sensor is a low voltage CMOS device that provides the full functionality of a single-chip VGA camera and image processor in a small footprint package. The OV7670/OV7171 provides full-frame, sub-sampled or windowed 8-bit images in a wide range of formats, controlled through the Serial Camera Control Bus (SCCB) interface.”
While the OV7670 is a powerful and versatile IC, it produces only Raw pixel data. For most images to be useful, they need to be in jpeg, png, tiff or similar format. This project shows how you can capture a raw image from the camera and then convert this into a png file.
Here are the major components for this project
- Arduino Nano 33 BLE
- OV7670 camera module
- Breadboard
- Connectors
- Computer with Python ver 3 installed
OV7670 CMOS VGA Sensor
Datasheet for the OV7670 included with this project.
The block diagram from the datasheet:
The image array captures the arriving light and after processing the signal, the signal is converted to a digital signal in a A/D converter. This digital signal can then be read from the data bus (D0 – D7) controlled by SIO_C and SIO_D
The OV7670 is capable of capturing video in addition to still images. This project will focus on still images only.
The output formats available from the OV7670 are given on the first page of the datasheet. In this project, the format used is RGB565 (more explanation later)
The image array can take pictures up to 640 x 480 pixels definition. Because of memory limitations on the Nano 33 BLE, pictures up to 320 x 240 are possible (QVGA)
The specific module used in this project includes a simple lens that focuses light on the CMOS array, the focal length of which can be manually adjusted. Loosen the small set screw and twist the lens.
Connection between the Nano and OV7670 as follows
Completing this connection is a little tricky and results in a tangle of wires. Picture included of the final connection
In this project, the RGB565 raw format will be used.
If you are interested in a complete explanation of all possible formats, consult the Wikipedia article:
https://en.wikipedia.org/wiki/List_of_monochrome_and_RGB_color_formats
Or read this article:
https://support.touchgfx.com/docs/basic-concepts/color-formats
RGB565 uses a total of 16 bits as shown
Green is allocated 6 bits because the human eye is more sensitive to graduations in green than red or blue.
This format was used in the early days of computing when processing and memory was at a premium. Most systems today use RGB888, where each color is allocated 8 bits for a total of 24 bits (so called true color).
This project requires the RGB565 format to be converted to RGB888 format. This is done by a combination of bit shifting and binary masking. The formula to achieve the conversion below:
p = original 16 bit raw 565 pixel information
red component of RGB888 = r = (p >> 11 & 0b00011111) << 3
green component of RGB888 = g = (p >> 5 & 0b00111111) << 2
blue component of RGB888 = b = (p >> 0 & 0b00011111) << 3
To show a specific example, assume a pixel in RGB565 representation which is only red:
p = 11111000 00000000
right shift 11 bits p = 00000000 00011111
bit mask with 0b00011111 p = 00000000 00011111
left shift 3 and drop leading eight bits r = 11111000
Note that the result is not 100% accurate because low information content cannot be converted to high information content. (However, high information content can always be converted to low information content.)
Arduino OV7670 libraryBefore using the OV7670, the Arduino library must be installed.
For Arduino IDE 2.x, search for OV7670 and install the library
The python program used to read data from the Nano 33 BLE requires that the python library pySerial be installed. This can be installed with the command
pip install pyserial (or sudo pip install pyserial, depending on how your computer is configured)
To check if the library is installed use
pip show pyserialTo test the OV7670, two programs are required. Here are the steps:
- Upload the program “RawCameraCapture.ino” to the Nano 33 BLE
- Close the Arduino IDE; the serial monitor in the IDE prevents the python program from communicating with the Nano
- Place the camera to point at the subject. Some experimentation with lighting and distance from subject may be required
- Navigate to the directory containing the Python program “ReadCamera2.py”
- Run the the program with the command
python3 ReadCamera2.py- Once the process is finished, a message “image transfer complete” will print in the terminal
- The program creates a file called “camera” which contains the raw pixel data
- Navigate to the website http://rawpixels.net in a browser
- Upload the file “camera”
- Settings as follows:
width: 176
height: 144
offset: 0
Predefined Format: RGB565
Pixel Format: RGBA
Ignore Alpha checked
Little Endian not checked
The picture should display in the raw pixels interface.
Once the test is successful, the final step is to create the PNG image file. Really simple:
- Navigate to the directory containing the Python program “ConvertToPNG.py”
- Run the the program with the command
python3 ConvertToPNG.py- This program creates a temporary RGB888 file called “imagefile”
- A file called “finalpic.png” will be created
Success!


Comments