

Hardware components | ||||||
_ztBMuBhMHo.jpg?auto=compress%2Cformat&w=48&h=48&fit=fill&bg=ffffff) |
| × | 1 | |||
Software apps and online services | ||||||
 |
| |||||
Hand tools and fabrication machines | ||||||
 |
| |||||
1. Project Aurora: Mini Weather & “Quantum” Node
Read moreThis project uses an ESP32 to pull real-time data from the internet or local sensors and display it on a crisp OLED screen. It’s the “brain” of any smart home.
The Build- Difficulty: 1/5 (Great for your first project!)
- The Goal: Display temperature, humidity, and “System Status” (like WiFi strength) on a tiny screen.
- Microcontroller: ESP32 Dev Kit V1 (Built-in WiFi is key).
- Sensor: DHT11 or DHT22 (Temperature & Humidity).
- Display:0.96″ I2C OLED Display (SSD1306).
- Wiring:Breadboard and 10x Male-to-Male Jumper Wires.
- Cable: Micro-USB (for power and programming).
- Search YouTube for:“ESP32 OLED Weather Station Tutorial” or click here for tutorial.
- Top Recommendation:Random Nerd Tutorials – They have the most detailed step-by-step code for this exact setup.
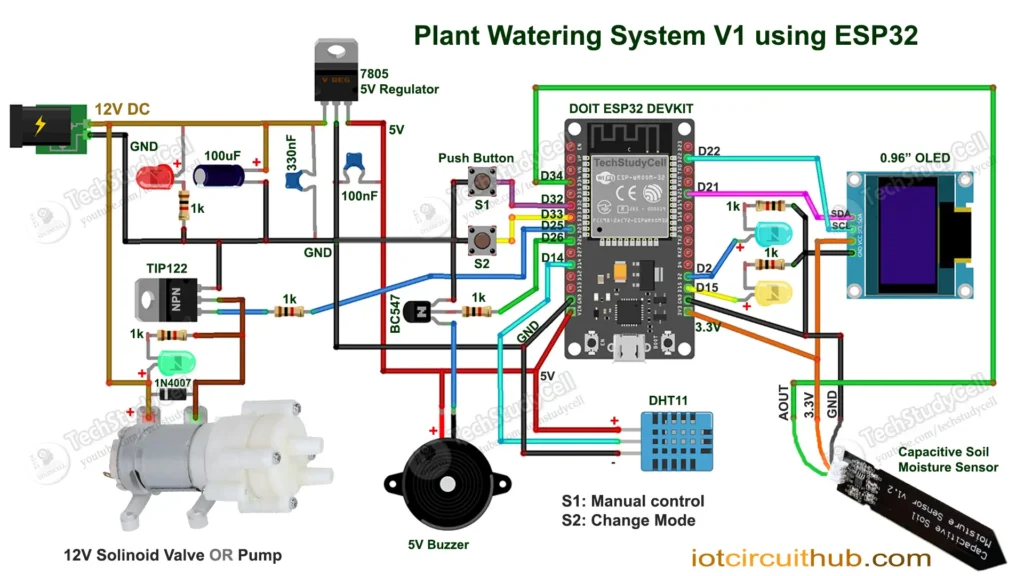
This is a functional piece of “cyberpunk” decor. It monitors your plant’s soil and automatically pumps water when it’s thirsty.
The Build- Difficulty: 3/5 (Involves a tiny bit of plumbing).
- The Goal: A self-sustaining plant that glows green when healthy and red when dry.
- Microcontroller:Arduino Uno or ESP32D.
- Sensor: Capacitive Soil Moisture Sensor (Avoid the “resistive” ones—they rust!).
- Actuator: 5V Submersible Mini Water Pump.
- Switch: 1-Channel 5V Relay Module (This acts as the “light switch” the Arduino flips to turn the pump on).
- Extras: WS2812B LED Strip (for the futuristic glow) and 5mm Vinyl Tubing.
- Search YouTube for:“Arduino Automatic Plant Watering System Tutorial” or click here to watch tutorial on youtube.
- Top Recommendation:GreatScott! or CircuitDigest – Both explain the relay wiring very clearly so you don’t fry your board.
This is the “heavy hitter.” Using an STM32 or Arduino Mega, you can control multiple “joints” to pick up and move objects.
The Build- Difficulty: 4/5 (Mechanical assembly takes time).
- The Goal: A 3-axis arm controlled by joysticks or pre-programmed moves.
- Microcontroller: Arduino Nano or STM32 Blue Pill.
- Motors: 3x to 4x SG90 Micro Servos (Cheap and easy to use).
- Control: 2x Analog Joysticks (like PlayStation controllers).
- Structure: 3D printed parts or even laser-cut cardboard/plywood.
- Power: 5V 2A External Power Adapter (Servos are “hungry” and shouldn’t be powered directly from the computer).
- Search YouTube for:“Simple Arduino Robotic Arm Joystick Control”
- Top Recommendation:HowToMechatronics – They provide the 3D files and the most stable code for smooth arm movement.
- Software: Download the Arduino IDE. It works for all three boards (Arduino, ESP32, and STM32).
- Power: When using motors or pumps, always use an external battery or wall adapter. The USB port on your laptop isn’t strong enough to move a robot!
- Community: If your code doesn’t work, copy the error and paste it into a forum—someone has definitely had the same problem before.
Which of these three sounds like the one you want to start with first?


Comments