


This guide details how to make a temperature control with Ubidots. In addition, we'll show you how to create different events that notify you through email or SMS when your "variable" (in this case, the temperature) changes its value.
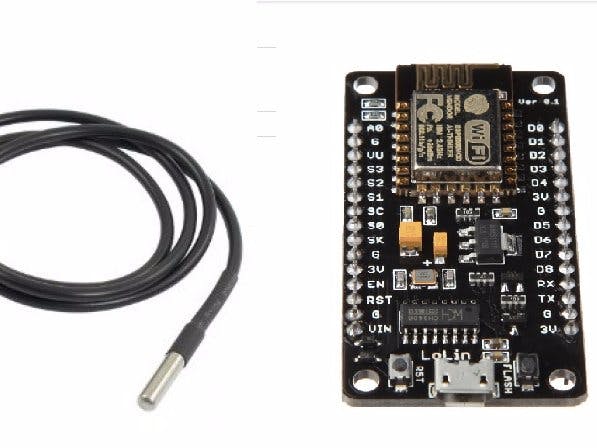
We are going to use a pre-wired and waterproof version of the DS18B20 sensor (OneWire temperature sensor). It's handy when you need to measure something far away, or in wet conditions. The OneWire temperature sensor has different versions; one of them has a resistor integrated and others don't, so make sure the version you're using is correct before starting with the project. For the control we are going to use a NodeMcu using a digital pin.
Requirements- One 4.7kΩ resistor (in case your DS18B20 doesn't have one)
- Cables
1. First, we should choose a version. If your sensor has the resistor integrated, just connect it to the NodeMcu like this:
- BLACK WIRE - GND
- RED WIRE - Vin
- YELLOW WIRE - D3
If not, you have to power the DATA pin through the resistance of 4.7kΩ, and the Vin and GND pins should be connected to each other and the ground.
2. Go to the Arduino IDE, click on Files -> Preferences, and enter http://arduino.esp8266.com/stable/package_esp8266com_index.json into the "Additional Board Manager URLs" field. You can add multiple URLs, separating them with commas.
3. Open "Boards Manager" from Tools -> Board menu and install esp8266 platform (and don’t forget to select your NodeMCU 1.0 board from the Tools > Board menu after installation).
4. Download the UbidotsESPMQTT library, OneWire Library, and DallasTemperature Library using these hyperlinks.
5. Now, click on Sketch -> Include Library -> Add .ZIP Library.
6. Select the .ZIP files of Ubidots ESPMQTT, OneWire, and DallasTemperature and then “Accept” or “Choose” for all the libraries. If you can't add the libraries, try manually: unzip the downloaded rar/zip and copy the folder from the library to the path C:\Users\ubidots\Documents\Arduino\libraries.
7. Close the Arduino IDE and open it again.
Program the ESP NodeMcuOnce everything is connected correctly, we will go to the IDE and write the following code:
ResultsNow, open your Ubidots account and go to Source. You will see a new DataSource named"control". click on it.
Then, you will see the temperature value.
Also, you can create an Event that notifies you when temperature is irregular. Go to Events, click on Add Event, and select your Data Source and Variable.
The Events can notify you via email, sms, Telegram, or WebHook. You can also set a variable:
When your event is ready you should see these windows:
In this example, if temperature value is >= 28, Ubidots will send you an email as previously configured, as such:
It's very simple! With just few cables you can observe the temperature behavior of your home, whether you're inside or outside. You can even trigger alerts via email/SMS in case of fire.
Now you try! If you haven't signed up with Ubidots, go here.


Comments