
Hardware components | ||||||
 |
| × | 1 | |||
| × | 1 | ||||
 |
| × | 1 | |||
Software apps and online services | ||||||
| ||||||
| ||||||
Hand tools and fabrication machines | ||||||
| ||||||
 |
| |||||
| ||||||
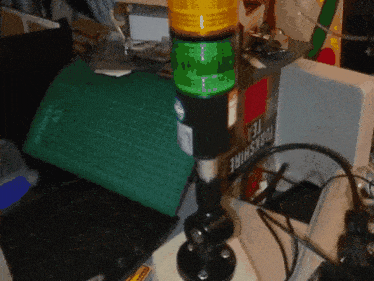
There was a black friday deal on the 12V traffic light tower at pimoroni (very similar to the adafruit one), so I finally had an excuse to order a Raspberry Pi Zero W, with the automation pHAT (the automation HATs baby brother), and get a cool rpi GPIO board thrown in for free...
I'd wanted the automation HAT for a long time, but not the 30quid price tag, and had enough experience (if not the confidence) to have played with relays and darlington pairs (transistor pairs) with some success. As a result I've avoided the HATs (raspberry pi addon boards - like Shields for arduino) if I could already acheive what they offered, but there's a lot to be said for buying something ready "off the shelf" and it just works without any further investment in time or money.
The initial thought was to have this wireless traffic light hooked up to monitor my (and potentially my teams) software builds and deployments at work, and to display progress visually while I walk around the office procrastinating...letting me know if there were any warnings (orange light) during the build, or errors (red light and buzzer if fatal error).
I tested the traffic light when it arrived with these cheap E23A 12V batteries from the local pound store, mainly because I'd previously obtained a few battery clips to power a 12V Dragonboard 410C. Using a few in parallel to allow for all the current the device might need, I tried out all the lights and the buzzer, and it was immediately obvious what the comment about not using all the lights at once meant. There was a real problem using certain multple colours, presumaly due to the differing voltage drop across differently coloured LEDs. I later chucked a multimeter in series and measured the current for each light and the buzzer as I was curious if they would approach the 500ma maximum current draw that I had read in the automation pHATs specs for the 24V sinking outputs.
- Red light: 64ma
- Yellow: 33ma
- Green: 22ma
- Buzzer: 20ma
--= Please do you're own measurements, my batteries are old as the current usage drops off rapidly and they are probably not able to supply the maximum current the lights may take =-
Next I used my dangerous gas-powered soldering iron (flames shoot out, temperature control dial response is controlled by magical pixies) to stick some headers on the zeroW and the automation phat.
I used cardboard wrapped in electrical tape to prop up the boards while soldering headers, and due to heat concerns with my iron, I ended up tacking each end and then doing pairs at each end to avoid too much heating in one area.
I found some random sample from my brother of heat matting for processors instead of liquid thermal compound, and it was a tad old (12months) and fragile, but I cut up strips to act as a heat disapation block, but more importantly as a support for the free floating area on the opposite side to the header pins between the two boards. I did go the extra mile and cut out areas to avoid the usb and microsd area, so the processor gets the best contact, and the other layers trap it down and hopefully provide a fan-like structure above by their sprung-under-tension fanned out layers.
I then explored a few cases and attached the traffic light to the first one I thought I could stick on the wall...
Instant regret on the container choice, but minor satisfaction at the realisation it should work. As far as containers go, I've found "The Range", "The Works" "Wilkinsons" and poundstores/craftstores all sell these cheap chinese wooden boxes for a quid or two, perfect for projects, and sometimes the perfect plastic box like tiny tuperware in the kitchen or lunch-box sections.
I found a better tupaware container for general Pi Zero usage (future outdoor project) and cut a small channel for the power cord and refilled with slices of stickyfoam pads to attempt a waterproof/airproof seal. As an initial experiment I tested an LED on the GND and 5V on the automation phat and it worked except when I left one there it blew a test LED, so I got a resistor (about 330ohm or anything's better than nothing here) and stuck it in series with the next sacrificial LED which worked fine. Then I switched around a bit to connect the led to the current sinking outputs and ran python and tried to use output 1 to light the LED, which worked as expected, and interesting to note was it turned off when python exited. This should work fine, we just replace the 5V with the positive terminal of a 12V battery and connect the grounds together (battery ground to automation phat ground).
As far as the pi setup goes, I followed a guide on headless deployment of Raspbian. It basically goes setup sd card with Raspbian, then add ssh file to /boot and edit /etc/wpa_supplicant/wpa_supplicant.conf
I found my main virgin media wifi network wont connect and I might be able to fix it by forcing the router to use a specific WPA2 implementation rather than Auto-detect, but the open guest network (sky36503) works and I've added my mobile hotspot as priority 3 for when I'm out and about.
Here's my wpa_supplicant.conf:
country=GB
ctrl_interface=DIR=/var/run/wpa_supplicant GROUP=netdev
update_config=1
network={
   ssid="VM8317446"
   psk="YOURpasswordNOTmine"
   priority=1
   id_str="primary home"
}
network={
   ssid="SKY36503"
   key_mgmt=NONE
   priority=2
   id_str="Open home"
}
network={
   ssid="free4all"
   key_mgmt=NONE
   priority=3
   id_str="hotspot"
}
This got my pi connected to my network and accessible over ssh. I then found it's IP using my router's connected devices status page, connected over shh and changed all the security details as advised, set the partition to expand on reboot (raspi-config) and updated all the packages, then installed the required library for the automation phat, and I went for both python3 and python2 libraries, because my windows laptop is only python3, but my other machines vary.
So now we have the constituent parts and the confidence that they all work.
I guess it's time to put it together. So we'll need 5V for the Pi, currently a 2.5A 5V Pi3 power supply, and 12V for the traffic light from the cheapo batteries.
I thought about just using the 12V batteries and transforming to 5V, but the Pi has a high current usage and I don't think it would last very long. It makes more sense to use something like the ESP32 with a LiPo battery, and LEDs or an E-paper screen to support occasional refreshes (desperate to get the new Inky pHAT). Anyway the point of this project is to use the traffic light and automation phat and not blow either up so onward dear reader...
I haven't got a lovely micro usb socket to mount in my project box, so I've ordered a couple of 90degree micro usb extension cables. I also hope this will allow tighter positioning of the board up against the edge of the box saving further space.
I've also gone and bought a treasure chest box for £2 and an equivalent of the tupaware in thick balsa-wood for £1, which will be the eventual successor to the hexagon.
Food break and then we connect it all and test each output with a simple bit of demo code, then connect something crazy in place of the demo code and done.
I've tested mine with the 3 sinking outputs and the relay. This would also work on the full sized automation HAT and raspberry pi 3. I'm now leaving it running as an endurance test on the batteries.


Comments