


Hardware components | ||||||
 |
| × | 1 | |||
 |
| × | 1 | |||
 |
| × | 1 | |||
 |
| × | 1 | |||
 |
| × | 2 | |||
 |
| × | 1 | |||
Software apps and online services | ||||||
 |
| |||||
 |
| |||||
This is a fun little activity introducing you to the world of IOT. In this tutorial you'll be utilizing a DHT11 temperature and humidity sensor and connecting it to a WeMos D1 Mini which uses the ESP8266 WiFi chip, and displaying the data (output) on a custom Grandeur canvas.
Step 1: Taking Care of the PrerequisitesDownload and install the following:
- Arduino IDE
- Driver (Not Lewis Hamilton)
- ESP8266 Arduino Support
Download these libraries:
After setting up the Arduino IDE, under Files go to the Preferences tab :
Paste this link in Additional Boards Manager URLs.
Under Tools, go to the Board option and click on Boards Manager:
Wait for a few moments to let the Boards Manager download the new requirements, type in esp8266 and install the package.
Once the packages are installed, head back to Tools, go to the Board option and click on NodeMCU1.0(ESP-12E Module)
Now before you compile the code, the details of which are shared below, make sure you have the DHT11 library included. You'll have to add it manually. Under Sketch , go to include library and click on Add .zip library:
Add the path to the .zip folder:
Make sure that you have added this (Wifi.h as mentioned above) to the folder where you have saved your sketch.
You can now compile and upload the code successfully, but however you won't be able to connect to your Wi-Fi at the moment, you'll need to add the credentials of the Wi-Fi you want to connect it to and the token, device ID and API key for connection to Grandeur. This is discussed in Step 3, but let's not worry about it at the moment shall we ? let's get fiddly with our little hardware.
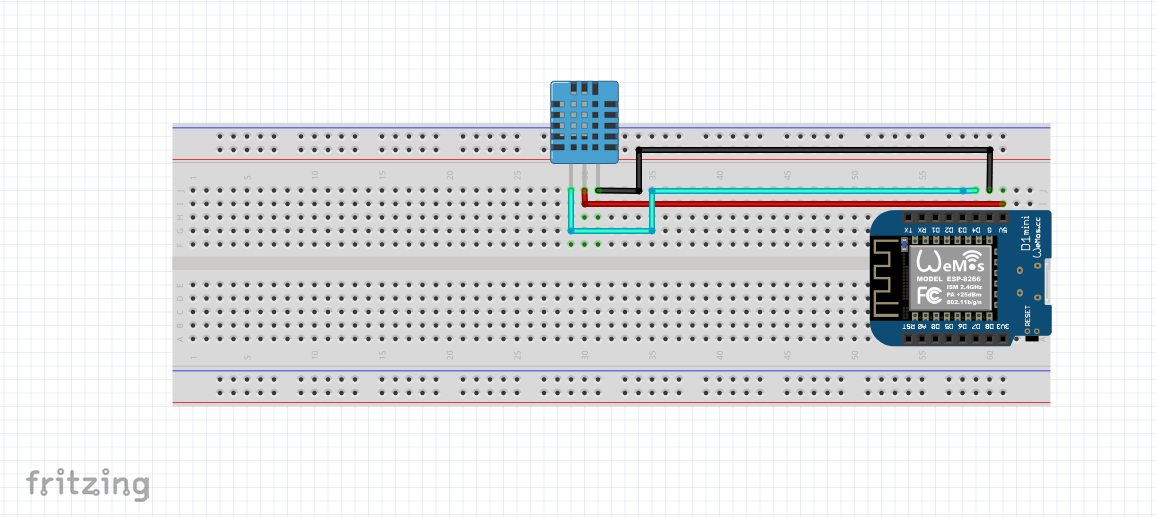
Step 2: Putting Together the HardwareThe DHT11 has 3 Pins : VCC, Data, and Ground, connect them as follows:
- VCC Pin of DHT11 to 5V Pin of WeMos D1 Mini
- Data Pin of DHT11 to D4 Pin of WeMos D1 Mini
- GND Pin of DHT11 to GND Pin of WeMos D1 Mini
- Head over to Grandeur and sign up.
- Check out their Cheat Sheet for help in signing up, setting up drivers, sample codes and what not.
Click on the New Project button.
Fill in the name and description of the project and click Create Project button.
Voila ! your project is created.
Step 5: Register your deviceClick on the Devices tab from the left menu.
To register your device (WeMos D1 Mini), you first need to register its data model. We want to display Temperature and Humidity over the internet, so we'll register the model as {"tem": 0, "hum":0}, 0 to initialize them.
To register a model, under the Models header, click the Add button.
Fill in the name and schema {"tem": 0, "hum":0} of the model.
And click the Add button. The model is added.
Step 6: Add DeviceTo add the device, under the Devices header, click the Add button.
Select the model that you created in the last step, give the device a product ID and click on Register.
After registering you will get an Access Token, make sure to copy it somewhere, for instance on a text file, as this will be used in our code.
Now copy the Device Token and keep it safe, you guessed it, it will be used in our code.
Your device is now registered. (One step closer to world domination eh ?)
Now, from the Settings tab on the Grandeur Dashboard, copy the API Key.
Your text file should look something like this.
To control the device from Grandeur , you need a user account. Click on the Accounts tab from the left menu, and click on Add Account.
Enter details and click on Add.
An account can only see and control the devices paired with it. Go to the Devices tab and in the Actions column of the device you created previously, click on the Pair button.
Now click on the created user account in the emerged pop-up to pair your device with the user.
Device and user are now paired. (Now you have surpassed Elon Musk, you'll be getting a call from Tesla soon)
Here comes the best part, the icing on the cake , the cherry on top , the masala on fries, and it is :
Step 9: Making a custom drag-and-drop app on Grandeur Canvas.Click on the Canvas tab from the left menu, and let's add display and graph widgets to check out how cool we are.
We'll repeat the same process for humidity.
Remember the schema {"tem": 0, "hum":0} ?
tem and hum are our variables that are connected to Grandeur, as these variables change their values locally on your device (with incoming data) they are updated on Grandeur simultaneously. How cool is that !
Upload the provided code in Arduino IDE.
Change the Wifi_SSID and WIFI_PASSPHRASE, put the name of the WiFi you want your device to be connected to in Wifi_SSID and put it's password in WIFI_PASSPHRASE accordingly.
For instance the name of my WiFi is : SAW.
The password is : hahahaha.
Use the API Key, Token and device ID that you copied in the precious steps. put them in place of apiKey, deviceID and token respectively.
NOTE: Make sure you enter these as a string, just replace ours with your own in the " " .
Then upload the code.
Step 11: Results


Comments