


Hardware components | ||||||
 |
| × | 1 | |||
| × | 1 | ||||
 |
| × | 1 | |||
 |
| × | 1 | |||
Software apps and online services | ||||||
 |
| |||||
 |
| |||||
As part of the final certification exam requirements of the Bolt IoT and ML course, I had to make and submit an original IoT project using a Bolt IoT module. After going through many interesting projects for reference, I got the idea for this project. It is easy to do and should take no more than two hours from start to finish. I chose to do it with a Philips wifi bulb because that was what I had with me at the time of making this project. But this can be integrated with any type of smart bulb supported by the IFTTT platform, or in fact any smart device you would want to control using a Bolt IoT module. Hope you have fun doing this!
Introduction
The idea of the project is that the sensor is supposed to be placed facing the window, so when there is enough light entering the room, light is turned off. when the sunlight outside decreases or when the window is blocked, the light will turn on.
Note: make sure the sensor is facing away from the Light bulb, as that light may interfere with the sensor's readings and cause accidental turning off of the bulb.
We are going to set an upper and lower threshold for the light values, and when the light values fall or exceed these values, the Bolt module will trigger an IFTTT applet which will then turn ON or OFF the light based on the event triggered.
First part is creating an applet on IFTTT which will turn ON and OFF the light based on the triggered webhhok URL. we will need two applets, one for turning ON the light and another for turning OFF the light.
Second part is creating a program on a virtual linux cloud server or virtual box, from where we will be initiating the program and the result will be displayed.
Initialization
I'm going with the assumption that the user knows how to connect the Bolt module to the Bolt cloud. After the module is connected to your account, enable the API in your Bolt cloud account and copy the unique API Key.
Also note down the Bolt ID which is the Bolt device ID found in the device section, We will be needing these two values to connect to the Bolt module later on.
Make an applet on IFTTT
Log into IFTTT and create an applet to control your light.
Repeat the same steps to create a "light_off" trigger to turn off the light. Note these two URLs down. To test if the URLs are working properly, press the test it button to trigger the URL, which should turn ON the bulb or OFF based on the URL you are testing. If it doesn't work check if the event name you have entered in the box is right.
Coding
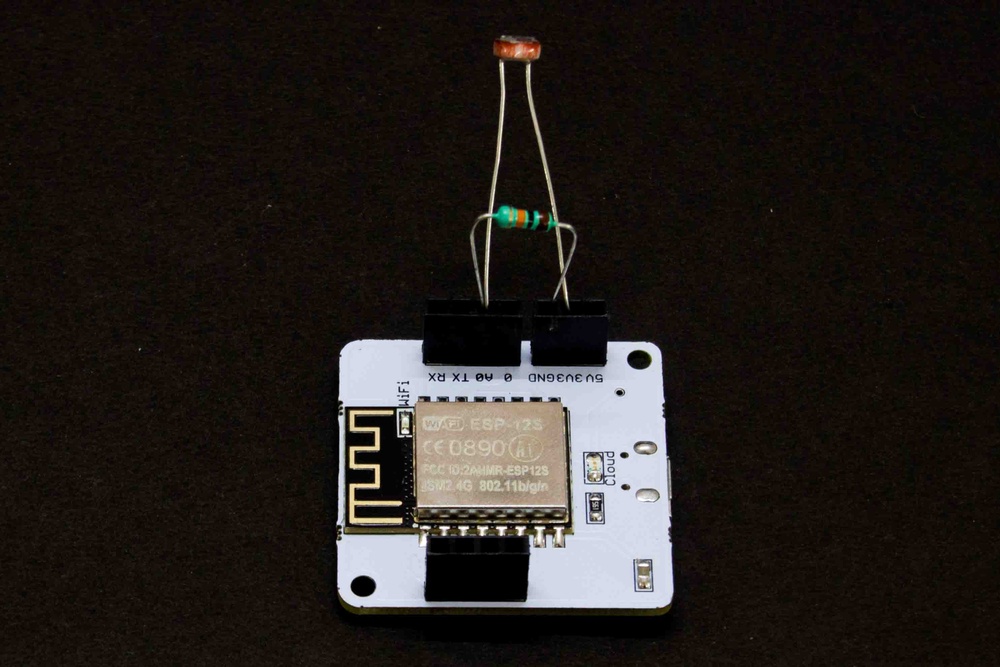
Step 1: Make the circuit connection according to the schematic given and turn on the module. once both the blue and Green LEDs are on, log in to your Cloud server or your VirtualBox and create a new folder to hold the files for this topic.
Step2: Install the following libraries first.
sudo apt-get update
sudo pip3 install boltiot
sudo pip3 install pyOpenSSL ndg-httpsclient pyasn1
sudo pip3 install 'requests[security]'
Step 3: Next, create a new folder and enter it using the following command.
mkdir light_control;
cd light_control;
Step 4: Create a configuration file for this project, using the following command.
nano conf.pyAfter the editor is open, type in the following configuration parameters
API_KEY = 'This is your Bolt Cloud account API key'
DEVICE_ID = 'This is the ID of your Bolt device'
Note: You have to replace the above value with your credentials, which you will find in the Bolt Cloud dashboard.
Step 5: Now create one more file named light_control.py, using the following command
sudo nano light_control.pyPaste the code given.
Step6: In the code, modify the code given below in the main code to trigger the webhook.
NOTE: You will need to replace the URLs with the webhooks that you created and copied previously.
def trigger_on_webhook():
    URL = "paste the ON webhook here" # REPLACE WITH CORRECT URL
    response = requests.request("GET", URL)

def trigger_off_webhook():
    URL = "paste the OFF webhook here" # REPLACE WITH CORRECT URL
    response = requests.request("GET", URL)
Step 7: Save the file by pressing Ctrl+x.
Step8: Once that is done, run the code using the following command
python3 light_control.pyThe system will start printing the light intensity values, as per the following image. The values may change depending on the lighting conditions.
If the values cross or decrease below the thresholds, the corresponding Webhooks will be activated and the light will turn ON/OFF.


Comments