
Hardware components | ||||||
 |
| × | 1 | |||
 |
| × | 2 | |||
 |
| × | 2 | |||
 |
| × | 2 | |||
 |
| × | 1 | |||
| × | 1 | ||||
| × | 1 | ||||
 |
| × | 1 | |||
Software apps and online services | ||||||
 |
| |||||
| ||||||
Disclaimer: this project aims at building an inaccurate self-playing melodica. If you want to build an accurate one, use a DC motor with encoder (best option) or a stepper motor. You will at least be able to make it play diatonic (white keys) melodies the right way.
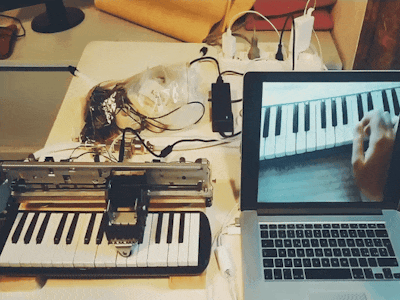
For my project "AI've just started to learn to play" I built a robot melodica which listens to fragments taken from YouTube melodica tutorials and tries to reproduce the melody in real time. The robot was active at Incó_ntemporanea Festival in Piacenza, Palazzo Ghizzoni Nasalli, for 24 hours (October 11th, 2020). Four musicians from the local Collettivo_21 were present for the whole 24 hours and jamming/reacting to the robot. Few audience members were allowed in special times of the day, while the whole event was streamed live on the estival's website and on Twitch. In the following video you can see the robot jamming with the musicians as well as some excerpt from the Twitch streaming:
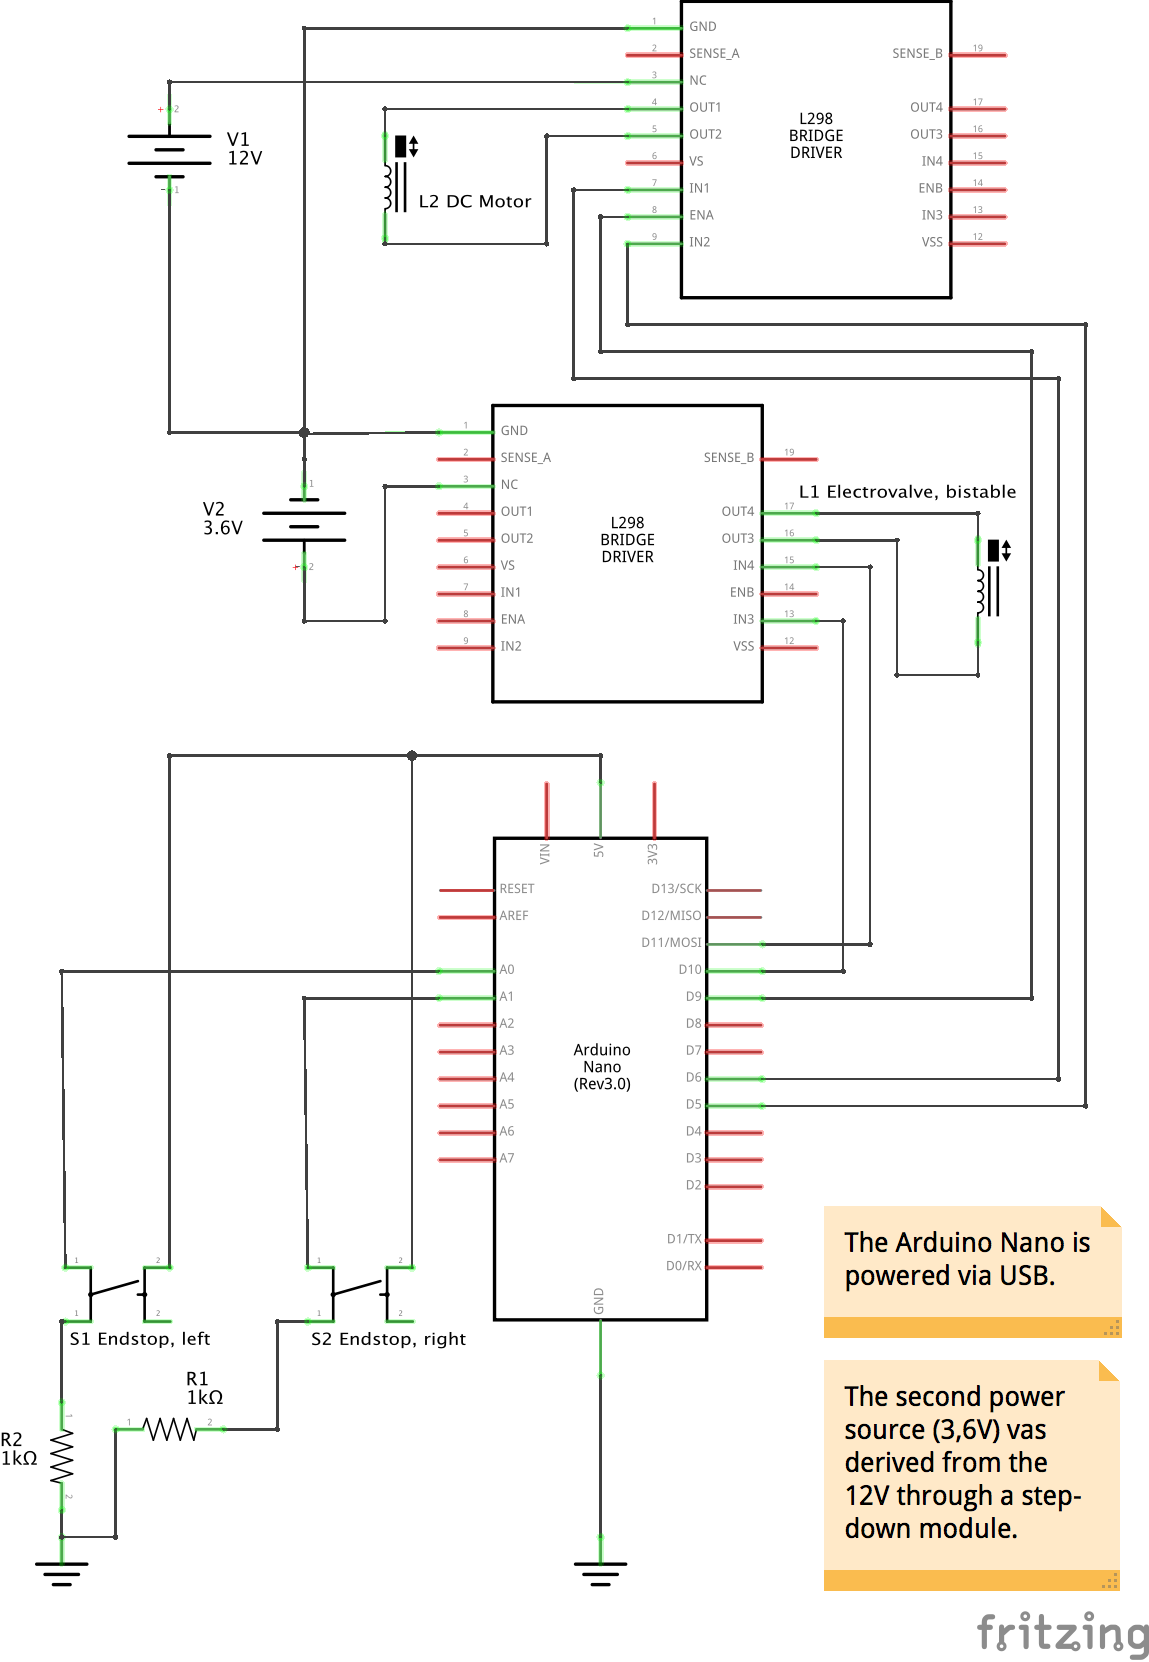
Technically the robot consists of a DC motor savaged from an old printer (also keeping the original scaffolding structure), mounted over a melodica and controlled via Arduino. Arduino also controls a bistable electro-valve, which is letting through, when necessary, the air flow coming from a compressor.The Arduino sketch makes it possible, for the robot, to receive a control value from the computer. The control value describes a combination of control states: air valve open or closed, and DC motor still, moving upwards or moving downwards. Two end-stop switches throw back the DC motor to a center position when it reaches the keyboard edges.
Build!First I salvaged a DC motor from a friend's old printer. I expected a stepper but I got a DC with encoder. I did not want to mess with an encoder and I wanted the result to be quite "wrong", so at the end I decided to go with the DC. (That's also why I decided to use two wheels, resulting in a more cacophonic effect due to the minor seconds).
After that, I mounted the motor with all its plastic scaffolding on a wooden structure, so that I could adjust the height and tune it to the melodica dimensions
The two wheels were screwed to the moving part of the printer scaffolding. They were common cart wheels you can buy when you make your own furniture.
The wooden structure was made so that the instrument would fit and stay still during the action.
Some recycled padding material was glued to the bottom for a final touch.
I prepared the circuit with the Arduino microcontroller, driving the L298. There are several tutorials on how to control a DC moto via L298, for example this one. At the beginning, the basic circuit was meant to drive the motor right and left, as a test. After that, I added two endstop switches on the right and left edges of the wooden structure.
This is how the robot worked at this point. I was still using my lungs to play it, but soon I would add an electrovalve controlling the air flow from a compressor. In the video you can also compare the original sound of the tutorial with the wrong-and-lovely rendition of the robot pupil.
The electrovalve dilemmaThe last feature I added was an electrovalve. It was used to control the airflow that would reach the melodica, producing the sound. The air source was an air compressor.
I had to use a different L298 for the electrovalve because the one I found was a 3.6V one, so I preferred to be safe and separate the DC motor board and the electrovalve board. Initially, the first electrovalve I used started to melt pretty soon, as solenoids tend to reach very high temperatures when powered for long times (the electovalve needed to be continually powered to be open).
Then I decided to find a bistable electrovalve. These valves only need a short impulse in order to switch from open to close or vice-versa, so they don't need to be powered for long times. This electrovalve was working at only 3.6V, and fortunately I had a stepdown module I could use to go from the 12V I was already using to power the DC motor to those 3.6V of the electrovalve. If you find a bistable electrovalve which runs at the same voltage of your DC motor, you can of course run them on one only L298, being the L298 a double board.
Once connected to the L298, this valve opens with HIGH and a LOW signal on the input pins of the board; and closes with the opposite. These values should be sent for at least 30 milliseconds to operate the valve, as you can read in the specs:
Working mode: positive pulse opens valve, negative pulse off.Pulse width: 30 ms.Working pressure: 0.02-1 MPa.Medium temperature: 1-80℃Lifespan: 300, 000 timesSize: 5.5 x 5 cm / 2.17 x 1.97 inches.Weight: 130 g.Wiring method: red: "+", black: "-"
You can set the Arduino to send both LOW signals in order to stop the current flow.
SoftwareApart from the Arduino sketch, which you find attached, the listening and controlling software is written in Max and uses the sigmund~ object. The audio analysis of a library of video-tutorials yields the melodic contour (which controls the movement of the DC motor) and the timing for note ons and offs (which control the electro-valve).
It would be impossible to explain the functioning of the Max patch, which is very complex and articulated (it also contains some video processing, streaming control, voting system and much more). But in any case you can send via serial different commands (see below) to control the robot. The patch worked this way:
Video with monodic sound → sigmund~ → differential in pitch and silence detection → time length for DC motor movement and electrovalve control
You are encouraged to try to program it yourself and find your way to solve the many small problems you will have to face.
Basically the Max patch was sending via serial different numbers, as it's clear from the last section of the Arduino sketch, where consecutive if statements are parsing the instructions.
They were the combination of three possible states of the DC motors: steady (1), move left (0) or move right (2). When 100 was added to these numbers, it also meant to close the valve. When 200 was added, it meant that the valve needed to be open. So, for example, message 200 meant 200+0: move the motor left (0) and open the valve (200). Message 101 meant: keep the motor steady (1) and close the valve (100).
* * *
This robot was conceived and realized in the frame of "Ars Cyber != Dystopian", event in collaboration with Claudio Panariello and Luca Guidarini. With the support of Konstnärsnämnden, Ernst von Siemens Foundation, Camera di Commercio Piacenza, Comune di Piacenza, Fondazione di Piacenza e Vigevano.


_3u05Tpwasz.png?auto=compress%2Cformat&w=40&h=40&fit=fillmax&bg=fff&dpr=2)
Comments