


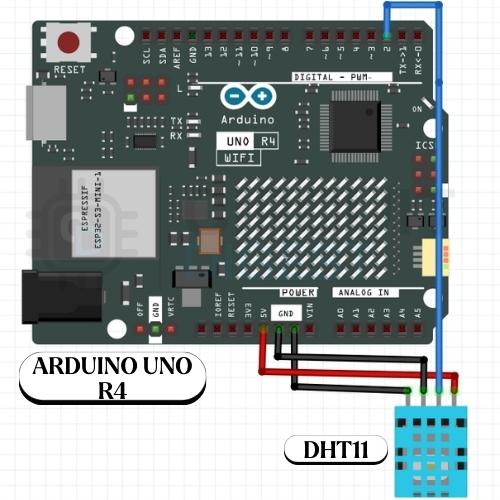
Hardware components | ||||||
 |
| × | 1 | |||
 |
| × | 1 | |||
 |
| × | 1 | |||
| × | 1 | ||||
Software apps and online services | ||||||
 |
| |||||
Hand tools and fabrication machines | ||||||
| ||||||
In this Arduino Send Email Notifications project, you’ll learn how to send automated email notifications using an Arduino board connected to an IoT cloud platform. This setup is useful for real-time alerts in applications like home security, environmental monitoring, or industrial systems.
Instead of relying on complex backend servers, this method uses a cloud-based trigger system to send emails whenever a specific condition is met. The result is a simple, scalable, and beginner-friendly alert system.
The core idea is straightforward:
- The Arduino reads data from a sensor or input.
- When a predefined condition is triggered (for example, temperature crossing a threshold), it updates a variable in the cloud.
- The cloud platform detects this change and triggers an automated email notification.
- This removes the need for SMTP configuration on the Arduino, making the system more reliable and easier to implement.
- Arduino board (such as Arduino Uno or similar)
- Wi-Fi-enabled module or board (e.g., ESP8266 or ESP32)
- Sensor (temperature, motion, or any input device)
- USB cable for programming
- Internet connection
Create an account on your preferred IoT cloud service.
- Set up a new project or “thing.”
- Define a variable that will store the alert state (for example, a boolean or integer).
Configure an automation rule:
- Trigger: When the variable changes or exceeds a value
- Action: Send an email notification
Make sure to verify your email address so alerts can be delivered successfully.
- Install the required libraries for your board and cloud integration.
- Connect your Arduino to Wi-Fi using the appropriate credentials.
- Link your device to the cloud project using the provided device ID or authentication keys.
Your Arduino code should:
- Continuously read sensor data
- Compare it with a defined threshold
- Update the cloud variable when the condition is met
For example:
- If motion is detected → update variable to “true”
- If temperature exceeds limit → send alert signal
To prevent repeated emails, you can add a delay or reset condition after triggering the alert.
Testing the SystemAfter uploading the code:
- Power the Arduino and ensure it connects to Wi-Fi.
- Monitor sensor values via serial output or cloud dashboard.
- Trigger the condition manually (e.g., simulate motion or heat).
- Check your email inbox for the alert message.
- If everything is configured correctly, you should receive notifications instantly.
This system can be adapted for many real-world uses:
- Home intrusion alerts
- Fire or smoke detection
- Water level monitoring
- Equipment fault warnings
- Smart agriculture notifications
- Use stable Wi-Fi to avoid missed alerts
- Add debounce logic to avoid false triggers
- Keep your thresholds realistic for your environment
- Use meaningful email messages for clarity
This Project demonstrates how combining Arduino with cloud automation can simplify real-time communication systems. By offloading email handling to the cloud, you reduce complexity while improving reliability.
It’s a practical and scalable approach that can be extended to many IoT-based applications. If you’re looking for inspiration, check out these Arduino projects with code and circuits to explore a variety of practical and creative ideas you can build yourself.


Comments