

Hardware components | ||||||
| × | 1 | ||||
| × | 1 | ||||
| × | 1 | ||||
Software apps and online services | ||||||
 |
| |||||
| ||||||
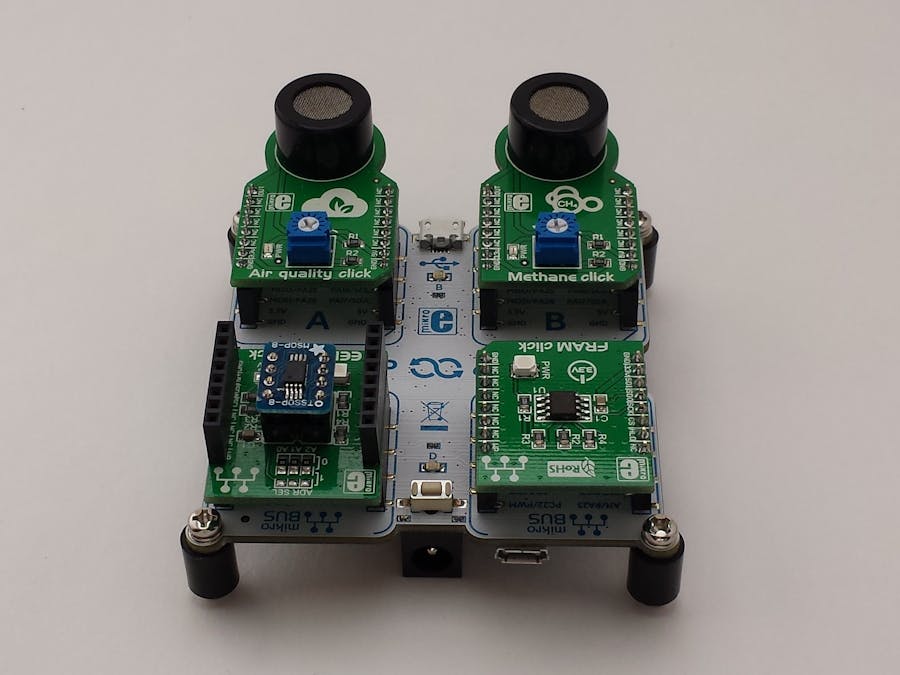
We needed a simple and efficient way to store configuration settings and values between projects, using common storage devices like EEPROM, FLASH, FRAM, and NVSRAM. This example project shows several of these functioning with the MikroElectronika "Flip-n-Click" board. The "Flip-n-Click" is code compatible with the Arduino Due platform, and uses the SAM3X (Cortex-M3) processor.
What is Embedis?Embedis is a very small, in-memory, data structure store for key/value pairs; and why it is also known as a "keystore server". Embedis can be used as a database, cache, and message broker, with it's publish and subscribe mechanisms. Embedis uses a syntax similar to the popular "Redis" program, which has API/bindings available for C/C++, Python, Ruby, TCL, etc.
In this example the Embedis command interpreter is connected to the Serial Monitor (i.e. Serial.print), however we have examples that show it running several simultaneous connections at once, including Telnet, WWW, MQTT, and others.
The Embedis database is persistent, and can be used across multiple projects to configure your program settings for the specific hardware and network configuration that you are using. The Embedis database supports the internal CPU EEPROM storage by default, however the SAM3X doesn't have internal EEPROM memory, so it is emulated using the program FLASH memory. You can also add other external memory devices easily, as we show in this example, by adding an external I2C EEPROM such as the 24LC64 (8K bytes), and an external SPI FRAM, such as the MB85RS256 (32K bytes).
Now, you don't need to recompile your program and reflash your device in order to change your device and project settings anymore. Project settings can be changed "on-the-fly" with just a serial or wireless interface! (Some settings changes however, will require a restart/reboot to take effect.)
Installing EmbedisTo Install Embedis in the Arduino IDE, please see the Detailed Install Directions. Embedis is installed using the Arduino Library Manager, from the top menu bar:
Sketch -> Include Library -> Manage Libraries -> Embedis
The DueFlashStorage library is installed using the Arduino Library Manager, from the top menu bar:
Sketch -> Include Library -> Manage Libraries -> DueFlashStorage
The DueFlashStorage library is necessary to enable Embedis to treat the internal flash memory of the Due (SAM3X) as an EEPROM interface.
Installing the FRAM ClickMake sure that you are grounded, and use a personal ground strap and static protected surface if you have one. Unplug all connections from the the Mikroe Flip-n-Click board, and install the FRAM Click board in Socket C - make sure to get the board direction correct by lining up the "cut corner" on the bottom right.
Make sure that you are grounded, and use a personal ground strap and static protected surface if you have one. Unplug all connections from the the Mikroe Flip-n-Click board, and install the EEPROM Click Board in Socket D - make sure to get the board direction correct by lining up the "cut corner" on the bottom right.
You'll notice that on my board I have removed the stock 24C08WP EEPROM, as it is a tiny 256 bytes of storage. Do yourself a favor and replace it with a larger 24AA64/24LC64 (8192 bytes) or even larger model of EEPROM, as you can see I have done using an Adafruit DIP adaptor board for a surface mount part. But you can easily order a DIP version also.
Build Tip:
You'll also notice that I put "stacking headers" on the EEPROM Click, so that I can use the same socket for UART & SPI peripherals as well other I2C peripherals.
Note: Remember to use the "Programming Port" USB Jack on the blue side of the board and not the "Native USB" Jack on the white side of the board with the Arduino IDE for correct programming operation.
Loading the Example ProjectAfter installing the Embedis library in the Arduino IDE, the Embedis examples will be available under the menu as:
File -> Examples -> Embedis -> flip-n-click -> Embedis_Due
Make sure to select Arduino Due (Programming Port) under the Board Manager, and set the "port" to the correct COM: port for your board. Then just press the "Download" button to compile and download your project.
Once you have flashed your board using the Upload command, open the Arduino Serial Monitor and you can begin giving commands to Embedis. Type "commands" into the Arduino Serial Monitor, and get a list of commands:
Now this is where it gets really interesting, you have three (3) different memories available to you to store your data in, which in Embedis are referred to as "DICTIONARIES" and these are:
- FLASH (internal to the CPU)
- SPI_FRAM (external chip on the SPI bus)
- I2C_EEPROM (external chip on the I2C bus)
By using the Embedis "select" command, you can select which memory you are going to use to read and write, for example when you type "select FLASH", then Embedis will return the number of bytes of free space in the FLASH dictionary.
FLASH DictionaryThe FLASH dictionary is implemented using the DueFlashStorage Library, which normally gives you 1024 bytes of "emulated" EEPROM, and two (2) of those bytes are used by Embedis for a pointer, so you have 1022 bytes to work with. That is not very much storage, and can be increased; however the big problem with the "emulated EEPROM" on the Due platform is that it is reset whenever you upload a new program - since it uses program memory space (i.e FLASH), unlike most other internal EEPROM implementations (or the ESP8266 Emulated EEPROM, which is persistent after new program uploads, as it it implemented differently).
When you "select SPI_FRAM", Embedis will select the SPI_FRAM and return the number of free bytes in that Embedis Keystore. If you are using a MB85RS256, you will see that you have almost 32K bytes of storage to work with!
Similarly, when you "select I2C_EEPROM", Embedis will select the I2C_EEPROM and return the number of free bytes in that Embedis Keystore. If you are using a 24AA64, you will see that you have almost 8K bytes of storage to work with, and if using a 24AA256 you will have almost 32K of storage space! In the example below, we are using an 8K x 8 (24AA64) I2C EEPROM part:
Embedis Set/Get/DelNow you can start to add data to your Embedis Keystore using the "set" and "get" commands. You delete a key from the dictionary with a "del" command. Since the last "Dictionary" that was selected was the I2C_EEPROM, that is where our data will be written, for example:
So we created a key named "IPADDR" and set it to "192.168.1.127". Make sure to use quotes around any string with spaces or special characters. Now let's use the "get IPADDR" command to retrieve the data from the Embedis Keystore.
There are many advanced features of Embedis, including the ability to publish and subscribe to changes in keys and the logging system. We'll cover those in upcoming projects here at the thingSoC platform!
You can use the Embedis keystore to hold all kinds of setup and configuration information, such as device pins, mode and baud rate settings, as well as sensor calibration data.
Air Quality SensorWe added the Air Quality Sensor to Analog Input A0 (Socket A), in order to show how easy it is to add commands and do custom processing. Just enter the command:
analogRead A0
And you'll get the AiR quality reading from the sensor - cool, eh? Now you can store that value in the Embedis keystore. We like to keep things like the sensor calibration data in the keystore.
Happy Hacking!


Comments