


Hardware components | ||||||
 |
| × | 1 | |||
 |
| × | 1 | |||
 |
| × | 1 | |||
 |
| × | 1 | |||
 |
| × | 1 | |||
Software apps and online services | ||||||
| ||||||
| ||||||
Here we’ll walk through the complete process of building a smart weather device - from hardware wiring to a fully working logic running on the board computer.
You’ll learn how to connect the device and publish real-time telemetry to ThingsBoard dashboards for remote monitoring using the CircuitPython ThingsBoard Client SDK, as well as how to integrate a Weather API to retrieve and display external weather data.
The device logic is implemented on a Raspberry Pi 4 Model B using CircuitPython with Blinka.
PrerequisitesBefore we begin, let’s review the full list of hardware, software, and CircuitPython libraries used in this project, along with the links you will need.
SoftwareFor the software part, we use CircuitPython with Blinka as the device runtime, PyCharm IDE as the development environment together with SSH, and ThingsBoard as the device management platform.
HardwareFor the hardware setup, we use a Raspberry Pi 4 Model B together with an SHT31-D temperature and humidity sensor and an SSD1306 OLED display module. Both peripherals are connected via the I2C interface, which keeps the wiring simple and compact. We also use jumper wires and a solderless breadboard for assembling the circuit. All device logic in this guide is implemented in Python with CircuitPython libraries running on the Raspberry Pi.
CircuitPython LibrariesTo start working, we need to install the ThingsBoard CircuitPython Client SDK library and other libraries required for data communication.
For now, let’s briefly look at the purpose of each library used in the project:
- ThingsBoard CircuitPython Client SDK - used to connect the device to the ThingsBoard IoT platform via MQTT and send telemetry data.
- Adafruit SSD1306 Library - provides support for controlling the SSD1306 OLED display from CircuitPython.
- Adafruit SHT31D Library - used to read temperature and humidity measurements from the SHT31-D sensor.
- requests - used to send HTTP requests to the weather API and retrieve current weather data.
- time - used for delays and scheduling periodic sensor readings, display updates, and telemetry transmission.
- busio - used to initialize and manage the I2C communication bus for connected peripherals.
- board - provides access to the Raspberry Pi board pin mappings used by CircuitPython.
ImportantThe Adafruit SSD1306 library may require the font5x8.bin file for rendering text on the display. Before running your script, ensure that this file is copied either to the root of the Pico filesystem or to the same folder as the executable script. Otherwise, the display initialization may succeed, but text rendering can fail due to the missing font file. You may download this file here.Schematics & Wirings
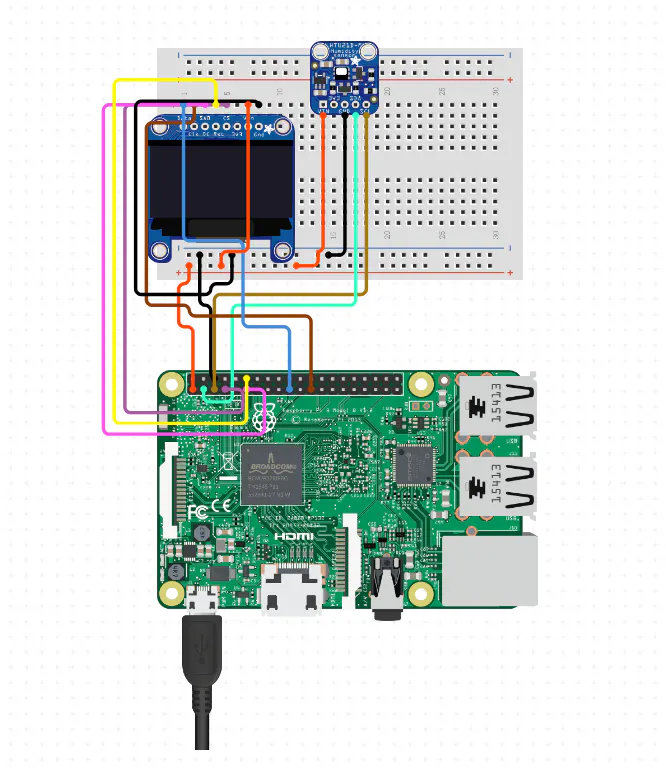
To simplify the connection of all required hardware components, we are attaching the connection schema below with its detailed description.
The Raspberry Pi 4 Model B acts as the central device in this setup and is powered through its USB power connector. The SHT31-D sensor and the SSD1306 OLED module are interfaced via I2C, using the Raspberry Pi's shared SDA and SCL lines. This allows the board to communicate with both peripherals over the same bus.
In this project, the SHT31-D provides indoor temperature and humidity measurements, while the OLED display presents these local readings alongside externally fetched weather data. The Raspberry Pi periodically reads the sensor values, sends requests to the weather API, and updates the display so the user can see both the indoor conditions and the current weather information in a compact format.
ThingsBoard PreparationBefore starting, make sure that you have a local ThingsBoard instance up and running or use ThingsBoard Cloud. In this step, we will create a device on the ThingsBoard platform and obtain the access token required to connect our physical ESP32 device to the platform.
To complete this step, follow the instructions below:
- On the ThingsBoard platform, open the Devices page. By default, you navigate to the device group “All”. Click on the “+” icon in the top right corner of the table and then select “Add new device”.
- Input device name (it should be called “Smart Weather Device”) and click the“Add” button.
- Click on the device row in the table to open device details. Click "Copy access token". The Token will be copied to your clipboard.
Raspberry Pi boards do not come with the operating system or CircuitPython tools preinstalled, so you will first need to install the OS and set up the required CircuitPython software. We strongly recommend reading this article first. If you run into issues during the CircuitPython installation, you may also find common solutions in this guide.
After completing this setup, your Raspberry Pi 4 Model B will be ready to run CircuitPython-based code.
ImportantSince this project uses I2C communication, make sure that I2C is enabled on your Raspberry Pi before running the code. You can find the setup instructions here.Installing Necessary Libraries
After installing CircuitPython support on the Raspberry Pi, the next step is to install the required Python libraries: ThingsBoard CircuitPython Client SDK, Adafruit SSD1306 Library, Adafruit SHT31D Library, and requests. Since we are working with a Raspberry Pi running Linux, Wi-Fi is configured at the operating system level, so there is no need to write additional Python code to connect the board to a wireless network.
First, connect to your Raspberry Pi over SSH or use any other convenient way to access the board.
Install ThingsBoard CircuitPython Client SDK. This library provides the functionality required to connect your device to the ThingsBoard platform and send telemetry over MQTT:
pip3 install "git+https://github.com/thingsboard/CircuitPython_thingsboard-client-sdk.gitInstall Adafruit SSD1306 library. This library is used to control the OLED display using Python:
pip3 install adafruit-circuitpython-ssd1306Install Adafruit SHT31D library. This library allows your Raspberry Pi to communicate with the SHT31-D temperature and humidity sensor:
pip3 install adafruit-circuitpython-sht31dInstall the requests library, which is used to make HTTP requests to the Weather API:
pip3 install requestsNow it’s time to look at the CircuitPython code that powers our Raspberry Pi-based weather monitoring device. We will go through each logical part step by step - from installing the required libraries, to reading temperature and humidity data from the SHT31-D sensor, displaying the values on the SSD1306 OLED screen, requesting external weather data from the Weather API, and sending telemetry to ThingsBoard.
You can use the source code from the corresponding example as a reference and adapt it in your preferred development environment, such as PyCharm or Thonny.
By the end of this section, you’ll have a clear understanding of the Python code that allows you to monitor local environmental conditions in real time, display both sensor readings and weather data on the screen, and integrate the device with a ThingsBoard dashboard for remote monitoring.
Implement Smart Device LogicIn this section, we implement the core logic of the smart weather device. We walk through the device behaviour step by step: reading the humidity and temperature from the sensor, getting the current outdoor humidity and temperature based on your city location.
Import necessary CircuitPython libraries:
import time
import board
import busio
import adafruit_ssd1306
import adafruit_sht31d
import requests- time - used for delays and for scheduling periodic tasks such as sensor readings, display updates, and telemetry transmission.
- board - provides access to the Raspberry Pi pin definitions used by CircuitPython.
- busio - used to initialize the I2C communication bus for the connected peripherals.
- adafruit_ssd1306 - provides the driver for working with the SSD1306 OLED display.
- adafruit_sht31d - provides the interface for reading temperature and humidity data from the SHT31-D sensor.
- requests - used to send HTTP requests to the Weather API and retrieve external weather data.
To retrieve current weather data, you first need to obtain an API key from OpenWeather. You can find the setup instructions here.
OPENWEATHER_API_KEY = "YOUR_WEATHER_API_KEY"
DEFAULT_CITY = "Kyiv,UA"- OPENWEATHER_API_KEY - your personal API key obtained from the OpenWeather API copy and paste it into this variable.
- DEFAULT_CITY - the location for which the device will request weather data. You can specify just the city name, for example,
New York, but it is better to include the country code as well, for example,New York,US, to avoid ambiguity when multiple cities share the same name. By default, it is set toKyiv,UA.
Important: After generating a new OpenWeather API key, it may take a few hours before it becomes active.
Please note that WEATHER_UPDATE_PERIOD and DISPLAY_REFRESH_PERIOD are fully configurable and can be adjusted depending on your case.
WEATHER_UPDATE_PERIOD = 600
DISPLAY_REFRESH_PERIOD = 2

selected_city = DEFAULT_CITY- WEATHER_UPDATE_PERIOD - specifies how often the device requests updated weather data from the API, in seconds. In this example, the weather data is refreshed every 600 seconds.
- DISPLAY_REFRESH_PERIOD - specifies how often the OLED display is updated, in seconds. Here, the display is refreshed every 2 seconds.
- selected_city - stores the currently selected city for which weather data will be requested. By default, it is initialized with
DEFAULT_CITY. - weather_data - a dictionary used to store the latest weather information received from the API, including temperature, humidity, and a short weather description.
- last_weather_update - stores the timestamp of the last successful weather data update.
- last_display_refresh - stores the timestamp of the last display refresh.
Initalization of hardware instances:
i2c = busio.I2C(board.SCL, board.SDA)
display = adafruit_ssd1306.SSD1306_I2C(128, 32, i2c)
sensor = adafruit_sht31d.SHT31D(i2c)- i2c - initializes the I2C communication bus using the Raspberry Pi’s
SCLandSDApins. - display - creates an SSD1306 OLED display object with a resolution of 128x32 pixels connected over I2C.
- sensor - creates an SHT31-D sensor object on the same I2C bus, allowing the script to read local temperature and humidity values.
The draw_screen() function is responsible for displaying data on the OLED display with both local sensor readings and external weather data:
def draw_screen(indoor_temp, indoor_humidity, outdoor_temp, outdoor_humidity):
    display.fill(0)

    display.text(f"InT:{indoor_temp:5.1f}C", 0, 0, 1)
    display.text(f"InH:{indoor_humidity:5.1f}%", 64, 0, 1)

    if outdoor_temp is not None:
        display.text(f"OutT:{outdoor_temp:4.1f}C", 0, 16, 1)
    else:
        display.text("OutT: N/A", 0, 16, 1)

    if outdoor_humidity is not None:
        display.text(f"OutH:{outdoor_humidity:4.1f}%", 64, 16, 1)
    else:
        display.text("OutH: N/A", 64, 16, 1)

display.show()- display.fill(0) - clears the screen before drawing new content, preventing old text from remaining visible.
- display.text(...) - writes formatted text at specific screen coordinates.
- InT - shows the indoor temperature measured by the SHT31-D sensor.
- InH - shows the indoor humidity measured by the SHT31-D sensor.
- OutT - shows the outdoor temperature received from the Weather API.
- OutH - shows the outdoor humidity received from the Weather API.
- display.show() - sends the prepared frame buffer to the OLED display so the updated text becomes visible.
The get_current_weather() function is responsible for sending a request to the OpenWeather API and retrieving the current weather data for the selected city:
def get_current_weather(city_name):
    url = "https://api.openweathermap.org/data/2.5/weather"
    params = {
        "q": city_name,
        "appid": OPENWEATHER_API_KEY,
        "units": "metric"
    }

    try:
        response = requests.get(url, params=params, timeout=10)
        response.raise_for_status()
        data = response.json()

        return {
            "temp": float(data["main"]["temp"]),
            "humidity": float(data["main"]["humidity"]),
        }
    except Exception as e:
        print("Weather request failed:", e)
return None- url - stores the OpenWeather current weather endpoint used for the HTTP request.
- params - defines the query parameters sent to the API: q - the city name, for example
Kyiv,UA;appid - your OpenWeather API key; units - set to "metric" so temperature is returned in degrees Celsius. - requests.get(...) - sends the HTTP request to the Weather API.
- response.json() - converts the API response from JSON format into a Python dictionary.
- The returned dictionary contains: temp - the current outdoor temperature; humidity - the current outdoor humidity.
The main() function is the main entry point of the program. It initializes the runtime state, performs the first weather request, and then continuously updates the sensor readings, weather data, and OLED display inside an infinite loop:
def main():
    weather_data = {
        "temp": None,
        "humidity": None
    }

    last_weather_update = 0.0
    last_display_refresh = 0.0

    initial_weather = get_current_weather(selected_city)
    if initial_weather is not None:
        weather_data["temp"] = initial_weather["temp"]
        weather_data["humidity"] = initial_weather["humidity"]

    while True:
        now = time.monotonic()

        indoor_temp = sensor.temperature
        indoor_humidity = sensor.relative_humidity

        if now - last_weather_update >= WEATHER_UPDATE_PERIOD:
            last_weather_update = now
            updated_weather = get_current_weather(selected_city)
            if updated_weather is not None:
                weather_data["temp"] = updated_weather["temp"]
                weather_data["humidity"] = updated_weather["humidity"]

        if now - last_display_refresh >= DISPLAY_REFRESH_PERIOD:
            last_display_refresh = now
            draw_screen(
                indoor_temp,
                indoor_humidity,
                weather_data["temp"],
                weather_data["humidity"]
            )

time.sleep(0.1)- weather_data - a dictionary used to store the latest weather information received from the API, including temperature, humidity, and a short weather description.
- last_weather_update - stores the timestamp of the last successful weather data update.
- last_display_refresh - stores the timestamp of the last display refresh.
- initial_weather - performs the first weather request before entering the main loop.
- time.monotonic() - returns the elapsed running time and is used to control periodic updates.
- sensor.temperature - reads the current indoor temperature from the SHT31-D sensor.
- sensor.relative_humidity - reads the current indoor humidity from the SHT31-D sensor.
- time.sleep(0.1) - adds a short pause to prevent the loop from running unnecessarily fast and consuming too many resources.
At this point we have fully functional device that is able to read both humidity and temperature from a sensor and display it on the screen and retieve data from OpenWeather API. But it would be much more informative when it reports its state to the platform in real time. In this section, we add telemetry reporting so the Raspberry Pi 4 can send raw soil readings, calibrated moisture percentage.
To send telemetry data to ThingsBoard, we need to import the TBDeviceMqttClient class from the SDK:
from tb_device_mqtt import TBDeviceMqttClientTBDeviceMqttClient — the main client class used to connect the device to the ThingsBoard platform over MQTT and send telemetry data.
Next, we define the configuration parameters required to connect the device to the ThingsBoard server and control how often telemetry is sent:
THINGSBOARD_HOST = "YOUR_THINGSBOARD_HOST"
THINGSBOARD_TOKEN = "YOUR_THINGSBOARD_DEVICE_TOKEN"
THINGSBOARD_PORT = 1883
TELEMETRY_SEND_PERIOD = 10- THINGSBOARD_HOST - the address of your ThingsBoard server, for example an IP address or domain name.
- THINGSBOARD_TOKEN - the access token of the device created in ThingsBoard. This token is used to authenticate the device on the platform.
- THINGSBOARD_PORT - the MQTT port used for communication with ThingsBoard. In this example, port
1883is used for an unencrypted MQTT connection. - TELEMETRY_SEND_PERIOD - defines how often the device sends telemetry data to ThingsBoard, in seconds. In this example, telemetry is sent every 10 seconds.
Add telemetry send functionality:
def main():
   //Existing functionality
    last_telemetry_send = 0.0

    client = TBDeviceMqttClient(
        THINGSBOARD_HOST,
        port=THINGSBOARD_PORT,
        access_token=THINGSBOARD_TOKEN
    )
    client.connect()

    while True:
       //Existing code

        if now - last_telemetry_send >= TELEMETRY_SEND_PERIOD:
            last_telemetry_send = now

            telemetry = {
                "indoorTemp": round(indoor_temp, 1),
                "indoorHumidity": round(indoor_humidity, 1),
                "outdoorTemp": weather_data["temp"],
                "outdoorHumidity": weather_data["humidity"],
                "city": selected_city
            }

            try:
                client.send_telemetry(telemetry)
                print("Telemetry sent:", telemetry)
            except Exception as e:
                print("Telemetry send failed:", e)

        time.sleep(0.1)
Where:
- last_telemetry_send - stores the timestamp of the last successful telemetry transmission.
- client = TBDeviceMqttClient(...) - creates an MQTT client object configured to connect to your ThingsBoard instance.
- client.connect() - establishes the connection between the Raspberry Pi and the ThingsBoard server.
- The telemetry sending block checks whether the configured telemetry interval has elapsed.
- telemetry - a dictionary containing the values that will be sent to ThingsBoard: indoorTemp - indoor temperature measured by the SHT31-D sensor; indoorHumidity - indoor humidity measured by the SHT31-D sensor; outdoorTemp - outdoor temperature received from the Weather API; outdoorHumidity - outdoor humidity received from the Weather API; city - the selected city used for the weather request.
- client.send_telemetry(telemetry) - sends the telemetry payload to ThingsBoard.
- try / except - ensures that if telemetry sending fails, the application continues running and prints an error message instead of crashing.
- time.sleep(0.1) - adds a short delay to reduce CPU usage and keep the loop efficient.
All preparation steps are now complete, and it is time to start the device. Connect the hardware as shown in the Wiring Diagram section, make sure all required libraries and supporting files are available on the Raspberry Pi, and then run the Python code.
Once the program starts, the Raspberry Pi initializes the SHT31-D temperature and humidity sensor and the SSD1306 OLED display over the I2C interface. After that, the device begins reading the local environmental data and requests current weather information for the selected city from the Weather API.
During operation, the device continuously measures the local temperature and local humidity using the SHT31-D sensor. At the same time, it retrieves external weather data, such as outdoor temperature and humidity, and combines both local and remote readings in one workflow. These values are then shown on the OLED display in a compact and readable format.
If the device is connected successfully to ThingsBoard, it will also begin publishing telemetry for remote monitoring. This allows you to observe both indoor sensor data and weather-based information directly from your ThingsBoard dashboard.
The OLED screen is updated periodically to display the most relevant values, while telemetry is sent to the platform at defined intervals. As a result, the device acts as a compact environmental monitoring station, combining local sensor measurements, cloud-based weather data, and remote visualization through ThingsBoard.
In order to see the telemetry coming to the platform, use the following steps:
- In the left navigation bar click on “Entities” - “Devices”.
- Click on the created device to open device details.
- Go to the “Latest telemetry" tab.
On the Latest telemetry tab, you will see incoming telemetry that reflects the current state of the device in real time. This includes:
- city - the city currently used for retrieving weather data
- indoorHumidity - the humidity measured locally by the SHT31-D sensor
- indoorTemp - the temperature measured locally by the SHT31-D sensor
- outdoorHumidity - the current outdoor humidity retrieved from the Weather API
- outdoorTemp - the current outdoor temperature retrieved from the Weather API
The device sends telemetry periodically, even if the displayed values have not changed significantly. This makes it possible to continuously monitor both the local sensor readings and the external weather data from the ThingsBoard platform in one place.
Data VisualizationTo make the device data easier to understand and interact with, we will visualize it using widgets on a ThingsBoard dashboard. Dashboards allow you to display telemetry such as indoorHumidity, indoorTemp, outdoorHumidity, outdoorTemp values in a clear and human-readable form using indicators, and charts.
You are able to import a dashboard in JSON format. You can find the corresponding dashboard and download it here. In order to import the dashboard, use the following steps:
Navigate to the “Dashboards” page on the left sidebar.
Click on the “+” button in the upper right corner of the page and choose “Importdashboard”.
The dashboard import window should pop up, and you will be prompted to upload the downloaded dashboard JSON file and click “Import”.
Then click on the created dashboard and you will see the following dashboard from the JSON file. You are able to both monitor and control the device via appropriate widgets.
Make attention that device name has to be called “Smart Weather Device” in order to bind to an Aliase and widget states synchronization.Summary
In this article, we walked through the complete process - from wiring the hardware and implementing the device logic in Python with CircuitPython libraries to integrating the device with ThingsBoard for real-time telemetry and remote monitoring. You can further adapt and extend this project for your own use cases, customize the dashboard, or reuse the same approach for other environmental monitoring solutions based on Raspberry Pi and CircuitPython.
By following these steps, you can build an IoT device that combines local sensor measurements with external weather data, displays the results on an OLED screen, and publishes live telemetry to the cloud for convenient monitoring.
If you have any questions or ideas for improvement, feel free to leave a comment below.


_3u05Tpwasz.png?auto=compress%2Cformat&w=40&h=40&fit=fillmax&bg=fff&dpr=2)


Comments