


Hardware components | ||||||
 |
| × | 1 | |||
| × | 2 | ||||
 |
| × | 2 | |||
| × | 1 | ||||
Software apps and online services | ||||||
 |
| |||||
Hand tools and fabrication machines | ||||||
| ||||||
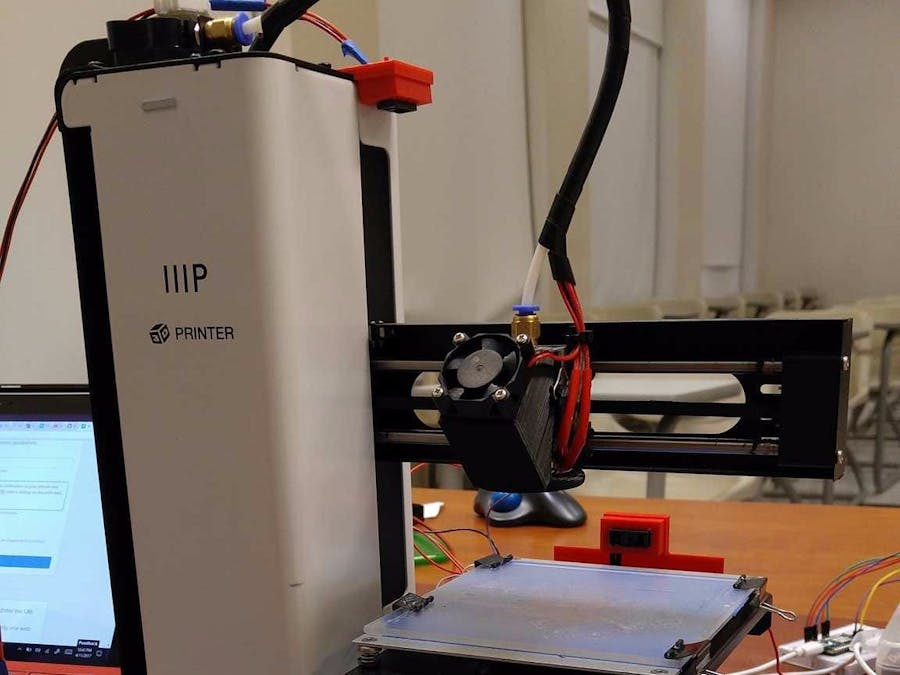
This sensor was designed specifically for the MP Select Mini. I had left my printer running in order to run a very long print. When I came home, I was greeted by a large spaghetti monster and a large nugget melted to the extruder nozzle. In order to combat this, I scoured the web to search for a sensor design to inform me when a slip has occurred, but there was none. So, Ian and myself decided to make our own sensor for this very issue.
Instructional VideoWhen the build was finished, Ian shot a video of me explaining and demonstrating how everything communicated with each other to let you know when a print had slid off the bed.
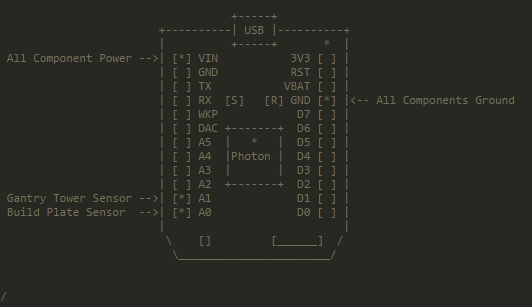
ComponentsThe overall build consists of three basic components. The "Remote" is an OLED screen provided in the Particle Photon Maker kit. It's sole purpose is to deliver the message "Your 3D Print is Slipping" when it retrieves data from the printers Photon. This allows it to be semi-portable, it's limitations of use being anywhere it can both receive power and a wifi connection.
The last two portions are the IR Distance Sensors connected into the "3D Printer" photon. When this project was started, there were no libraries of the IR Sensors used. In order to get accurate distance readings, it was necessary to record the voltage output of the sensors at different distances. These readings were imported into Excel, and the below chart and formula was created. Do note that the decimal points are not rounded as they are defaulted. If the equation is left in its rounded state, it will provide extremely inaccurate results.
The first part being the IR Distance Sensor connected to the top of the tower. It is programmed to determine its distance away from the top of the gantry, and tell when it has risen a certain amount. In this case, it looks for a height of 30mm. This prevents the IR sensor on the print bed from mistaking the moving extruder nozzle as a printing slip.
The final component is the aforementioned print bed sensor. It is focused on the center line of the print bed where most prints will be created. Its job is to register how far away the print is and determine when that distance has changed more than 15mm. This is done by averaging the old reading with a new reading and comparing it to the old average from previous iterations. The bright red cases housing the sensors were designed by William Page specifically for the MP Select Mini.
When both the gantry height is high enough, and a change in distance on the print bed is above 15mm, it changes a "warning" variable in the code from 0 to 1, triggering a notification to be sent from IFTTT to my phone. The setup for this applet is shown below.
This data is also recorded in a Google Sheet as a time stamp to see when exactly the print began to experience slipping issues, as seen below.
In this chart, 1 signifies a time when the print was slipping and 0 signifies when the print was stationary. This graph was simulated by using a false print and moving it by hand. It is created using the two IFTTT applets shown below. When the applets are created, be sure to disable notifications for both the Time Stamp recording applets, otherwise you will receive an update every 15 seconds when it writes a new line in the Google sheet.
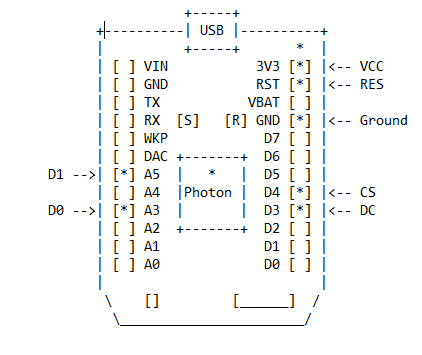
IR Distance Sensors Circuit Diagram


Comments