



Hardware components | ||||||
| × | 1 | ||||
| × | 1 | ||||
Software apps and online services | ||||||
 |
| |||||
Build your own Obstacle Avoider Robot using Python, OpenCV, and Quarky Intellio. In this project, you will assemble an Intellio Rover, connect it to PictoBlox, and use computer vision to detect red and blue obstacles along a track.
Quarky Intellio features an ESP32-S3 processor, a 5MP OV5640 autofocus camera with a 72° field of view, and 2.4 GHz Wi-Fi connectivity. The onboard camera captures images, while an OpenCV Python program running on a connected computer processes the video and identifies obstacles using HSV colour detection.
The rover responds to two programmed instructions:
- Red Obstacle: Turn left.
- Blue Obstacle: Turn right.
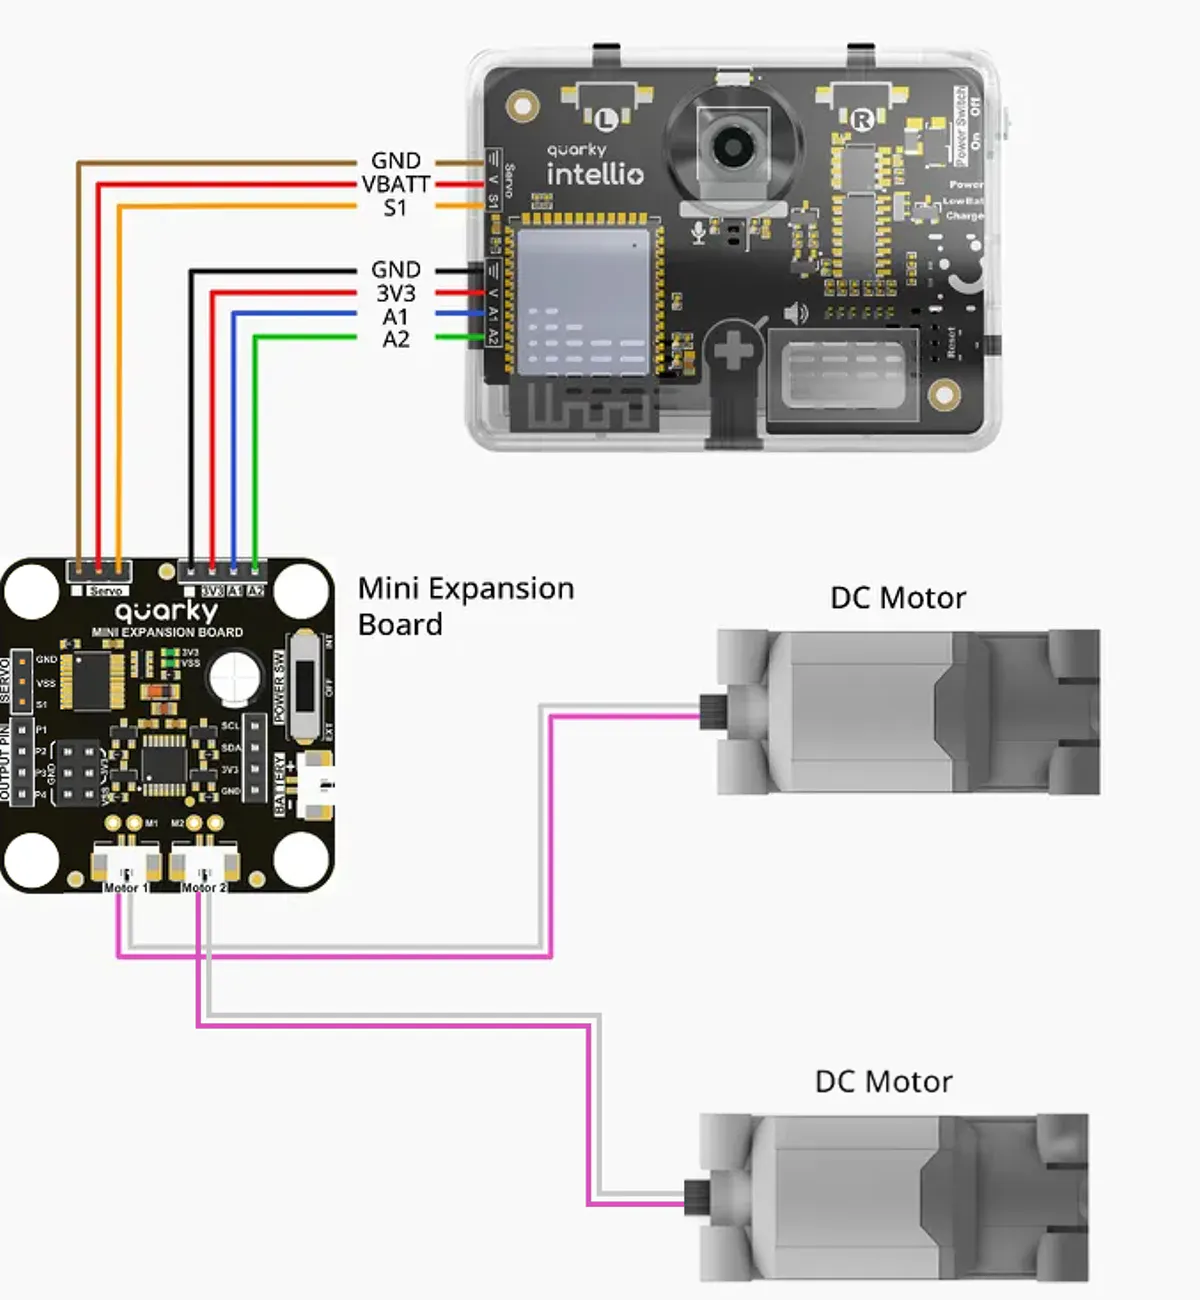
A servo motor controls the steering direction, while two DC motors drive the rover forward through the Quarky Mini Expansion Board.
By completing this project, you will explore computer vision, Python programming, image processing, colour recognition, motor control, and autonomous robot navigation through hands-on STEM learning.
Note: This project uses predefined colours to determine steering direction. It does not measure obstacle distances or detect every obstacle type
Why Use Quarky Intellio for Obstacle Avoidance?Quarky Intellio combines camera-based sensing, wireless connectivity, and programmable hardware to support interactive robotics projects.
- 5MP Autofocus Camera: The built-in OV5640 camera captures visual information for obstacle detection. Its 72° field of view helps the rover observe objects in front of it.
- ESP32-S3 Processor: The ESP32-S3-based board supports the Intellio hardware and its communication with the connected system. In this project, the computer performs OpenCV image processing.
- 2.4 GHz Wi-Fi Connectivity: Wireless communication allows Intellio to connect to the PictoBlox workflow and provide camera images to the Python program.
- Programmable Servo Steering: The servo connected to the S1 channel adjusts the rover’s steering angle in response to detected obstacles.
- Motor Control: The Quarky Mini Expansion Board controls the two DC motors, enabling the rover to move along the prepared track.
- Rechargeable Battery: The built-in 1000mAh Li-ion battery powers Intellio, providing a portable platform for robotics experiments.
Note: Although Quarky Intellio has a 5MP camera, this project processes the received images at 320 × 240 pixels to perform colour detection and steering calculations.
To purchase the Quarky Intellio Rover Kit and begin your robotics journey, visit Explore the Quarky Intellio Rover Kit.
What Will You Learn?By completing this project, you will learn how to:
- Build and prepare a Quarky Intellio Rover for camera-based navigation.
- Connect Quarky Intellio to PictoBlox using Wi-Fi.
- Receive and process live camera images using Python.
- Use OpenCV and NumPy to detect coloured objects.
- Apply HSV colour filtering and contour detection.
- Calculate steering angles according to obstacle positions.
- Control servo and DC motors using PictoBlox Python.
- Maintain steering decisions briefly using obstacle persistence.
- Test, troubleshoot, and improve an autonomous robotics project.
Hardware Components
Use red and blue objects approximately 12 cm tall or larger for initial testing. Solid colours, even lighting, and non-reflective surfaces help make detection more consistent.
Software Requirements
- PictoBlox: The programming platform used to connect, programme, and control Quarky Intellio. This guide uses version 10.1.0 as the reference build.
- OpenCV: A Python library used for image processing, colour detection, contour analysis, and displaying camera images.
- NumPy: A Python library that supports numerical arrays and image data processing.
- Python Standard Libraries: The program also uses socket, threading, and time.
The rover follows five main stages:
- See: Quarky Intellio captures live video using its onboard camera. The camera stream is made available to the Python program running on the computer.
- Detect: OpenCV analyses each frame and identifies red and blue regions using predefined HSV colour ranges.
- Decide: The program determines the appropriate steering direction. A red obstacle triggers a left turn, while a blue obstacle triggers a right turn.
- Steer: The program calculates a servo angle based on the obstacle's horizontal position in the image. It sends this command to the servo while the DC motors continue moving forward.
- Continue: The process repeats for each incoming frame. When an obstacle disappears, the rover maintains its previous steering angle briefly before returning to straight movement.
Working Principle
Camera Input → Image Processing → Colour Detection → Direction Decision → Servo Control → Rover Movement
The program also uses obstacle persistence, meaning the rover continues its most recent turn briefly after the detected obstacle leaves the camera's field of view.
Step-by-Step InstructionsStep 1: Assemble the Quarky Intellio Rover
Before starting the obstacle avoidance project, make sure your Quarky Intellio Rover is correctly assembled.
Refer to theQuarky Intellio Rover Assembly Guideon YouTube for a step-by-step visual explanation of the complete assembly process.
Quarky Intellio Rover Kit | Unboxing and Step-By-Step Robot Assembly | AI and AR DIY Robotics Kit
For a detailed illustrated guide, refer to the Quarky Intellio Rover Assembly Documentation.
To purchase the Quarky Intellio Rover Kit and begin your robotics journey, visit Explore the Quarky Intellio Rover Kit.
Before proceeding, ensure that:
- Quarky Intellio is securely mounted on the rover.
- The camera faces forward and is properly aligned.
- The DC motors are connected to the Mini Expansion Board.
- The steering servo is connected and moves freely.
- The wheels can rotate without obstruction.
- Intellio is sufficiently charged.
- The Mini Expansion Board is switched on, and its power selection is set to Internal.
The steering servo must be connected according to the rover assembly instructions. The supplied Python program controls it through the S1 connection.
Step 2: Install PictoBlox and Update Intellio Firmware
This project uses PictoBlox 10.1.0 and above and Intellio Firmware 2.0.0 and above.
- Visit the PictoBlox Download page and download and install the PictoBlox new version.
- Launch PictoBlox and update the firmware using the Quarky Intellio Firmware Troubleshooting Guide.
- Check the installed firmware and update it to the required version if necessary.
For detailed firmware instructions, refer to the Quarky Intellio Firmware Troubleshooting Guide.
Step 3: Connect Quarky Intellio to PictoBlox Using Wi-Fi
The obstacle avoider uses Wi-Fi to communicate between Quarky Intellio and the computer.
Connect Intellio to PictoBlox. Follow the step-by-step instructions in the Quarky Intellio Connection Guide to establish the connection.
Important: Quarky Intellio supports 2.4 GHz Wi-Fi.
Step 4: Download and Open the Obstacle Avoider Code
Once Quarky Intellio is connected, download the obstacle avoidance project program.
Download the Project Files
Opening the Program in PictoBlox
- Launch PictoBlox and open the downloaded Intellio Obstacle Avoider.sb3 project through the File menu.
- Confirm that the Python program appears in the editor.
- Select Quarky Intellio as the board.
Understanding Code
StructureThe Python program contains the following parts:
Step 5: Install the Required Python Libraries
The program requires OpenCV and NumPy.
To install the libraries:
- Open the Install Pip Package option in PictoBlox.
- Enter the name of the package you want to install, then click Install to begin the installation process.
- Repeat the same process for opencv-python.
Confirm both installations have completed successfully.The program begins with:
import cv2
import numpy as np
import socket
import threading
import time- cv2 provides computer-vision functions.
- numpy processes image arrays and numerical values.
- socket receives video data through UDP.
- threading allows video reception to run independently of the main processing loop.
- time supports timing and obstacle persistence.
The last three modules are included with Python.
Step 6: Verify the Camera Video Stream
The Python script receives camera frames through a UDP video receiver.
Its receiver settings are:
STREAM_PORT = 6000
LOCALHOST = "127.0.0.1"
Here, 127.0.0.1 is the computer's loopback address, not Quarky Intellio's network address.
The code expects a compatible streaming workflow to forward image data to this local receiver. It does not itself start the camera stream.
To verify the connection:
- Keep the rover's wheels raised.
- Confirm that Quarky Intellio is connected through Wi-Fi.
- Ensure the compatible camera-streaming workflow is active.
- Run the Python program.
- Observe the Video feed window.
- Check that the camera image updates continuously.
If the receiver has not received a frame, the window displays:
Waiting for video stream...Do not place the rover on the floor until the camera feed is working.
Step 7: Prepare the Obstacle Avoidance Track
Prepare a flat, open area and arrange the obstacles in an alternating pattern.
To create the intended zigzag movement:
- Place the red obstacles on the right side of the track.
- Place the blue obstacles on the left side.
- Arrange them alternately along the rover's path.
- Leave enough space for the rover to change direction between obstacles.
- Keep the track well lit and free from unnecessary red or blue objects.
For initial testing, begin with two red and two blue obstacles.
Ensure the cones are visible from the rover's camera position and that the surface does not produce strong reflections.
Step 8: Test Red and Blue Obstacle Detection
Before running the rover on the floor, verify that the colour-detection system works correctly.
- Run the Python program while the wheels are raised.
- Wait for the live camera feed to appear.
- Hold a red cone in front of the camera.
- Observe the Red Mask window.
- Verify that the program displays a left-steering decision.
- Repeat the test using a blue cone.
- Observe the Blue Mask window and confirm the right-steering decision.
- Check that the physical servo movement matches the expected directions
The program opens three display windows:
The display may show:
The actual servo angle depends on the obstacle's position in the camera frame.
Step 9: Run the Intellio Obstacle Avoider
Once the camera, servo, and motors have been tested:
- Place the rover at the beginning of the obstacle track.
- Ensure the camera faces forward.
- Check that the Mini Expansion Board is powered on in Internal Mode.
- Verify that the Wi-Fi connection and camera stream are stable.
- Run the program in PictoBlox.
- Observe the rover moving towards the obstacles.
- Check that it steers left for red objects and right for blue objects.
- Continue testing with different obstacle spacings.
As each obstacle disappears from the camera's view, the rover briefly maintains its previous steering direction before returning to the centre position.
Step 10: Stop the Program Safely
To stop the rover:
- Select one of the OpenCV display windows.
- Press the q key.
- Allow the program to execute its cleanup commands.
receiver.stop()
mini.stoprobot()
cv2.destroyAllWindows()
These commands stop the video receiver, stop the drive motors, and close the OpenCV windows.
Avoid relying solely on PictoBlox's Stop button because forcibly interrupting the program can prevent the cleanup code from executing. Keep the rover's physical power switch accessible throughout testing.
Understanding OpenCV and NumPyBefore exploring the Python program, it is important to understand how the rover processes camera images.
What Is OpenCV?
OpenCV (Open Source Computer Vision Library) is a programming library used for image and video processing.
It enables computers and robots to analyse visual information, recognise patterns, identify colours, and locate objects.
In this project, OpenCV performs five important tasks:
- Converts camera frames into the HSV colour space.
- Identifies red and blue regions.
- Removes unwanted noise from detected regions.
- Locates obstacles using contours.
- Displays the processed camera images and steering decisions.
What Is NumPy?
NumPy is a Python library used for numerical calculations and working with arrays. When OpenCV receives an image, it represents that image as a multidimensional NumPy array.
Each pixel contains numerical values representing its colour.
For example, the project processes frames at a resolution of 320 × 240 pixels.
A colour image is represented as an array with the shape:
(240, 320, 3)Here:
- 240 represents the image height.
- 320 represents the image width.
- 3 represents the three colour channels.
OpenCV normally stores decoded colour images using the BGR channel order.
Understanding HSV Colour Detection
HSV stands for:
The program converts each image from BGR to HSV because HSV ranges are convenient for identifying specific colours, such as red and blue.
The image-processing sequence is:
Camera Image → NumPy Array → HSV Conversion → Colour Mask → Contour Detection → Steering Command
Explanation of the Python CodeThe complete Python program consists of 12 important sections. Each section performs a specific task in receiving images, detecting obstacles, or controlling the rover.
Note: Press ‘q’ on your keyboard to safely stop the program. Avoid using the Stop button in PictoBlox, as it may halt code execution without stopping the motors, causing them to continue running.
Code Section 1: Import Libraries and Initialise Hardware
import cv2
import numpy as np
import socket
import threading
import time

mini = QuarkyMiniExpansion()
mini.miniinitialise()

intellio = QuarkyIntellio()
How It Works
The program loads all required libraries before initialising the robot.
QuarkyMiniExpansion() creates the Mini Expansion Board object and mini.miniinitialise() prepares it for motor control.
QuarkyIntellio() creates the Intellio object used to control the steering servo.
These hardware classes are provided by the PictoBlox Python environment.
Code Section 2: Define Configuration Parameters
STREAM_PORT = 6000
LOCALHOST = "127.0.0.1"

MAX_UDP_PACKET = 65536

MAX_SPEED = 50
MIN_SPEED = 0
diff = 5

MIN_CONTOUR_AREA = 150

SERVO_CENTER = 90
SERVO_LEFT_MAX = 55
SERVO_RIGHT_MAX = 125

FORWARD_SPEED = 60
OBSTACLE_PERSISTENCE_SEC = 0.8
How It Works
These variables configure the video receiver, motor speed, steering angles, and obstacle persistence.
The servo's centre position is 90°, with limits of 55° and 125°.
The drive motors receive a forward-speed command of 60.
The variable MIN_CONTOUR_AREA is declared as 150, but the active red and blue detection filters use a hard-coded value of 3000. Consequently, 3000 is the actual contour-area threshold.
The variables MAX_SPEED, MIN_SPEED, and diff are declared but not used in the current movement logic.
Code Section 3: Create the Video Receiver
self.sock = socket.socket(socket.AF_INET, socket.SOCK_DGRAM)
self.sock.bind((LOCALHOST, port))
self.sock.settimeout(1.0)

self.lock = threading.Lock()
self.thread = threading.Thread(target=self.receive_loop)
self.thread.daemon = True
self.thread.start()
How It Works
The VideoReceiver class creates a UDP socket to receive video packets.
The receiver listens at 127.0.0.1:6000 and processes packets in a background thread.
A thread lock protects the most recently decoded camera frame from simultaneous access by the receiving thread and the main program.
The socket timeout prevents the receive operation from blocking indefinitely. It is not an automatic robot-stop watchdog.
Code Section 4: Receive and Decode Camera Frames
if data.startswith(b"SIZE:"):
    header = data.decode().strip()
    expected_size = int(header.split(":")[1])
    current_buffer = bytearray()
    receiving = True

elif receiving:
    current_buffer.extend(data)

    if len(current_buffer) >= expected_size:
        np_arr = np.frombuffer(current_buffer, dtype=np.uint8)
        frame = cv2.imdecode(np_arr, cv2.IMREAD_COLOR)
How It Works
The receiver collects incoming UDP packets containing encoded camera images.
Each image begins with a SIZE: header that indicates the expected number of bytes.
The program accumulates the image data until the specified size is reached. NumPy converts the bytes into an array, and OpenCV decodes the array into a colour image.
The successfully decoded frame is stored for processing by the main control loop.
Code Section 5: Detect Red Obstacles
hsv = cv2.cvtColor(frame, cv2.COLOR_BGR2HSV)

red1 = cv2.inRange(
    hsv, np.array([0, 80, 80]), np.array([10, 255, 255])
)

red2 = cv2.inRange(
    hsv, np.array([170, 80, 80]), np.array([180, 255, 255])
)

mask = cv2.bitwise_or(red1, red2)
How It Works
The program converts the camera image from BGR into HSV colour space.
Two HSV ranges are used because red lies near both ends of OpenCV's hue scale.
The resulting masks are combined using cv2.bitwise_or().
A 5 × 5 kernel is then applied through morphological opening and closing to remove small noisy regions and fill gaps.
The final mask identifies image regions matching the configured red colour ranges.
Code Section 6: Detect Blue Obstacles
hsv = cv2.cvtColor(frame, cv2.COLOR_BGR2HSV)

mask = cv2.inRange(
    hsv, np.array([90, 60, 60]), np.array([140, 255, 255])
)
How It Works
Blue detection uses one HSV colour range.
The program isolates matching pixels and applies the same morphological opening and closing operations used for red detection.
This creates a cleaned binary mask identifying blue regions.
Code Section 7: Find Contours and Identify Obstacles
red_contours, _ = cv2.findContours(
    red_mask, cv2.RETR_EXTERNAL, cv2.CHAIN_APPROX_SIMPLE
)

valid_red = [
    c for c in red_contours
    if cv2.contourArea(c) > 3000
]
How It Works
The program locates the boundaries of connected coloured regions using cv2.findContours().
Only contours with an area greater than 3000 pixels are accepted.
The program selects the largest valid contour, calculates its bounding rectangle and determines its horizontal centre.
x, y, w_box, h_box = cv2.boundingRect(cnt)
cx = x + w_box // 2
The value cx indicates where the detected obstacle is located horizontally.
The same threshold is used for blue obstacles. Red contours are checked first, giving red priority when both colours are present.
Code Section 8: Calculate the Dynamic Steering Angle
def calc_servo_angle(cx, frame_width, direction):
    norm = cx / frame_width
    CURVE = 2.0

    if direction == "left":
        t = norm ** (1 / CURVE)
        angle = SERVO_CENTER - t * (
            SERVO_CENTER - SERVO_LEFT_MAX
        )
    else:
        t = (1.0 - norm) ** (1 / CURVE)
        angle = SERVO_CENTER + t * (
            SERVO_RIGHT_MAX - SERVO_CENTER
        )

    return int(np.clip(angle, SERVO_LEFT_MAX, SERVO_RIGHT_MAX))
How It Works
The function converts the obstacle's horizontal position into a normalised value between approximately 0 and 1.
It applies a non-linear curve to calculate steering strength.
For red obstacles, the calculated angle moves from 90° towards 55°.
For blue obstacles, it moves from 90° towards 125°.
np.clip() ensures the result stays within the configured steering range.
Code Section 9: Apply Obstacle Persistence
last_obstacle = {
    "direction": "left",
    "angle": servo_angle,
    "expires_at": now + OBSTACLE_PERSISTENCE_SEC
}
How It Works
Each detected obstacle is stored with its direction, servo angle and expiry time.
If the obstacle disappears, the program continues using the previous steering angle while the persistence period is active.
With OBSTACLE_PERSISTENCE_SEC = 0.8, the rover maintains its previous turn for up to 0.8 seconds after the last detection.
After the expiry time passes, the servo returns to 90°.
Code Section 10: Control the Servo and DC Motors
intellio.setservo("S1", servo_angle)

mini.runbothmotors(
    '1',
    '1',
    int(FORWARD_SPEED),
    int(FORWARD_SPEED)
)
How It Works
The updated program uses intellio.setservo() to control the servo connected to S1.
This replaces the unsupported intellio.write() method that caused the earlier AttributeError.
The mini.runbothmotors() function commands both drive motors to move forward at the configured speed of 60.
Both drive motors receive the same speed value. The rover changes direction through its steering servo rather than differential motor-speed control.
Code Section 11: Display Camera Feedback
cv2.imshow("Video feed", debug)
cv2.imshow("Red Mask", red_mask)
cv2.imshow("Blue Mask", blue_mask)
How It Works
The program opens three windows.
The Video feed window displays the camera image, obstacle bounding rectangle, obstacle centre and current steering decision.
The Red Mask and Blue Mask windows show the image regions matching the configured colour thresholds.
The video overlay may display messages such as RED -> LEFT, BLUE -> RIGHT, PERSIST LEFT, PERSIST RIGHT and FORWARD.
Code Section 12: Handle Errors and Stop the Program
except Exception as ex:
    print("Loop Error:", ex)
    mini.stoprobot()
How It Works
If an exception occurs inside the main image-processing loop, the program prints the error message and attempts to stop the drive motors.
The supplied code then continues looping, so the same error may recur until the program is stopped.
When the user presses Q during normal operation, the loop exits and executes:
receiver.stop()
mini.stoprobot()
cv2.destroyAllWindows()
These commands close the video receiver, stop the motors, and close the OpenCV windows.
Safety Limitation: The program does not contain a complete stale-video-frame watchdog. If video reception freezes after the first valid image, the main loop may continue using the previously stored frame.
Complete Python ProgramThe following is the source code supplied for the PictoBlox project. It requires the appropriate Quarky Intellio programming environment and compatible camera-stream forwarding.
# ================= NOTE =================
#Press 'q' on your keyboard to safely stop the program.  Avoid using the Stop button in PictoBlox, as it may
#halt code execution without stopping the motors, causing them to continue running.

# ================= IMPORTING REQUIRED LIBRARIES =================
import cv2
import numpy as np
import socket
import threading
import time

# ================= INITIALIZING THE ROBOT =================
# Initialize the Mini Expansion board used to control the motors.
mini = QuarkyMiniExpansion()
mini.miniinitialise()

# Initialize the Intellio board used to control the steering servo.
intellio=QuarkyIntellio()

# ================= CONFIGURATION =================
STREAM_PORT = 6000
LOCALHOST = "127.0.0.1"

MAX_UDP_PACKET = 65536

# Motor Parameters
MAX_SPEED = 50
MIN_SPEED = 0
diff = 5

# Contour filtering
MIN_CONTOUR_AREA = 150

SERVO_CENTER = 90
# Dynamic servo range — how far left/right we can steer
SERVO_LEFT_MAX = 55    # hardest left
SERVO_RIGHT_MAX = 125  # hardest right

FORWARD_SPEED = 60

# How long (seconds) to keep turning AFTER the obstacle leaves frame
OBSTACLE_PERSISTENCE_SEC = 0.8

last_servo_angle = None

# ================= VIDEO RECEIVER =================

# This class is responsible for receiving the camera video.
class VideoReceiver:
    def __init__(self, port):
        self.sock = socket.socket(socket.AF_INET, socket.SOCK_DGRAM)
        self.sock.bind((LOCALHOST, port))
        self.sock.settimeout(1.0)
        self.latest_frame = None
        self.running = True
        self.lock = threading.Lock()
        self.packets_received = 0
        self.frames_decoded = 0
        self.last_debug_print = time.time()
        self.thread = threading.Thread(target=self.receive_loop)
        self.thread.daemon = True
        self.thread.start()
        print(f"UDP Video Receiver listening on {LOCALHOST}:{port}")

    # This function continuously waits for camera data.
    def receive_loop(self):
        current_buffer = bytearray()
        expected_size = 0
        receiving = False
        addr = ("?", 0)

        while self.running:
            try:
                data, addr = self.sock.recvfrom(MAX_UDP_PACKET)
                self.packets_received += 1

                if data.startswith(b"SIZE:"):
                    try:
                        header = data.decode().strip()
                        expected_size = int(header.split(":")[1])
                        current_buffer = bytearray()
                        receiving = True
                    except Exception:
                        receiving = False
                elif receiving:
                    current_buffer.extend(data)
                    if len(current_buffer) >= expected_size:
                        np_arr = np.frombuffer(current_buffer, dtype=np.uint8)
                        frame = cv2.imdecode(np_arr, cv2.IMREAD_COLOR)
                        if frame is not None:
                            with self.lock:
                                self.latest_frame = frame
                            self.frames_decoded += 1
                        receiving = False
                        current_buffer = bytearray()

                now = time.time()
                if now - self.last_debug_print > 2.0:
                    # print(f"[VideoReceiver] packets={self.packets_received} "
                    #       f"frames={self.frames_decoded} addr={addr}")
                    self.last_debug_print = now

            except socket.timeout:
                print("[VideoReceiver] No UDP packet in last 1s.")
                continue
            except Exception as e:
                print(f"[VideoReceiver] Error: {e}")

    def get_frame(self):
        with self.lock:
            return self.latest_frame

    def stop(self):
        self.running = False
        self.sock.close()

# ================= COLOUR MASKS =================
def get_red_mask(frame):
    hsv = cv2.cvtColor(frame, cv2.COLOR_BGR2HSV)
    red1 = cv2.inRange(hsv, np.array([0, 80, 80]),   np.array([10, 255, 255]))
    red2 = cv2.inRange(hsv, np.array([170, 80, 80]), np.array([180, 255, 255]))
    mask = cv2.bitwise_or(red1, red2)
    kernel = np.ones((5, 5), np.uint8)
    mask = cv2.morphologyEx(mask, cv2.MORPH_OPEN,  kernel)
    mask = cv2.morphologyEx(mask, cv2.MORPH_CLOSE, kernel)
    return mask

def get_blue_mask(frame):
    hsv = cv2.cvtColor(frame, cv2.COLOR_BGR2HSV)
    mask = cv2.inRange(hsv, np.array([90, 60, 60]), np.array([140, 255, 255]))
    kernel = np.ones((5, 5), np.uint8)
    mask = cv2.morphologyEx(mask, cv2.MORPH_OPEN,  kernel)
    mask = cv2.morphologyEx(mask, cv2.MORPH_CLOSE, kernel)
    return mask

# ================= DYNAMIC SERVO ANGLE CALCULATOR =================

def calc_servo_angle(cx, frame_width, direction):
    norm = cx / frame_width  # 0.0 = far left, 1.0 = far right

    # Power curve — exponent > 1 makes even mid-frame detections steer harder
    # 2.0 = quadratic, try 1.5 to 3.0 to taste
    CURVE = 2.0

    if direction == "left":
        t = norm ** (1 / CURVE)   # boost the steer amount
        angle = SERVO_CENTER - t * (SERVO_CENTER - SERVO_LEFT_MAX)
    else:
        t = (1.0 - norm) ** (1 / CURVE)
        angle = SERVO_CENTER + t * (SERVO_RIGHT_MAX - SERVO_CENTER)

    return int(np.clip(angle, SERVO_LEFT_MAX, SERVO_RIGHT_MAX))

# ================= PERSISTENCE STATE =================

# Stores the last seen obstacle so we can keep steering after it leaves frame
# { "direction": "left"/"right", "angle": int, "expires_at": float }
last_obstacle = None

# ================= MAIN SETUP =================
receiver = VideoReceiver(STREAM_PORT)

cv2.namedWindow("Video feed",    cv2.WINDOW_NORMAL)
cv2.namedWindow("Red Mask",      cv2.WINDOW_NORMAL)
cv2.namedWindow("Blue Mask",     cv2.WINDOW_NORMAL)

intellio.setservo("S1",SERVO_CENTER)
time.sleep(0.5)

# ================= MAIN LOOP =================
while True:
    frame = receiver.get_frame()

    if frame is None:
        placeholder = np.zeros((240, 320, 3), dtype=np.uint8)
        cv2.putText(placeholder, "Waiting for video stream...",
                    (10, 120), cv2.FONT_HERSHEY_SIMPLEX, 0.5, (0, 0, 255), 1)
        cv2.imshow("Video feed", placeholder)
        if cv2.waitKey(1) & 0xFF == ord('q'):
            break
        mini.stoprobot()
        time.sleep(0.05)
        continue

    try:
        frame = cv2.resize(frame, (320, 240))
        h, w = frame.shape[:2]
        debug = frame.copy()

        red_mask  = get_red_mask(frame)
        blue_mask = get_blue_mask(frame)

        red_contours,  _ = cv2.findContours(red_mask,  cv2.RETR_EXTERNAL, cv2.CHAIN_APPROX_SIMPLE)
        blue_contours, _ = cv2.findContours(blue_mask, cv2.RETR_EXTERNAL, cv2.CHAIN_APPROX_SIMPLE)

        decision     = "FORWARD"
        servo_angle  = SERVO_CENTER
        red_found    = False
        blue_found   = False
        now          = time.time()

        # ── Find the LARGEST red contour above threshold ──────────────────
        valid_red = [c for c in red_contours if cv2.contourArea(c) > 3000]
        if valid_red:
            cnt = max(valid_red, key=cv2.contourArea)
            red_found = True
            x, y, w_box, h_box = cv2.boundingRect(cnt)
            cx = x + w_box // 2          # horizontal centre of obstacle

            cv2.rectangle(debug, (x, y), (x + w_box, y + h_box), (0, 0, 255), 2)
            # Mark the centre so you can see what the servo is reacting to
            cv2.circle(debug, (cx, y + h_box // 2), 5, (0, 255, 255), -1)

            servo_angle = calc_servo_angle(cx, w, "left")
            decision    = f"RED -> LEFT  angle={servo_angle}"

            last_obstacle = {
                "direction": "left",
                "angle":     servo_angle,
                "expires_at": now + OBSTACLE_PERSISTENCE_SEC
            }

        # ── Find the LARGEST blue contour above threshold ─────────────────
        if not red_found:
            valid_blue = [c for c in blue_contours if cv2.contourArea(c) > 3000]
            if valid_blue:
                cnt = max(valid_blue, key=cv2.contourArea)
                blue_found = True
                x, y, w_box, h_box = cv2.boundingRect(cnt)
                cx = x + w_box // 2

                cv2.rectangle(debug, (x, y), (x + w_box, y + h_box), (255, 0, 0), 2)
                cv2.circle(debug, (cx, y + h_box // 2), 5, (0, 255, 255), -1)

                servo_angle = calc_servo_angle(cx, w, "right")
                decision    = f"BLUE -> RIGHT  angle={servo_angle}"

                last_obstacle = {
                    "direction": "right",
                    "angle":     servo_angle,
                    "expires_at": now + OBSTACLE_PERSISTENCE_SEC
                }

        # ── Persistence: keep last turn if obstacle just left frame ───────
        if not red_found and not blue_found:
            if last_obstacle and now < last_obstacle["expires_at"]:
                servo_angle = last_obstacle["angle"]
                remaining   = last_obstacle["expires_at"] - now
                decision    = (f"PERSIST {last_obstacle['direction'].upper()} "
                               f"angle={servo_angle} ({remaining:.1f}s left)")
            else:
                last_obstacle = None   # fully expired → go straight
                servo_angle   = SERVO_CENTER
                decision      = "FORWARD"

        # ── Apply commands ────────────────────────────────────────────────
        intellio.setservo("S1",servo_angle)
        mini.runbothmotors('1','1',int(FORWARD_SPEED), int(FORWARD_SPEED))

        cv2.putText(debug, decision, (10, 30),
                    cv2.FONT_HERSHEY_SIMPLEX, 0.6, (0, 255, 0), 2)

        # SHOW DEBUGGING WINDOWS
        cv2.imshow("Video feed", debug)
        cv2.imshow("Red Mask",   red_mask)
        cv2.imshow("Blue Mask",  blue_mask)

        if cv2.waitKey(1) & 0xFF == ord('q'):
            break

        time.sleep(0.070)

    # If something unexpected goes wrong inside the main loop, stop the robot.
    except Exception as ex:
        print("Loop Error:", ex)
        mini.stoprobot()

# ================= CLEANUP =================

# Stop the robot and receiving video feed
receiver.stop()
mini.stoprobot()
cv2.destroyAllWindows()When the code runs correctly, the rover starts moving forward with its steering servo centred.
As it detects a red obstacle, it calculates and applies a left-steering angle. For blue obstacles, it applies a right-steering angle.
The most recent steering direction is briefly maintained after an obstacle disappears, allowing the rover to complete its turn before returning to straight movement.
The three OpenCV windows display the live camera feed, colour masks, and steering decisions.
Customising the Obstacle AvoiderNote: To make MIN_CONTOUR_AREA control the actual threshold, replace the hard-coded 3000 in both contour filters with MIN_CONTOUR_AREA. Set it to 3000 initially if you want to retain the current behaviour.
Tips for Best ResultsUse even lighting and a non-reflective surface. Begin with a few large red and blue obstacles before preparing a longer course.
Keep the camera securely mounted and monitor the Red Mask and Blue Mask windows throughout testing.
Ensure Intellio is sufficiently charged and that the Mini Expansion Board is powered correctly.
Start with a lower motor speed if the updated value of 60 causes the rover to move too quickly.
Press q in an OpenCV window for the intended program shutdown, and keep the physical power switch accessible.
Common Mistakes and TroubleshootingFor additional information, refer to the documentation.
- Intellio Rover Obstacle Avoider – DOCX
- Intellio Obstacle Avoider – PPT (PDF)
- Quarky Intellio Rover Assembly Documentation
- Quarky Intellio Connection Guide
- Quarky Intellio Firmware Troubleshooting
The Intellio Rover Obstacle Avoider demonstrates how Python and computer vision can be combined to control a moving robot.
Using OpenCV for colour detection, NumPy for image processing, and PictoBlox Python for motor and servo control, the rover can navigate a predefined track of red and blue obstacles without continuous manual steering.
The updated project uses the supported intellio.setservo() method and a forward-speed setting of 60. It also introduces concepts such as dynamic steering, contour filtering, and obstacle persistence.
Future improvements could include an automatic video-loss stop, configurable contour thresholds, more advanced speed control, and improved colour calibration.


Comments