
Hardware components | ||||||
_ztBMuBhMHo.jpg?auto=compress%2Cformat&w=48&h=48&fit=fill&bg=ffffff) |
| × | 1 | |||
 |
| × | 1 | |||
| × | 4 | ||||
 |
| × | 1 | |||
 |
| × | 1 | |||
 |
| × | 1 | |||
| × | 1 | ||||
| × | 1 | ||||
| × | 1 | ||||
Software apps and online services | ||||||
 |
| |||||
| ||||||
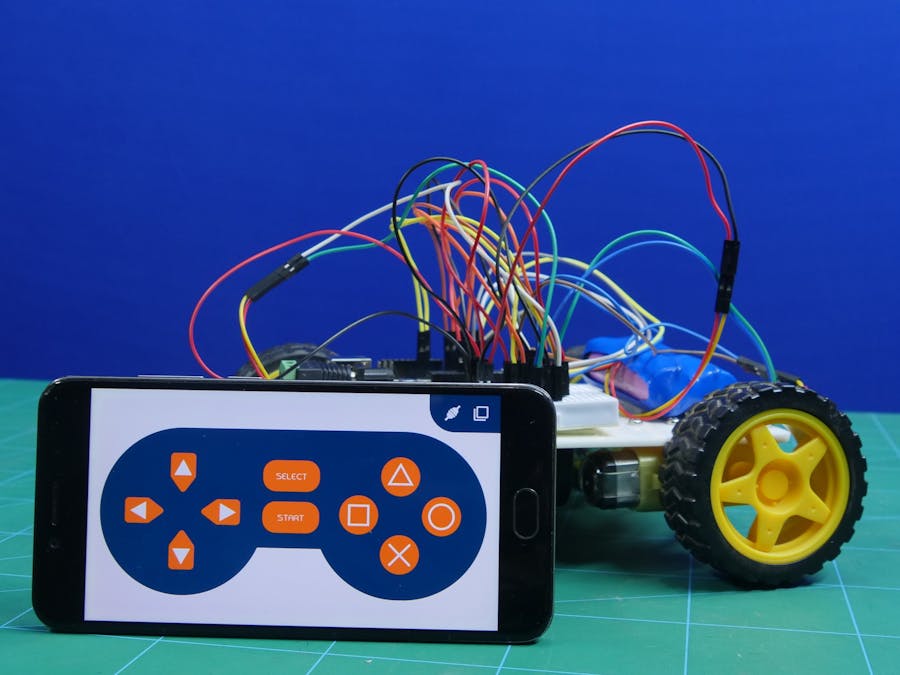
Another project, another out-of-the-box gifting idea! Presenting to you the Dabble controlled 4-wheel robot - an simple-and-fun to build and easy-to-control robot that can be controlled via Bluetooth using Dabble, a mobile application indigenously developed us. All you need to make your robot is an Arduino Uno board, chassis, wheels, motor shafts, and other accesories and tools. To control it, you need to install Dabble from Google Play and pair it with Bluetooth; and your robot’s ready to go places!
What better way to end the year with the same DIYing spirit that it began with, right? So what are you waiting for!
So, Let’s get started!
Step 1: Things You'll Need- Arduino Uno Board
- Breadboard
- Chassis
- Motor Mounts
- DC Motors
- Wheel
- Motor Driver
- Bluetooth Module HC05
- DC Terminal Block
- Battery
- Jumper Cables
Firstly, we will start making the body of the 4 Wheel Robot.
Take the chassis and turn it upside down.
Onto this chassis mount 4 motor mounts using M3 Bolts and nuts.
Fix the DC Motors and fix them on the motor mounts using M2 Nuts and Bolts.
Attach wheels on each shaft of the DC Motor.
Flip the assembly, thus your body is created.
The microcontroller that we are going to use is Arduino Uno.
We are going to make all the connections on it, but we are also going to use a breadboard to make the connections.
Step 4: Making Connections and Using Motor DriverMake the connection as shown in the below figure.
We are going to make use of the motor drivers because Arduino Uno does not provide sufficient power to run 4 Motors. Thus, we will be adding the motor driver, we will be able to give the robot needed energy.
The left two motors are connected in parallel. Similarly, the right two motors are too connected in parallel.The connections are made as follows:
- Enable Pins – Digital Pin 10 and 11
- VCC – Arduino 5V
- m1_dir1, m1_dir2, m2_dir1, m2_dir2 – Digital Pin 4, 5, 6, and 7
- VC – External Battery
- GND – GND of Arduino and BatteryMake sure we connect all the GND wires together.
We need to add a module that will make the connection between your robot and Dabble App on Smartphone.
We are taking Bluetooth HC05 Module. Connect it as shown in the connection figure.
We will need to add an extra power source to our robot. Also, to connect Arduino Uno with the battery we are going to use DC Terminal Block or DC Jack.
Upload the following code:
Step 8: WorkingWe can easily connect our robot to our Smartphone using Dabble.
Before working with any of the modules, you need to connect the Bluetooth that you are working on.
There are many modules available in the App for other functionalities.
Today we will be working with the Gamepad Module.
And we will be using the Left Set of buttons:
- Up – Move Forward
- Down – Move Backward
- Left – Turn Left
- Right – Turn Right
With this, you DIYDabble-controlled 4wheel robot is ready for action!
Psst! Just so you know, Dabble can do much more than just wirelessly controlling robots. You can explore more about it here!
_RkD1UL1cTw.jpg)


_RkD1UL1cTw.jpg)
Comments