

Hardware components | ||||||
 |
| × | 1 | |||
 |
| × | 1 | |||
 |
| × | 1 | |||
 |
| × | 1 | |||
 |
| × | 1 | |||
Software apps and online services | ||||||
| ||||||
| ||||||
Hi, welcome to Swift 3.0 for Raspberry Pi part 3, GPIO - Getting Started. This tutorial is compatible with all Raspberry Pi models with 40 GPIO pins. It may also work with the older 26 GPIO pin models with some code modification.
To complete this tutorial you will first need to install Swift-Lite on your Raspberry Pi. Details for this are in tutorial 1. In this tutorial we will be using an LED, a 330 Ohm resistor, a breadboard and some jumpers wires to connect to the Pi's GPIO pins. First we will connect the hardware and then download some sample code to flash the LED.
Okay, let's get started.
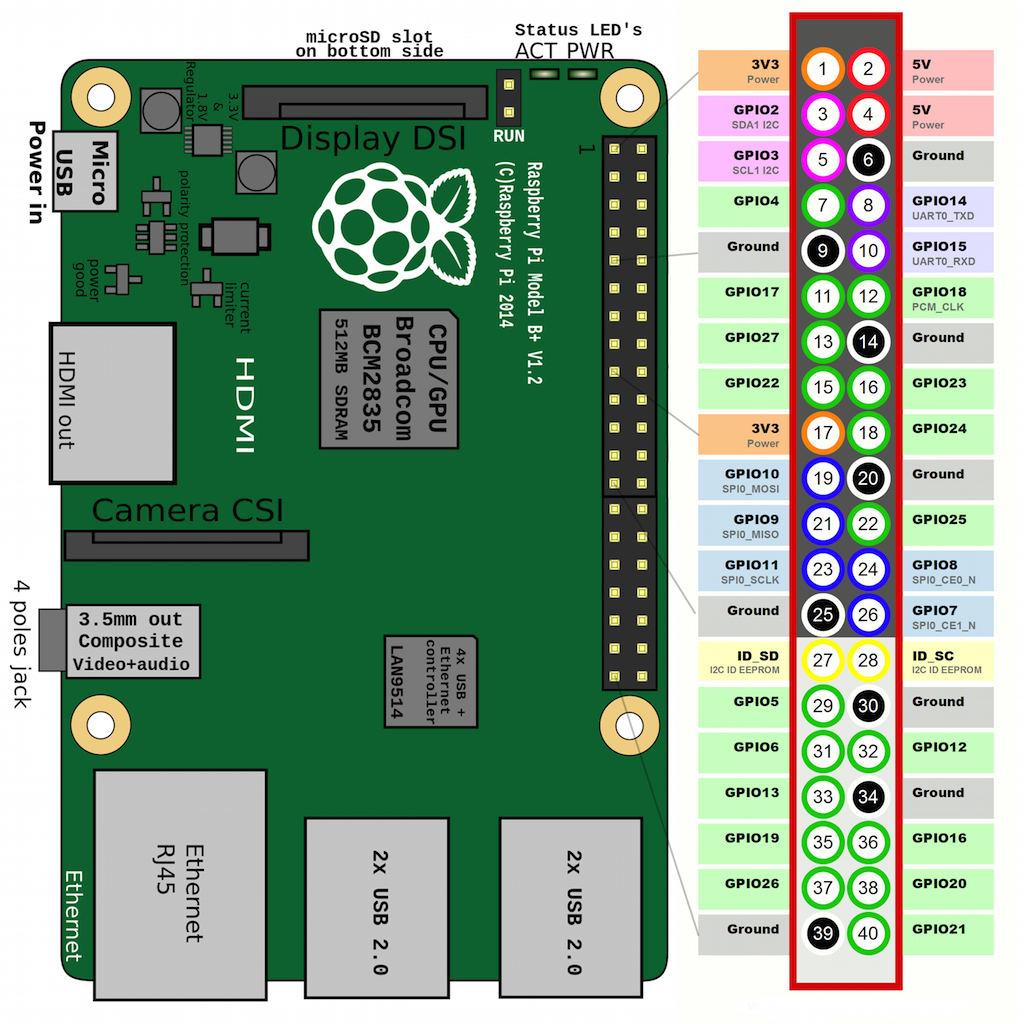
The GPIO PinsThe diagram above shows the layout of the 40 pin GPIOs. We will connect (Ground) pin [6] and (GPIO17) pin [11] .
The CircuitAs show in the diagram above, we will be adding a resistor in the circuit. This is to stop too much voltage being drawn by the LED and damaging the Raspberry Pi.
Connecting the HardwareConnect the LED, resistor and jumper wires as shown in the diagram. Make sure you connect the long wire on the LED (+) to the jumper wire going to GPIO17. LEDs will only work if the current is flowing in the correct direction.
It should look something like this. Now that we are all connected, let's download the sample code.
Download Sample CodeOpen a Terminal window and ssh to your Raspberry Pi.
ssh pi@raspberrypi3x.local
Use "wget" to download the sample code package.
wget https://s3-us-west-2.amazonaws.com/swiftpi.swiftlite.v1/flashLEDSampleCode.tar.gz
Unzip (tar) the package.
tar -xzpf flashLEDSampleCode.tar.gz
Remove package file.
rm flashLEDSampleCode.tar.gz
We should now have 2 new files. A project file called "piCodeLEDTimer.swift" and a module file called "piCodeGPIO.swift".
The "piCodeGPIO.swift" module file allows control of the GPIO pins. The code contained in this file is advanced and is beyond the scope of this tutorial. You are welcome to look at the code but in this tutorial we only need to include the module and use its functions.
The "piCodeLEDTimer.swift" file is the main project file.
The first step is to include the "piCodeGPIO" module so we can setup GPIO pin access. This is done adding an include statement in the comments header as shown in tutorial part 2.
// include:piCodeGPIO.swift
Next is to set the board type. "piCodeGPIO" includes an "autodetect board" function for easy setup.
let gpios = autoDetectBoardType()
Now set the GPIO pins, direction and value.
// setup the GPIO pins
var gp = gpios[.P17]!   // Pin to conect the LED to
gp.direction = .OUT     // Pin connection direction - OUT - when turned on the pin will output 5v
gp.value = 0            // Set intial value 0 = off 1 = on
Next we need to add 2 timers. One timer will control the flash interval and the other will control the flash length.
var intervalTimer: Timer!   // this timer controls the time intervals the LED turns on. As this is a repeating timer it needs to be added to a runloop.
var flashTimer: Timer!      // this timer controls the length of time the LED remains on.
We will now need to add some variables for things such as: number of flashes, flash length, etc.
var flashNumber = 5 // the number of flashes
var flashIntervalTime: Double = 2.0 // the time between the start of each flash
var flashLengthTime: Double = 0.75 // the length of time of each flash
var runLoopTime: Double = 11 // the lenghth of time the runloop will run - set this to be longer than the time for all the flashes to complete

// the runloop can be set to continous if this is action you need.
Now to add the functions. There are 2 functions to setup and initialize the timers and 2 functions that the value of the GPIO pin.
func runIntervalTimer() {
   intervalTimer = Timer.scheduledTimer(withTimeInterval: flashIntervalTime, repeats: true, block: {(_) in flashOnLED()})
}
func runflashTimer() {
   flashTimer = Timer.scheduledTimer(withTimeInterval: flashLengthTime, repeats: false, block: {(_) in flashOffLED()})
}
func flashOnLED() {
   print("flash on")
   gp.value = 1
   runflashTimer()
}
func flashOffLED() {
   gp.value = 0
   print("flash off")
   flashNumber -= 1
   if flashNumber == 0 {
       intervalTimer.invalidate()
       print("finished")
   }
}
In the "flashOffLED()" function we are also counting the number of flashes. After the set number of flashes, the timer is stopped by "intervalTimer.invalidate()".
We need to call the "runIntervalTimer()" function to start the LED flashing.
runIntervalTimer()
As the main interval timer is a repeating timer, we will need to create a runloop and add the timer to it.
let flashLEDLoop = RunLoop.current
flashLEDLoop.add(intervalTimer, forMode: .defaultRunLoopMode)
flashLEDLoop.run(until: Date(timeIntervalSinceNow: runLoopTime))
That's all the code finished. Now we need to build and run the swapp (swift app).
Building the ProjectChange to the "swiftProjects" directory.
cd swiftProjects
Use "swift-lite-build" to build the project.
swift-lite-build piCodeLEDTimer.swift
Processing Files
Building!
Build Finished
In our projects directory we should now have a file called "piCodeLEDTimer.swapp". Because we are accessing the GPIO pins, we will need to use "sudo" with the run command.
sudo ./piCodeLEDTimer.swapp
flash on
flash off
flash on
flash off
flash on
flash off
flash on
flash off
flash on
flash off
finished
We should now have a flashing LED!
Hope you enjoyed this tutorial. In the next tutorial, we will be measuring distance using the HC-SR04 Ultrasonic Ranging Sensor.


Comments