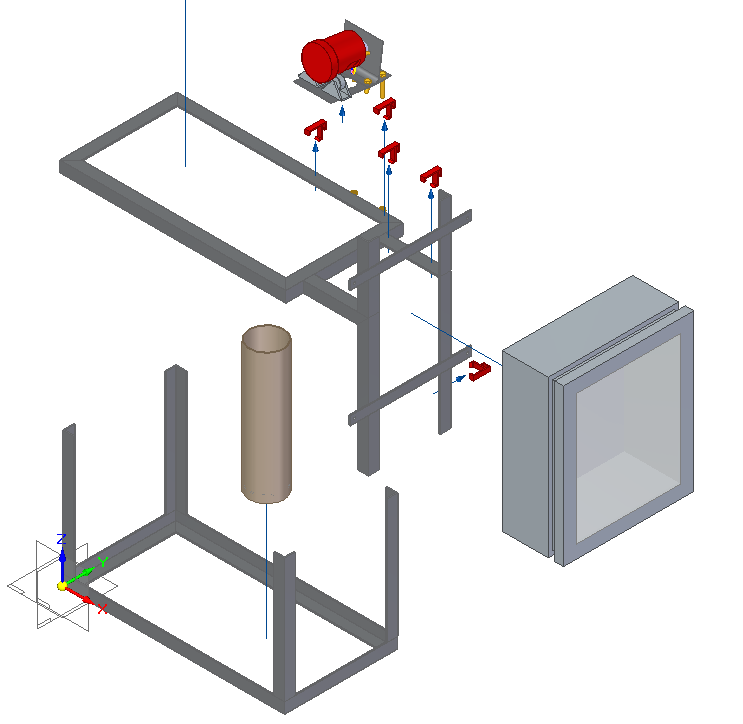
// Gebruikte pinnen:
// 2,3,5 voor Fona.
// 4 voor DHT.
// 6 voor de capcitieve niveausensor.
// 7 voor de troebelheissensor.
// 8 voor de ventilator.
// 9 voor de LED-Strip.
// 10,11,12,13 voor de MotorShield waarop de stappenmotor is aangesloten.
// A4 en A5 worden gebruikt voor de Dompelpomp en de Vacuumpomp
// Info:
// What pins are/are not used on the motor shield?
// The shield uses the SDA and SCL i2c pins to control DC and stepper motors.
// On the Arduino UNO these are also known as A4 and A5.
// On the Mega these are also known as Digital 20 and 21.
// On the Leonardo these are also known as digital 2 and 3.
// Do not use those pins on those Arduinos with this shield with anything other than an i2c sensor/driver.
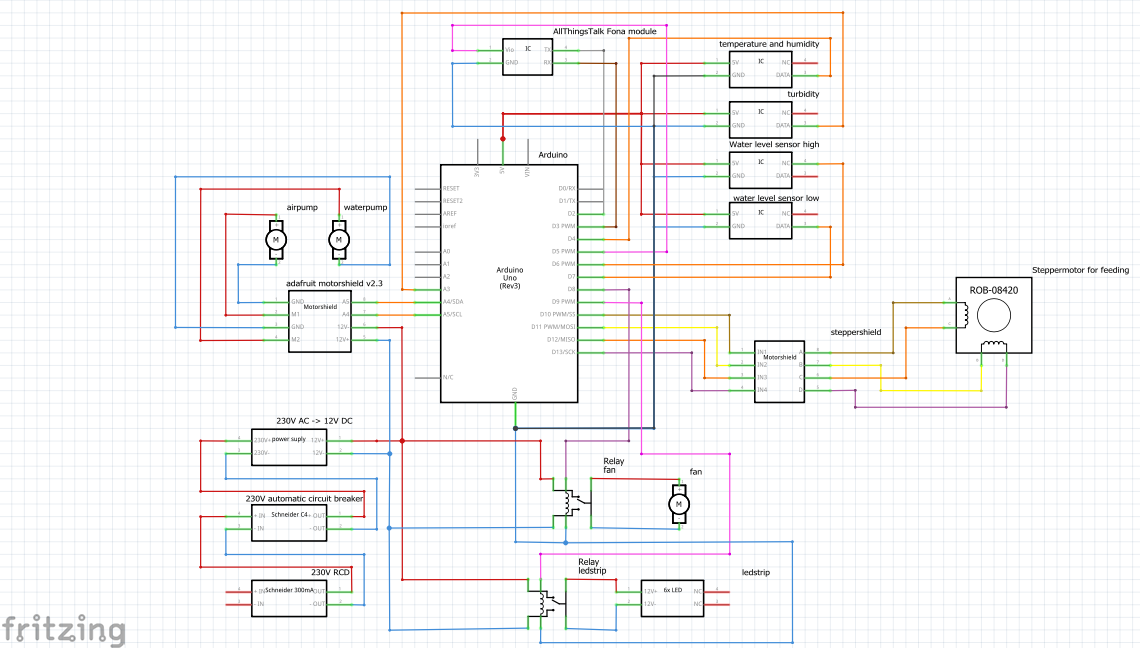
//Libraries van de FONA module
#include <SoftwareSerial.h>
#include "ATT_IOT_FONA.h"
#include "ATT_MQTT.h"
#include "ATT_IOT_GPRS.h"
#include <SPI.h> // required to have support for signed/unsigned long type.
//Constanten voor de FONA module
#define deviceId "your_device_id"
#define clientId "your_client_id"
#define clientKey "your_client_key"
#define FONA_APN "web.pro.be"
#define FONA_USERNAME ""
#define FONA_PASSWORD ""
#define FONA_RX 2 // Pin 2 is voor de RX
#define FONA_TX 3 // Pin 3 is voor de TX
#define FONA_RST 5 // Pin 5 is voor de RST
SoftwareSerial fonaSS = SoftwareSerial(FONA_TX, FONA_RX);
ATTDevice Device(deviceId, clientId, clientKey); // create the object that provides the connection to the cloud to manager the device.
#define httpServer "api.AllThingsTalk.io" // HTTP API Server host
#define mqttServer httpServer // MQTT Server Address
//Libraries voor de DHT serretemperatuur en serrevochtigheid
#include <dht.h>; //Libraries voor serretemperatuursensor meer info: http://www.ardumotive.com/how-to-use-dht-22-sensor-en.html
//Constanten voor DHT vochtigheids en temperatuursensor
#define DHTPIN 4 // DHT is aangesloten op pin 4
#define DHTTYPE DHT22 // DHT 22 (AM2302)
DHT dht(DHTPIN, DHTTYPE); // Initialize DHT sensor for normal 16mhz Arduino
//Libraries voor de Motorshield
#include <Wire.h> // Wire
#include <Adafruit_MotorShield.h> // Om de motoren aan te sturen
#include "utility/Adafruit_MS_PWMServoDriver.h" // Om de stappenmotor aan te sturen
// Create the motor shield object with the default I2C address
Adafruit_MotorShield AFMS = Adafruit_MotorShield();
// Or, create it with a different I2C address (say for stacking)
// Adafruit_MotorShield AFMS = Adafruit_MotorShield(0x61);
// Select which 'port' M1, M2, M3 or M4. In this case, M1
Adafruit_DCMotor *DompPomp = AFMS.getMotor(1);
// You can also make another motor on port M2
Adafruit_DCMotor *VacPomp = AFMS.getMotor(2);
//Variabelen
//Asset nummers toewijzen voor AllThingsTalk
int AssNrVocht = 1; // Asset Number Vochtigheid
int AssNrTemp = 2; // Asset Number Temperatuur
int AssNrNiv = 3; // Asset Number Niveau schakelaar
int AssNrHand = 4; // Asset Number Hand/Auto schakelaar
int AssNrVent = 5; // Asset Number Ventilator
int AssNrLed = 6; // Asset Number LED-Strip
int AssNrDomp = 7; // Asset Number Dompelpomp
int AssNrVac = 8; // Asset Number Vacuumpomp
int AssNrFeed = 9; // Asset Number Voedertrommel
//Variabelen voor communicaite met AllThingsTalk
float Vocht; // AI Stores humidity value
float Temp; // AI Stores temperature value
bool Niv; // DI Niveau sensor
bool Hand; // DI Systeembit Hand
bool Vent; // DO Ventilator
bool Led; // DO LED-Strip
bool Domp; // DO Dompelpomp
bool DmyDomp // Dummy Dompelpomp
bool Vac; // DO Vacuum pomp
bool DmyVac; // Dummy Vacuum pomp
bool Feed; // DO Voedertrommel
//Pin nummers toewijzen (2,3,5 voor Fona. 4 voor DHT. 10,11,12,13 voor stappenmotor)
//Inputs
int PinNiv = 6; // Pin Number Niveau Sensor
int PinTurb = 7; // Pin Number Troebelheid Sensor
//Outputs
int PinVent = 8; // Pin Number Ventilator
int PinLed = 9; // Pin Number LED-Strip
int PinSM0 = 10; // Pin Number Stappen Motor 0
int PinSM1 = 11; // Pin Number Stappen Motor 1
int PinSM2 = 12; // Pin Number Stappen Motor 2
int PinSM3 = 13; // Pin Number Stappen Motor 3
//Variabelen voor Tijdsfuncties
unsigned long CurTime = 0; // Current Time
unsigned long LastTime = 0; // Last saved Time
int Uur = 0; // Time of day: Uur
int Min = 0; // Time of day: Min
int Sec = 0; // Time of day: Sec
//Setpoints LED
int LedOnTime = 20; // Set time Led (uur)
int LedOffTime = 8; // Reset time Led (uur)
//Setpoints DHT
int VochtMax = 500; // Te vochtig => Set Vent
int VochtMin = 450; // Vocht ok => Reset Vent
int TempMax = 22; // Te warm => Set Vent
int TempMin = 21; // Warmte ok => Reset Vent
//Setpoints Voedertrommel
bool Feeding = false; // Voedertrommel is bezig met voederen
int FeedTime = 8; // Tijdstip voederen (uur)
int FeedRounds = 3; // Aantal toeren per voederbeurt
int FeedTimeRound = 4200; // Tijdsduur voederen (ms) 4200ms = 1 toer
unsigned long FeedEndTime; // Tijdstip Stop voederen (ms)
unsigned long NextStep; // Tijdstip voor de volgende stap
int StepTime = 1; // Tijdsduur voor 1 stap (ms)
int Step = 0; // Stap nummer (0 t.e.m. 7)
int StepDir = 1; // Draairichting (1 is default)
//Nodig voor de FONA module
void callback(const char* topic, const char* payload, unsigned int length);
// Setup the FONA MQTT class by passing in the FONA class and MQTT server and login details.
void setup()
{
fonaSS.begin(19200); // Openen van de Seriële Communicatie met de Fona module aan 19200 baud
Serial.begin(57600); // Openen van een virtuele Seriële Communicatie voor het debuggen aan 57600 baud
while(!Serial && millis() < 2000); // Make sure you see all output on the monitor.
{ // After 2 sec, it will skip this step, so that the board can also work without being connected to a PC
while (! Device.InitGPRS(fonaSS, FONA_RST, F(FONA_APN), F(FONA_USERNAME), F(FONA_PASSWORD)))
{
Serial.println("Retrying FONA");
}
Serial.println(F("Connected to Cellular!"));
delay(2000); // wait a few seconds to stabilize connection
while(!Device.Connect(httpServer)) // connect the device with the IOT platform.
{
Serial.println("retrying");
}
//Alle devices voor AllThingsTalk declareren
// Device.AddAsset(int AssetNr, string Name, string Discription, bool isActuator, string Type);
Device.AddAsset(AssNrVocht, "Vochtigheid serre", "Vochtigheid in de serre", false, "number");
Device.AddAsset(AssNrTemp, "Temperatuur serre", "Temperatuur in de serre", false, "number");
Device.AddAsset(AssNrNiv, "Niveausensor", "Waterniveau in het aquarium", false, "bool");
Device.AddAsset(AssNrHand, "Hand / Auto", "Schakelaar Hand / Auto", true, "bool");
Device.AddAsset(AssNrVent, "Ventilator", "Schakelaar en Terugmelding werking ventilator", true, "bool");
Device.AddAsset(AssNrLed, "LED-Strip", "Schakelaar en Terugmelding werking LED-Strip", true, "bool");
Device.AddAsset(AssNrDomp, "Dompelpomp", "Schakelaar en Terugmelding werking Dompelpomp", true, "bool");
Device.AddAsset(AssNrVac, "Vacuumpomp", "Schakelaar en Terugmelding werking Vacuumpomp", true, "bool");
Device.AddAsset(AssNrFeed, "Voedertrommel", "Schakelaar en Terugmelding werking Voedertrommel", true, "bool");
while(!Device.Subscribe(callback, mqttServer, 1883)) // make certain that we can receive message from the iot platform (activate mqtt)
{
Serial.println("retrying");
}
}
//Voor de DHT sensor
dht.begin();
//Voor MotorSield
AFMS.begin(); // create with the default frequency 1.6KHz
//AFMS.begin(1000); // or with a different frequency, say 1KHz
// Set the speed to start, from 0 (off) to 255 (max speed)
DompPomp->setSpeed(155);
// DompPomp->run(FORWARD); // Dat mag hier wss nog niet staan omdat dit reeds de pomp aan zet
VacPomp->setSpeed(250);
// VacPomp->run(FORWARD); // Dat mag hier wss nog niet staan omdat dit reeds de pomp aan zet
}
void loop()
{
//Uurwerk
CurTime = millis();
if (CurTime < 900) {LastTime = 0;}
if (CurTime >= (LastTime + 1000)) {
LastTime = CurTime;
Sec = Sec + 1;
if (Sec >= 60) {
Min = Min + 1; Sec = 0;
Serial.println("Klok: " + Uur + ":" + Min);
if (Min >= 60) {
Uur = Uur + 1; Min = 0;
if (Uur >= 24) {Uur = 0;}
}
}
}
//Ventilator
if (!Hand) { // Als het systeem in AUTO staat
if ((Temp > TempMax) or (Hum > VochtMax)) // Als het warmer is dan 22 graden OR vochtiger dan 500 draait de ventilator
{
if (!Vent){Serial.println("Ventilator: Automatisch aan");}
digitalWrite(PinVent, HIGH); // Ventilator aanzetten
Vent = true; // Terugmelding voor AllThingsTalk
}
if ((Temp < TempMin) and (Hum < VochtMin)) // Als het kouder is dan 21 graden AND droger dan 450 stop de ventilator
{
if (Vent){Serial.println("Ventilator: Automatisch uit");}
digitalWrite(PinVent, LOW); // Ventilator afzetten
Vent = false; // Terugmelding voor AllThingsTalk
}
}
else { // Als het systeem in HAND staat
if (digitalRead(PinVent) != Vent)
{
if (Vent){Serial.println("Ventilator: Handmatig aan"); digitalWrite(PinVent, HIGH);}
if (!Vent){Serial.println("Ventilator: Handmatig uit"); digitalWrite(PinVent, LOW);}
}
}
//LedStrip
if (!Hand) { // Als het systeem in automatisch staat
if (Uur == LedOnTime and Min == 0) // Om 8u 's avonds wordt de LED-Strip ingeschakeld
{
if (!Led){Serial.println("LED-Strip: Automatisch aan");}
digitalWrite(PinLed, HIGH); // LED-Strip aanzetten
Led = true; // Terugmelding voor AllThingsTalk
}
if (Uur == LedOffTime and Min == 0) // Om 8u 's morgens wordt de LED-Strip uitgeschakeld
{
if (Led){Serial.println("LED-Strip: Automatisch uit");}
digitalWrite(PinLed, LOW); // LED-Strip uitzetten
Led = false; // Terugmelding voor AllThingsTalk
}
}
else {
if (digitalRead(PinLed) != Led)
{
if (Led){Serial.println("LED-Strip: Handmatig aan"); digitalWrite(PinLed, HIGH);}
if (!Led){Serial.println("LED-Strip: Handmatig uit"); digitalWrite(PinLed, LOW);}
}
PinLed = Led;
}
//Dompelpomp
if (!Hand) { // Als het systeem in automatisch staat
if (Min == 0 and Sec < 10) // Ieder uur wordt de dompelpomp voor 10 seconden aangeschakeld
{
if (!Domp){Serial.println("Dompelpomp: Automatisch aan");}
DompPomp->run(FORWARD); // Pomp Starten
Domp = true; // Terugmelding voor AllThingsTalk
}
else
{
if (Domp){Serial.println("Dompelpomp: Automatisch uit");}
DompPomp->run(RELEASE);} // Pomp Stoppen
Domp = false; // Terugmelding voor AllThingsTalk
}
else { // Als het systeem in hand staat
if (DmyDomp != Domp)
{
if (Domp){Serial.println("Dompelpomp: Handmatig aan");}
if (!Domp){Serial.println("Dompelpomp: Handmatig uit");}
}
if (Domp == true) {DompPomp->run(FORWARD);} else {DompPomp->run(RELEASE);}
DmyDomp = Domp;
}
//Vacuumpomp
if (!Hand) { // Als het systeem in automatisch staat
if (Min < 15) // De eerste 15 minuten van ieder uur wordt de vacuumpomp aangeschakeld
{
if (!Vac){Serial.println("Vacuumpomp: Automatisch aan");}
VacPomp->run(FORWARD); // Pomp Starten
Vac = true; // Terugmelding voor AllThingsTalk
}
else
{
if (Vac){Serial.println("Vacuumpomp: Automatisch uit");}
VacPomp->run(RELEASE);} // Pomp Stoppen
Vac = false; // Terugmelding voor AllThingsTalk
}
}
else { // Als het systeem in hand staat
if (DmyVac != Vac)
{
if (Vac){Serial.println("Vacuumpomp: Handmatig aan");}
if (!Vac){Serial.println("Vacuumpomp: Handmatig uit");}
}
if (Vac == true) {VacPomp->run(FORWARD);} else {VacPomp->run(RELEASE);}
DmyVac = Vac;
}
//Voedertrommel
if (!Hand) { // Als het systeem in automatisch staat
if (Uur == FeedTime and Min == 0 and Sec == 0 and LastTime = CurTime)// Het is tijd om te voederen
{
if (!Feed){Serial.println("Voedertrommel: Automatisch gestart voor " + Feedrounds + " toeren");}
FeedTimeEnd = CurTime + (FeedRounds * FeedTimeRound) // Bereken de stoptijd voor het voederen
Feeding = true; // Voedertrommel starten
Feed = true; // Terugmelding voor AllThingsTalk
}
}
else { // Als het systeem in hand staat
if (Feed == true and Feeding == false)
{
if (Feed){Serial.println("Voedertrommel: Handmatig gestart voor 1 toer");}
FeedTimeEnd = CurTime + (FeedTimeRound) // Bereken de stoptijd voor het voederen
Feeding = true; // Voedertrommel starten
}
}
if (CurTime >= FeedTimeEnd)
{
if (Feed){Serial.println("Voedertrommel: gestopt met draaien");}
Feeding = false; // Voedertrommel stoppen
Feed = false; // Terugmelding voor AllThingsTalk
}
if (Feeding = true or Step != 0)
{
if (CurTime >= NextStep)
{
NextStep = CurTime + StepTime;
if (StepDir){Step++;} else {Step--;}
if (Step > 7) {Step = 0;}
if (Step < 0) {Step = 7;}
}
switch(Step)
{
case 0:
digitalWrite(PinSM0, LOW);
digitalWrite(PinSM1, LOW);
digitalWrite(PinSM2, LOW);
digitalWrite(PinSM3, HIGH);
break;
case 1:
digitalWrite(PinSM0, LOW);
digitalWrite(PinSM1, LOW);
digitalWrite(PinSM2, HIGH);
digitalWrite(PinSM3, HIGH);
break;
case 2:
digitalWrite(PinSM0, LOW);
digitalWrite(PinSM1, LOW);
digitalWrite(PinSM2, HIGH);
digitalWrite(PinSM3, LOW);
break;
case 3:
digitalWrite(PinSM0, LOW);
digitalWrite(PinSM1, HIGH);
digitalWrite(PinSM2, HIGH);
digitalWrite(PinSM3, LOW);
break;
case 4:
digitalWrite(PinSM0, LOW);
digitalWrite(PinSM1, HIGH);
digitalWrite(PinSM2, LOW);
digitalWrite(PinSM3, LOW);
break;
case 5:
digitalWrite(PinSM0, HIGH);
digitalWrite(PinSM1, HIGH);
digitalWrite(PinSM2, LOW);
digitalWrite(PinSM3, LOW);
break;
case 6:
digitalWrite(PinSM0, HIGH);
digitalWrite(PinSM1, LOW);
digitalWrite(PinSM2, LOW);
digitalWrite(PinSM3, LOW);
break;
case 7:
digitalWrite(PinSM0, HIGH);
digitalWrite(PinSM1, LOW);
digitalWrite(PinSM2, LOW);
digitalWrite(PinSM3, HIGH);
break;
default:
digitalWrite(PinSM0, LOW);
digitalWrite(PinSM1, LOW);
digitalWrite(PinSM2, LOW);
digitalWrite(PinSM3, LOW);
break;
}
}
//om de 5 seconden wordt de data op het AllThingsTalk platform gerefreched
if (Sec % 5 == 0 and LastTime == CurTime){ // Als Sec deelbaar is door 5 zonder rest en de nieuwe seconde is net begonnen (puls op de seconde)
Vocht = dht.readHumidity();
Temp = dht.readTemperature();
Niv = PinNiv;
Device.Send(String(Vocht), AssNrVocht);
Device.Send(String(Temp), AssNrTemp);
Device.Send(String(Niv), AssNrNiv);
//Device.Send(String(Hand), AssNrHand); // Hand wordt voorlopig enkel gelezen van AllThingsTalk en nooit geschreven.
Device.Send(String(Vent), AssNrVent);
Device.Send(String(Led), AssNrLed);
Device.Send(String(Domp), AssNrDomp);
Device.Send(String(Vac), AssNrVac);
}
Device.Process();
}
////Asset nummers toewijzen voor AllThingsTalk
//int AssNrVocht = 1; // Asset Number Vochtigheid
//int AssNrTemp = 2; // Asset Number Temperatuur
//int AssNrNiv = 3; // Asset Number Niveau schakelaar
//int AssNrHand = 4; // Asset Number Hand/Auto schakelaar
//int AssNrVent = 5; // Asset Number Ventilator
//int AssNrLed = 6; // Asset Number LED-Strip
//int AssNrDomp = 7; // Asset Number Dompelpomp
//int AssNrVac = 8; // Asset Number Vacuumpomp
//int AssNrFeed = 9; // Asset Number Voedertrommel
// Callback function: Behandeld berichten gezonden van het IOT platform naar de arduino.
// topic : Asset name
// payload : Message
void callback(const char* topic, const char* payload, unsigned int length)
{
String msgString(payload); // convert to string object, so we can easily compare and modify the string.
int AssNr = Device.GetPinNr(topic, strlen(topic));
Serial.print("Payload (Message): "); // show some debugging.
Serial.println(msgString);
Serial.print("Topic (Asset Name): ");
Serial.println(topic);
Serial.print("Pin (Asset Number): ");
Serial.println(AssNr);
msgString.toLowerCase(); // to make certain that our comparison later on works ok (it could be that a 'true' or 'false' was sent)
if (AssNr != NULL)
{
switch (AssNr) { // We controleren voor welke Actuator het bericht is
case AssNrHand: // Asset Number Hand/Auto schakelaar
if (msgString == "false"){Hand = false;}
else if (msgString == "true"){Hand = true;}
break;
case AssNrVent: // Asset Number Ventilator
if (msgString == "false"){Vent = false;}
else if (msgString == "true"){Vent = true;}
break;
case AssNrLed: // Asset Number LED-Strip
if (msgString == "false"){Led = false;}
else if (msgString == "true"){Led = true;}
break;
case AssNrDomp: // Asset Number Dompelpomp
if (msgString == "false"){Domp = false;}
else if (msgString == "true"){Domp = true;}
break;
case AssNrVac: // Asset Number Vacuumpomp
if (msgString == "false"){Vac = false;}
else if (msgString == "true"){Vac = true;}
break;
case AssNrFeed: // Asset Number Voedertrommel
if (msgString == "true"){Feed = true;}
break;
default:
Serial.println("We kregen een bericht van een onbekend Asset Number.")
Serial.println("Asset Number: " + AssNr)
break;
}
Device.Send(msgString, AssNr); // also let the IOT platform know that the operation was succesful: give it some feedback. This also allows the iot to update the GUI's correctly & run scenarios.
}
}


_baVEVgguW1.jpg?auto=compress%2Cformat&w=48&h=48&fit=fill&bg=ffffff)


_3u05Tpwasz.png?auto=compress%2Cformat&w=40&h=40&fit=fillmax&bg=fff&dpr=2)


Comments