

Hardware components | ||||||
 |
| × | 1 | |||
 |
| × | 1 | |||
 |
| × | 1 | |||
Software apps and online services | ||||||
 |
| |||||
Hand tools and fabrication machines | ||||||
 |
| |||||
 |
| |||||
The purpose of this project was to utilize an older Raspberry Pi's to collect weather data outside my office window. Often times, the local weather within my area varies from the weather reported by weather services.
I also wanted to publish the weather data to my MQTT service to display and use in my home automation platform. I use Home Assistant for my home automation and it comes with a nice MQTT broker add-on.
Hardware requirements- MPL3115A2 - I2C Barometric Pressure/Altitude/Temperature Sensor
- Raspberry Pi (any version, I used an older one)
- Flexible wires to connect the sensor to the Pi, make sure you have enough length to run from your Pi to the enclosure outside your window.
For this project we need to setup a Raspberry Pi to communicate with our sensor over I2C and also talk with our MQTT broker service.
I2C Setup
For the I2C setup I followed the instructions from this post for about connecting the MPL3115A2 sensor to the Raspberrry Pi: http://ciaduck.blogspot.com.ar/2014/12/mpl3115a2-sensor-with-raspberry-pi.html.
Below I will summarize the setup process, but for the final python see the code in the section.
1 . Set up your Raspberry Pi as outlined on by the Raspberry Pi foundation here https://www.raspberrypi.org/documentation/installation/installing-images/. Once you are done, SSH into the Pi to complete the setup.
2. Install and setup the IC2 packages for Raspberry Pi so we can read our sensor data from the MPL3115A2 sensor.
sudo apt-get install python-smbus
sudo apt-get install i2c-tools
Now enable the modules by editing the /etc/modules file.
sudo nano /etc/modules
The file should look this this when complete:
# /etc/modules: kernel modules to load at boot time.
#
# This file contains the names of kernel modules that should be loaded
# at boot time, one per line. Lines beginning with "#" are ignored.
i2c-bcm2708
i2c-dev
Remove the modules from the blacklist.
sudo nano /etc/modprobe.d/raspi-blacklist.conf
Make sure the spi and i2c lines are commented out, the final file should look like this:
#blacklist spi-bcm2708
#blacklist i2c-bcm2708
Finally, setup the I2C communication for repeated start. Run the following commands to enable repeated start on the Pi:
sudo su - echo -n 1 > /sys/module/i2c_bcm2708/parameters/combined exit
3. Connect the MPL3115A2 sensor to your Raspberry Pi as follows or check the Fritzing diagram at the bottom of the tutorial:
- VCC_3V3 -> 3V3
- GND -> GND
- SDA -> SDA
- SCL -> SCL
MQTT Setup
Now we will install the Paho MQTT python client and setup our MQTT service so we can communicate between our Raspberry Pi and our MQTT broker in Home Assistant.
1. Install the Paho MQTT python client onto the Raspberry Pi.
pip install paho-mqtt
2. Now setup and configure your MQTT server. I am using Home Assistant's (https://home-assistant.io/hassio/) MQTT broker add-on and the default settings.
We are going to publish two command topics from our Raspberry Pi to our broker for the sensor readings (this is will be in our final python code, don't do anything with this now):
# Command topic
temperature_topic = 'home/outside/temperature'
pressure_topic = 'home/outside/pressure'
In home assistant we will display the sensor data by creating new mqtt platforms in the configuration.yaml file that will read the topics that we publish from the Raspberry Pi. Add the following to your configuration.yaml file in Home Assistant's config folder:
- platform: mqtt
 state_topic: "home/outside/temperature"
 name: "Outside Temperature"
 unit_of_measurement: "°C"
- platform: mqtt
 state_topic: "home/outside/pressure"
 name: "Outside Pressure"
 unit_of_measurement: "kPa"
Now create a new default view in your groups.yaml file so we can display our sensor data in the front end of Home Assistant. Note that your Home Assistant setup may be different than mine.
default_view:
 view: yes
 entities:
   - group.outside_weather

Outside Weather:
 - sensor.outside_temperature
 - sensor.outside_pressure
The resulting view in Home Assistant should look something like this:
4. Now in the Raspberry Pi create a new file called MPL3115A2.py in the main directory and add the code from the attachments below listed in this tutorial.
5. Edit this file and add your MQTT server information (port, IP address, password, username), these are the lines that need to be updated:
# MQTT credentials
mqtt_username = 'homeassistant' # MQTT client username
mqtt_password = '3355' # MQTT client password
client_id = '1138' # unique client_id
mqtt_broker = "192.168.86.228" # broker address, usually your HASS IP address
6. Now run the file from the command line.
python MPL3115A2.py
If all goes well, you should begin see your current pressure and temperature published in your Home Assistant front end. In the next section we will talk about preparing and mounting your weather station outside.
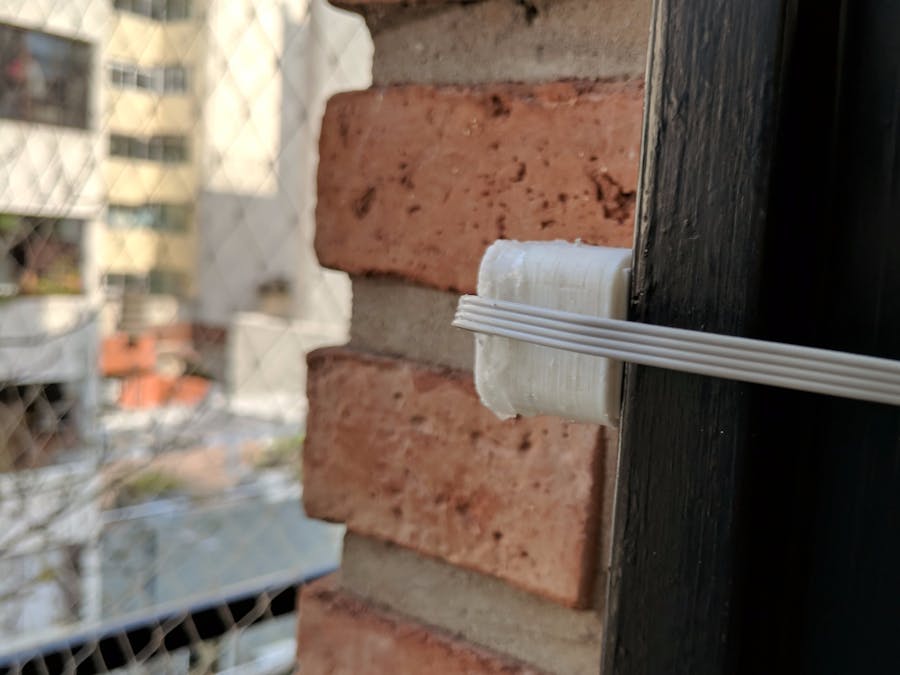
Preparing for Outside MountingTo prepare our weather station to read outside temperature, we need to have a weatherproof case and a way to mount just the sensor outside.
I used a 3D printed container and silicon to protect the sensor, then I mounted it outside my window with two-sided adhesive (3M) and ran the wires through the window to my Raspberry Pi mounted on the inside.
3D Printed Enclosure
I found a nice little 3D printable case for the MPL3115A2 that screws tightly together and has a gap to run the wires back to the RPi. You will need some screws that are small, similar to these https://www.mcmaster.com/#99461A173. I used seme from some old broken kid's toys. I have included the STL file in the attachments.
Mount the MPL3115A2 and run the wires through the small gap, place the screws on tightly. Notice there is one screw mount on the inside to secure the sensor and two screws to secure the lid.
Now to make sure your enclosure is weatherproof, seal it with either silicone (which I used) or a hot glue gun. Be sure to also cover the screws and seal the cables so there is no leakage.
Mounting
Now using double sided adhesive mount the enclosure outside the window onto the window frame. My frame was metal which offers a better hold.
Using more double sided adhesive, I mounted the Rpi onto the window frame. Now gently close the window making sure not to pinch the wires. I used more flexible wire so that the window frame would not damage the cables.
Obviously, each window is different. I have metal on both sides of my walls for the window frame which makes mounting easier with adhesive. I am also using a wifi dongle on my older RPi so that I didn't have to be near an ethernet port. Newer RPi's have built-in WiFi capability.


_3u05Tpwasz.png?auto=compress%2Cformat&w=40&h=40&fit=fillmax&bg=fff&dpr=2)


Comments