

Hardware components | ||||||
 |
| × | 1 | |||
 |
| × | 1 | |||
 |
| × | 1 | |||
 |
| × | 1 | |||
Software apps and online services | ||||||
 |
| |||||
This Arduino project creates a WiFi access point using an ESP8266 WiFi module, which allows an accompanying Android application to connect and send commands to control a LED light. The full Android and Arduino code are available.
I built this project because I could not find open source available Android code to communicate with a WiFi access point (in this case an ESP8266). I also wanted to learn how to use an ESP8266 as a WiFi access point server for future projects.
Hardware Requirements- Adafruit Feather HUZZAH with ESP8266 WiFi
- LED light
- 1k Ohm Resistor
- Arduino IDE with the ESP8266 WiFi Arduino Library installed
- Android IDE (if you are going to edit the application code)
Download and open the Arduino file in the Arduino IDE. Be sure you have the ESP8266 library installed. Use the Fritzing diagram to setup the LED light.
Compile and deploy the project to your ESP8266. The default access point name is "Esp8266TestNet" (it's a hidden network) and the password is "Esp8266Test". You may have to create the network manually. The access point will be created automatically on start of the ESP8266 device.
These can be changed in the Arduino file at the top.
// WiFi Definitions
const char* ssid = "Esp8266TestNet";
const char* password = "Esp8266Test"; // has to be longer than 7 chars
What makes the ESP8266 act as a WiFi access point is really simple. Using the ESP8266 library, you create the server with the following code using the ssid and password:
WiFi.mode(WIFI_AP);
WiFi.softAP(ssid, password, 1, 1);
WiFi.softAP takes 4 parameters in this case, the first is the SSID you want to use for the network name, the second is the password (which must be longer than 7 characters), the 3rd parameter is the channel (optional parameter to set WiFi channel, from 1 to 13), and the 4th is to make the network hidden. You can read more about softAP from the ESP8266 documentation.
Now, in a loop we check if the WiFi access point is available and once it is, check to see if we have any incoming requests. The requests are URL's and we parse the data from the URL to get the command to execute. If the url has "led/on" we turn on the LED light for example.
void loop() {
 // Check of client has connected
 WiFiClient client = server.available();
 if(!client) {
   return;
 }
 // Read the request line
 String request = client.readStringUntil('\r');
 Serial.println(request);
 client.flush();
 // Match request
 if(request.indexOf("/led/on") != -1) {
    digitalWrite(ledPin, HIGH);
    value = "on";
 } else if (request.indexOf("/led/off") != -1) {
    digitalWrite(ledPin, LOW);
     value = "off";
 }
 client.flush();
 // JSON response
 String s = "HTTP/1.1 200 OK\r\n";
 s += "Content-Type: application/json\r\n\r\n";
 s += "{\"data\":{\"message\":\"success\",\"value\":\"";
 s += value;
 s += "\"}}\r\n";
 s += "\n";
 // Send the response to the client
 client.print(s);
 delay(1);
 Serial.println("Client disconnected");
}
Since we talk to the server using a simple URL, we can connect to the access point from your computer or mobile device and then send commands using a browser.
Once you have successfully connected to the access point Esp8266TestNet, enter "http://192.168.4.1/led/off" to turn off the LED light and "http://192.168.4.1/led/on" to turn the LED light on. Notice the server address is 192.168.4.1.
The access point will return a HTTP 200 response with the "Content-Type: application/json" header set along with a JSON result with success and off/on value received:
{"data":{"message":"success", "value":"off"}}
You can use the companion Android application to communicate with the ESP8266 module from your Android device. Download the APK file from the Android Github repository release section and side load onto your mobile device. If you wish to, you can also checkout the Github repository and build the APK file using Android Studio.
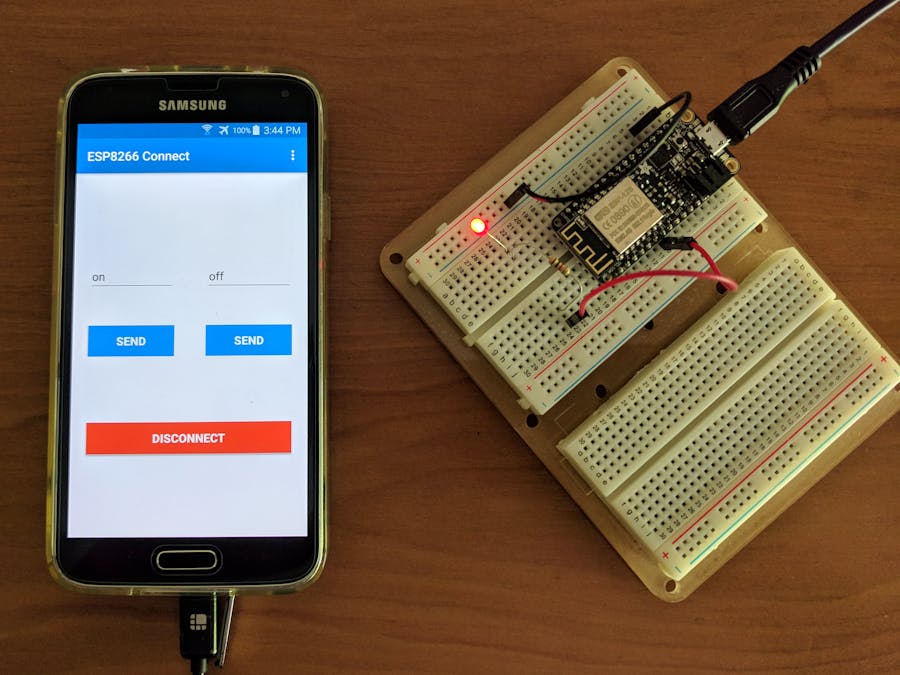
Open the installed application on your device and select the "Connect" button. This will connect to the access point with the default name and password. If you wish to change these, you can do so under the settings from the drop down menu.
Once you connect, you can use the "Send" buttons below the values to toggle on/off the LED light. Use the "Disconnect" button to disconnect from the access point and return reconnect to your previous WiFi connection.
The Android application uses the Android WiFiManager to connect to the access point as it would any other WiFi connection. It then makes an HTTP GET request to send "http://192.168.4.1/led/on" to turn the LED light on or "http://192.168.4.1/led/off" to turn the LED off.


Comments