


Hardware components | ||||||
 |
| × | 1 | |||
 |
| × | 1 | |||
| × | 1 | ||||
Software apps and online services | ||||||
| ||||||
| ||||||
| ||||||
 |
| |||||
 |
| |||||
Hand tools and fabrication machines | ||||||
 |
| |||||
IMPLEMENTATION STEPS :
Create Vivado Project
Give the project the desired name and select the desired directory for it. Be sure to check the option on the Project Type window that the Project is an extensible Vitis platform, this is the first hook required for a hardware accelerated design.
Vivado comes with board preset files you can select to set the base configuration in a project that are necessary for any FPGA development board (such as DDR pin-out and configuration) and needs to be setup for every project regardless of a user's custom design. In the Default Part page, switch to the Boards tab and click Refresh, then search for kr260. Single click on the row for the Kria KR260 Robotics Starter Kit and click Next.
Create Block Design
First things first in a new Vivado design is to create a block design. A block design is a graphical block programming tool where each block represents a chunk of HDL code that is configured and connected together via this GUI. It's the easiest way for a user not already familiar with any HDL language to get started in FPGA design.
In the Project Manager window under the IP Integrator tab, select the Create Block Design option and give it the desired name in the following pop up window.
After a few moments, a black block design will open:
The first thing that needs to be defined in a block design is the processor. In the case of the Kria, it has a physical ARM-core processor built into the fabric of the programmable logic. To instantiate it in the block design to be able to configure it and connect other IP blocks to it, click the + button in the Diagram window and search for "zynq".
Double-click the Zynq MPSoC IP to add it to the block design. This IP block is how the ARM-core processor's hardware settings can be customized by a user in the Kria SoM. A green banner will appear at the top of the Diagram window with the option to Run Block Automation. Block automation will apply the specific KR260 board presets to the Zynq MPSoC IP block.
Click the link for Run Block Automation and ensure that the option to Apply Board Preset is checked in the window that pops up before clicking OK.
integrated development environment (IDE) for programming and configuring FPGA (Field-Programmable Gate Array) hardware.
the console is likely used for interacting with the IDE, running commands related to image manipulation, or controlling other aspects of your project.
AXI is a standard interface that Xilinx uses in their designs as a connection interface for IP blocks in a hardware design because it's highly configurable and the connection process can be automated.
Validate & Save Block Design
Once the desired IP has been added/connected in the Diagram and the Platform Setup configuration completed, the overall block design needs to be validated and saved.
In the Diagram tab of the block design, click the checkbox icon to run a design validation
Run the dmesg command
Connect to Serial Console
Once you have identified the serial port (e.g., /dev/ttyUSB0), you can use Minicom to connect to it.
Install Minicom
Configure Minicom:
-sudo minicom -s
- Go to "Serial port setup."
- Set the serial device to the port you identified (e.g., /dev/ttyUSB0).
- Set the baud rate to 115200.
- Save the configuration and exit.
`
```
Set Up OpenAI API
1. Get OpenAI API Key:
If you don’t have an OpenAI API key, sign up at OpenAI and get your API key.
2. Configure OpenAI API Key:
Create a configuration file or set an environment variable with your OpenAI API key.
Python Code
Create a Python script to read sensor data, process it using the OpenAI API, and output the response via voice.
1. Reading Sensor Data:
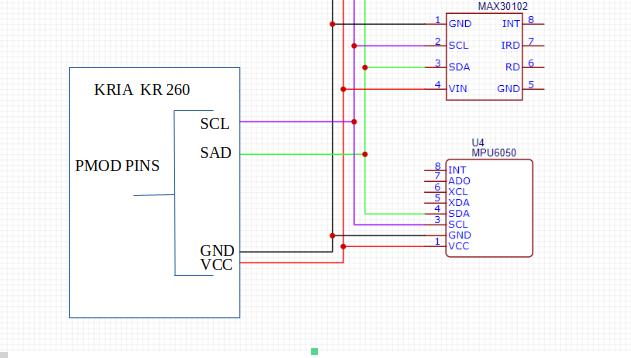
Read data from your sensors connected to the KR-260 kit. For example, if using a heart rate sensor or MPU6050:
2. Processing Data with OpenAI:
Use the OpenAI API to process the sensor data.
3. Voice Output:
Use a text-to-speech library to convert the response to voice output.
4. Main Function:
Combine the functions into a main loop.
Step 4: Deploy and Run
1. Transfer the Script:
Transfer your Python script to the KR-260 kit.
2. Run the Script:
SSH into your KR-260 kit and run the script.
code :
Transfer Files and Run AI Model
- Replace <kr-260_ip_address> with the actual IP address of your KR-260 kit.
Connect via SSH:
Navigate to Deployment Directory:
Create and Run Your AI Script:
- Use a text editor to create your Python script (run_model.py).
- Put AI code into the script and save it.
Run the AI Script:
python run_model.py


Comments