#include "pitches.h"
#include <Servo.h>
Servo turner;
boolean gameMode = false;
int modeSwitch = 3;
int buttons1 = A0;
int buttons2 = A1;
int A = 4;
int B = 5;
int C = 6;
int D = 7;
int E = 8;
int F = 11;
int G = 12;
int H = A2;
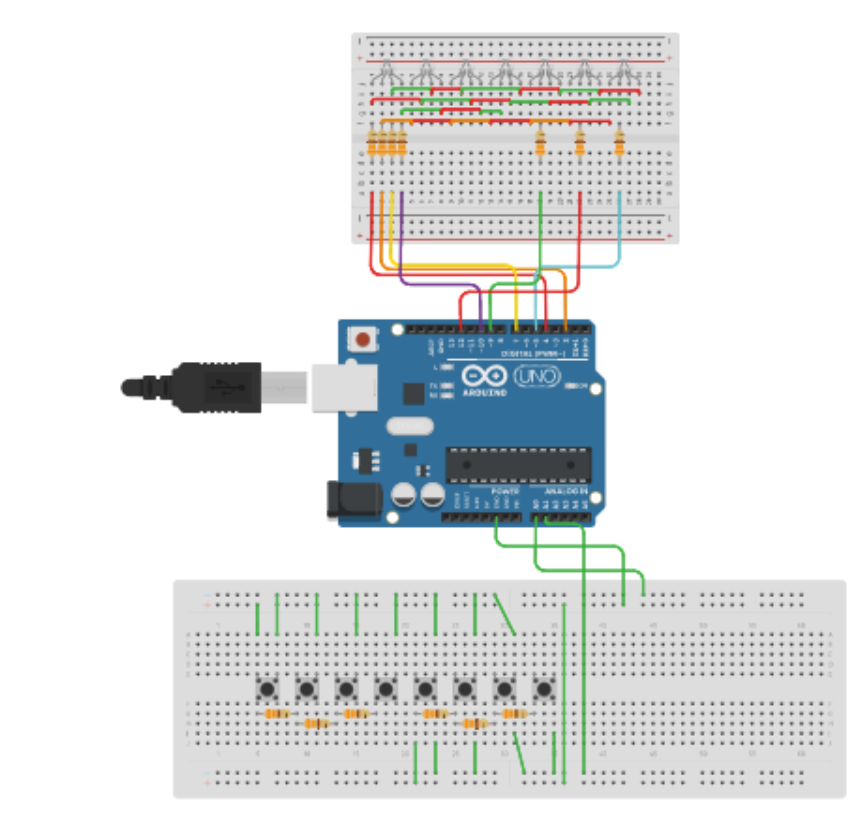
int LEDs[8][4][2] = {
{{B,A},{C,A},{D,A}},
{{A,B},{C,B},{D,B}},
{{A,C},{B,C},{D,C}},
{{A,D},{B,D},{C,D}},
{{A,E},{B,E},{C,E}},
{{A,F},{B,F},{C,F}},
{{A,G},{B,G},{C,G}},
{{A,H},{B,H},{C,H}}};
int Notes[8] = {NOTE_C4, NOTE_D4, NOTE_E4, NOTE_F4, NOTE_G4, NOTE_A4, NOTE_B4, NOTE_C5};
int totalS = 2; //This is the same value as the number of songs in Songs, adjust accordingly
//Follow this pattern if you want to add your own songs; songs are limited to only the notes in Notes and 50 total notes
int Songs[ 2 ][50] = {
//First song example; each value corresponds with the index of the note in Notes
{0,0,4,4,5,5,4,3,3,2,2,1,1,0,-1},
//Second song example
{4,2,4,4,2,4,5,4,3,2,1,2,3,2,3,4,0,0,0,0,0,1,2,3,4,4,1,1,3,2,1,0,-1}//,
//A -1 at the end of the array indicates that the song has ended.
//{0, 0, 0, 0, 0, 0, 0, 0, 0, 0, 0, 0, 0, 0, -1}
};
int songPos = 0;
int prevPos = -1;
int color = 0;
int currentSong = 0;
void setup() {
Serial.begin(9600);
set();
turner.attach(10);
pinMode(modeSwitch, OUTPUT);
pinMode(A4, OUTPUT);
pinMode(buttons1, OUTPUT);
pinMode(buttons2, OUTPUT);
}
void set() {
pinMode(A, INPUT);
pinMode(B, INPUT);
pinMode(C, INPUT);
pinMode(D, INPUT);
pinMode(E, INPUT);
pinMode(F, INPUT);
pinMode(G, INPUT);
pinMode(H, INPUT);
}
void set2() {
pinMode(A, OUTPUT);
pinMode(B, OUTPUT);
pinMode(C, OUTPUT);
pinMode(D, OUTPUT);
pinMode(E, OUTPUT);
pinMode(F, OUTPUT);
pinMode(G, OUTPUT);
pinMode(H, OUTPUT);
}
void loop() {
digitalWrite(modeSwitch, HIGH);
digitalWrite(A4, HIGH);
digitalWrite(buttons1, HIGH);
digitalWrite(buttons2, HIGH);
int val = analogRead(buttons1);
int val2 = analogRead(buttons2);
int modeVal = analogRead(modeSwitch);
//Serial.println(analogRead(val));
if (modeVal <= 100 && !gameMode) {
gameMode = true;
load("Game");
currentSong = random(0, totalS);
}
else if (modeVal > 100 && gameMode) {
//modeChange = true;
gameMode = false;
load("Normal");
songPos = 0;
currentSong = 0;
}
if (gameMode)
{
if (prevPos != songPos){
color = random(0, 3);
prevPos = songPos;
}
light(LEDs[Songs[currentSong][songPos]][color]);
}
if (val < 500)
{
handleActivity(7);
}
if (val+5 >= 955 && val-5 <= 955)
{
handleActivity(6);
}
if (val+5 >= 989 && val-5 <= 989)
{
handleActivity(5);
}
if (val+5 >= 1001 && val-5 <= 1001 && val2 > 500)
{
handleActivity(4);
}
if (val2 < 500)
{
handleActivity(3);
}
if (val2+5 >= 955 && val2-5 <= 955)
{
handleActivity(2);
}
if (val2+5 >= 989 && val2-5 <= 989)
{
handleActivity(1);
}
if (val2+5 >= 1001 && val2-5 <= 1001 && val > 500)
{
handleActivity(0);
}
}
void playSound(int order, int colr)
{
tone(9, Notes[order], 2000/4);
light(LEDs[order][colr]);
delay(2000/4*1.3);
set();
noTone(8);
}
void playSound(int order)
{
tone(9, Notes[order], 2000/4);
delay(2000/4*1.3);
set();
noTone(8);
}
// handles activty for both modes
void handleActivity(int order)
{
if (gameMode && Songs[currentSong][songPos] == order)
{
playSound(order);
if (songPos < 49 && Songs[currentSong][songPos] != -1){
songPos++;
}
else {
load("Game");
songPos = 0;
currentSong = random(0, totalS);
}
}
else if (!gameMode)
playSound(order, random(0, 3));
}
void load(String mode)
{
for(int i = 0; i < 3; i++)
{
if (mode == "Normal"){
turner.write(45);
}
else if (mode == "Game"){
turner.write(135);
}
for(int j = 0; j < 8; j++)
{
light(LEDs[j][i]);
delay(50);
set();
}
}
}
void light(int pins[2])
{
pinMode(pins[0], OUTPUT);
pinMode(pins[1], OUTPUT);
digitalWrite(pins[0], 1);
if(digitalRead(pins[1]) == 1){
digitalWrite(pins[1], 1);
digitalWrite(pins[1], 0);
} else {
digitalWrite(pins[1], 0);
}
}


_3u05Tpwasz.png?auto=compress%2Cformat&w=40&h=40&fit=fillmax&bg=fff&dpr=2)
Comments